


heart-felted friends for adventures near and far
Just as in our post about creating animal ornaments with needle felted wool, we began our hopeful emissary with a chenille stem armature wound with 100% wool roving. Once the form was fleshed out, we sewed on glass bead eyes, then felted on wool ears, paws, and pink nose. In order to replicate a true field mouse’s coat of browns and greys, it was necessary to comb together a blend of wool fibers.

Undermouse ready for felting on the details! Needle felting uses a special barbed needle to entangle the fibers together pretty permanently.

This entanglement allows for great details. The more the fiber is felted, the tighter the wool. Light felting allows for fuzzy fur etc.

We added nylon thread whiskers as a finishing touch! We were following the model of Augustine Mouse from the Instagram account story unfolding @augustineamouse, but this little one went as an encouraging pick-me-up to a good friend and Augustine fan working through chemotherapy in lieu of flowers or a card.


The original Augustine and her stunt double, Resilient Mouse hanging out between takes.

Resilient Mouse (above) in her duplicate gear heading out to bring some cheer.

Augustine rolling along in her story post.
hold fast to what matters
The rings were all converging this past weekend, were they not? Those who follow the Abrahamic religions were observing and/or celebrating Easter, Passover and Ramadan— plus it was a full moon, the pink moon, as it happens… or the "pink, lavender, pale blue, and other pastel springtime holiday” moon AKA "Reese’s peanut butter eggs for breakfast” moon…
The world, no less tenuous, no more peaceful, did seem a little cheerier as widely available Covid tests meant many people got together to celebrate.
We did.
And we absolutely forgot how to function at a Sunday dinner in the (gasp) DINING ROOM.
Boxes, storage bins, and unoccupied cobwebs were safely cleared to reveal a vault of a room. In the center, a flat surface surrounded by chairs clearly intended for convening and comestibles. We entered this unremembered temple to sharing a meal as cautiously and with the breathless exultation of Howard Carter and his Egyptian team headed into Tutankhamen’s tomb for the first time, but with (all toes and fingers crossed) fewer viral results.
Could not find the linen napkins, couldn’t be bothered with the china— but with a bit of last minute clipping from outside and a recycled Easter basket, there WAS a centerpiece. Needn’t be much. You can do it, too. The important thing was to have those laughs and love those faces that could make it.
Plus also, sent some cards, some chicks, some chocolate, and bunny beans to those who we gathered close in our hearts if not our arms.

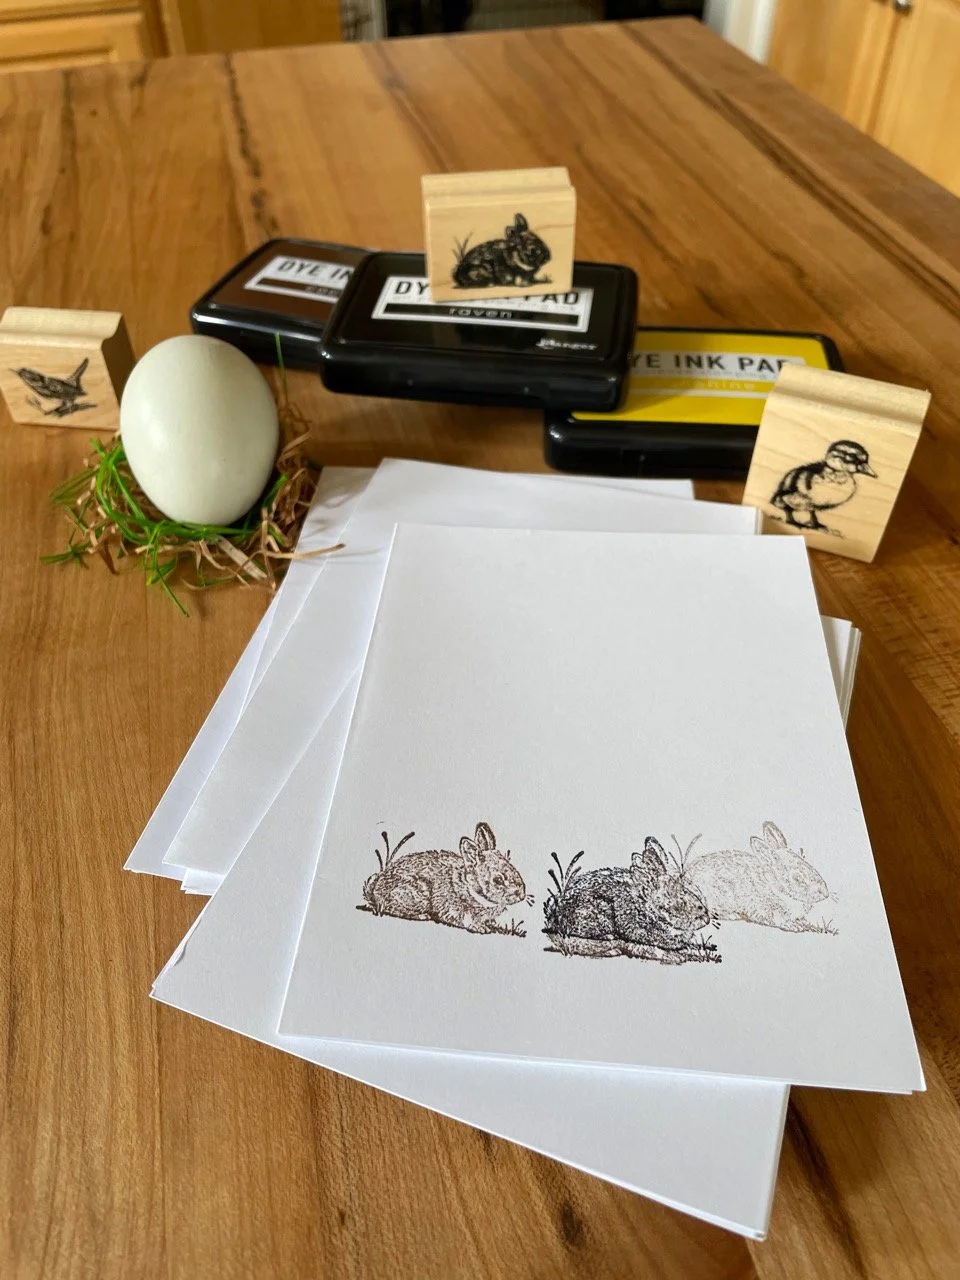
Recycled wool chicks, carefully created blown out Araucana eggs— and the beautiful work of Ukrainian artists.

Centerpiece of repurposed ribbon, sprigs of viburnum, and real eggs in the (gasp) DINING ROOM, surrounded by viburnum branches in a bourbon bottle and sheep headed for the yarn shop.

Eggs have always represented new potential, new beginnings. We wish you better days, safety, and the surety of peace and plenty.
we are not just a one chick pony
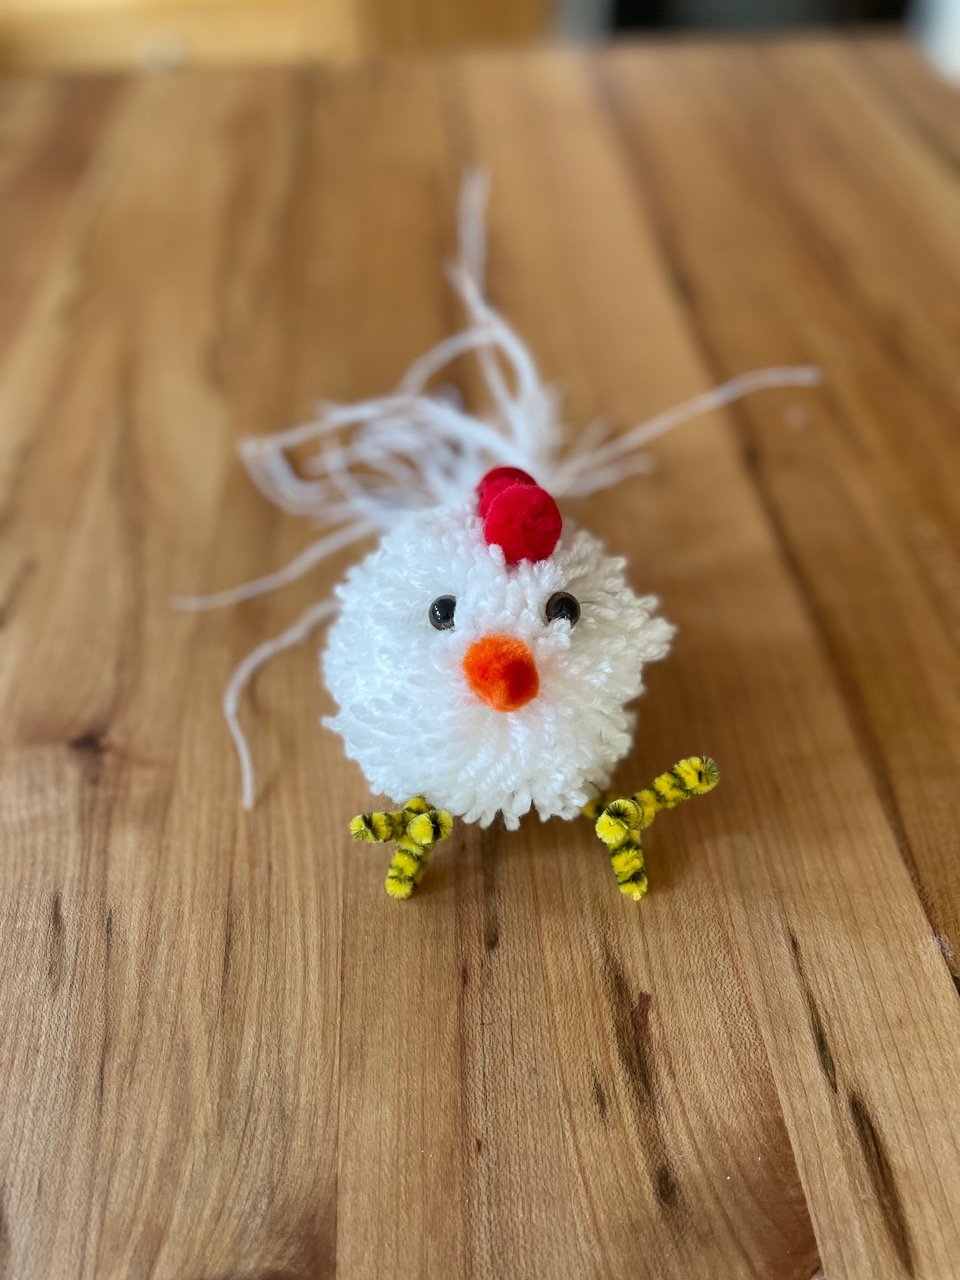
We’ve been working around the cluck… ahem… to get some tutorials up for easy peasy spring decor. If you thought the pom poms could only be used one way? Yolks on you— Chick this out: same pom, different chicken.
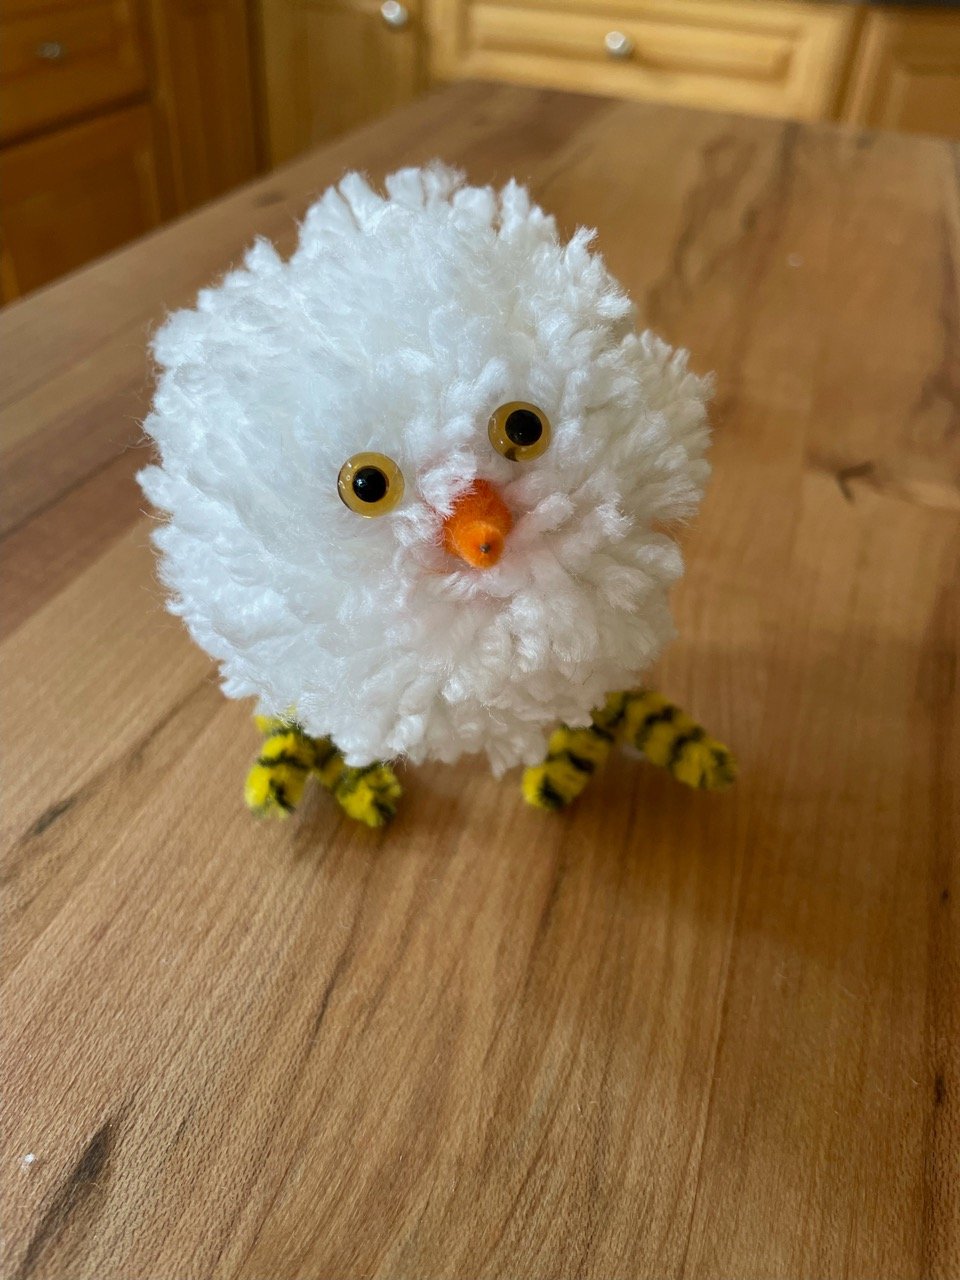
We used the same techniques as our spring chicken post. A store-bought or homemade yarn pom pom, eyes, a beak, then encircled with wire or chenille stems for legs and feet, embedded down in the fiber approximately halfway on the sphere, and made secure fairly tightly. A new twist on chicken legs!

Defying eggspectations, we changed it up and dyed the yarn chickie-yellow, using easy-to-hand food coloring. Hint: leave off gluing on eyes and beak until after the dyeing and drying process is complete.
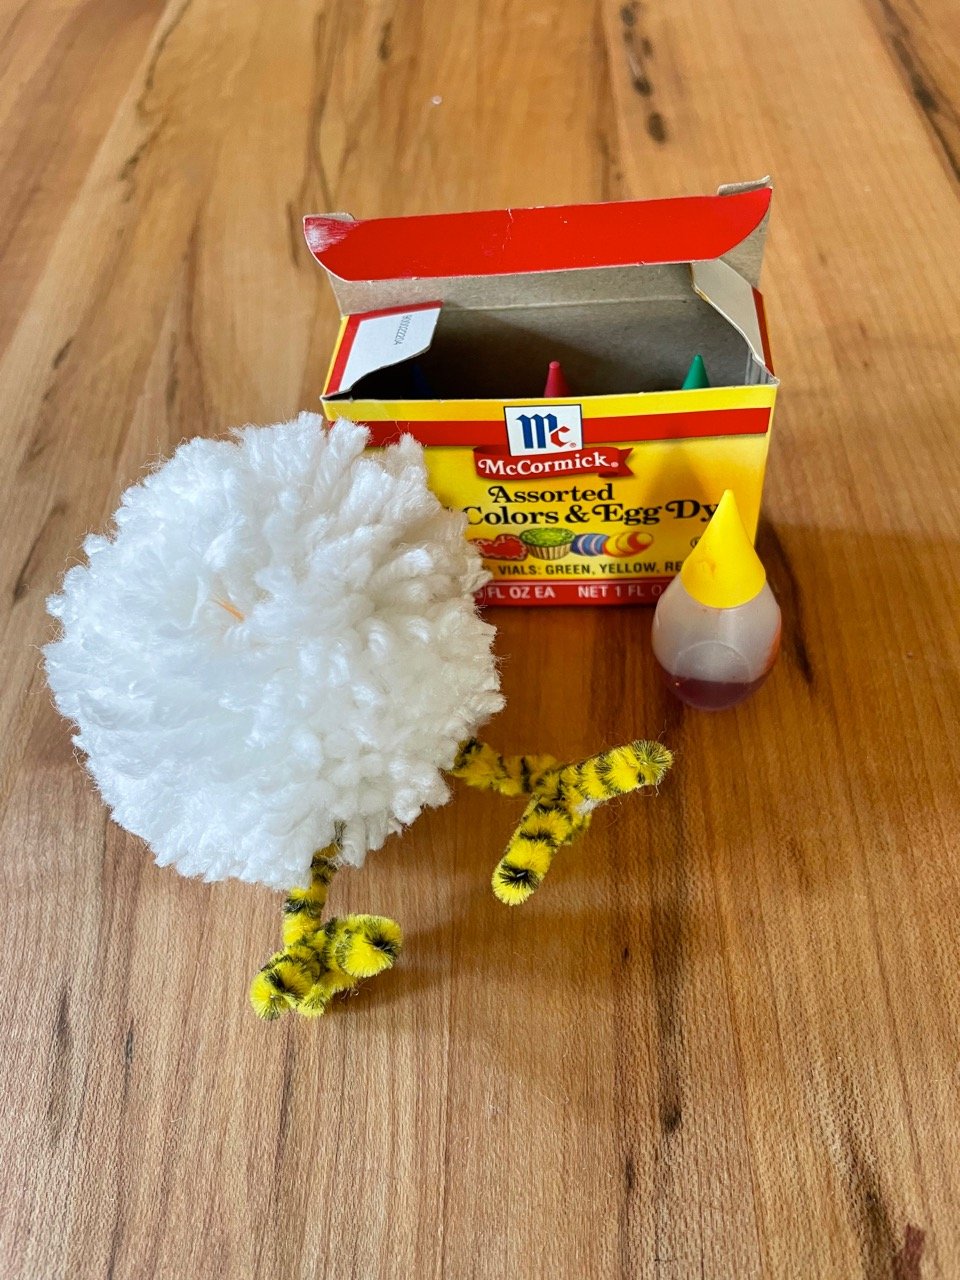
So we got up to our old chicks, covered our work surface, protected our clothes, and put on some plastic gloves in preparation for operation Tres Chic II…Hensome Lad: Son of a Biscuit.

We mixed yellow food coloring and water in a small bowl.
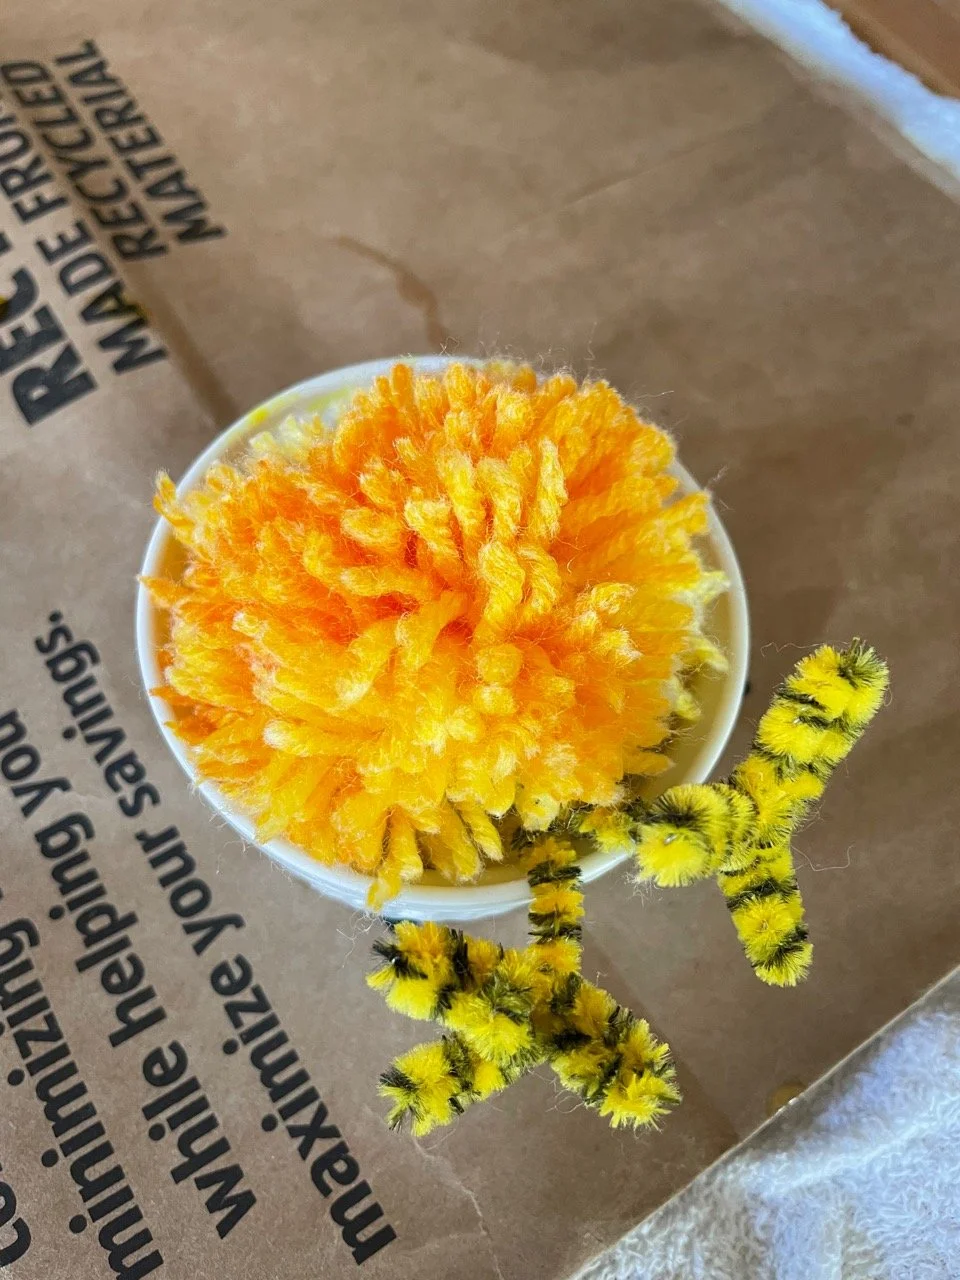
In a poultry amount of time, the yarn became saturated with dye by turning the pom a couple times. We rinsed the dyed pom in cool water, wrung it out carefully, then put it in the dryer with a couple old towels (the dye will come off until it is fully dry and set).

Trimming out some of the fiber to add some shaping, gives our chick some definition.

Talk is cheep… pictures say it best: this little one is im-peck-able!

Don’t mind us. Everyone around here is a comedi-hen. The best chicken puns don’t fall far from the poul-tree and we have all been dealing with not one, but several, eggs-istential crises, so we had to get them all in. Can’t wing for losing…
We’ll show ourselves to the eggs-it…
this IS a spring chicken
Adding handmade Spring decorations to your home or someone’s basket is easy and fun! Use homemade or purchased yarn pom poms as a start for this simple Spring Chicken.

Small pom poms, which can be made or store-bought, chenille stems or simple wire, any type of eyes— combine to make this adorable little Easter tree ornament or basket stuffer.
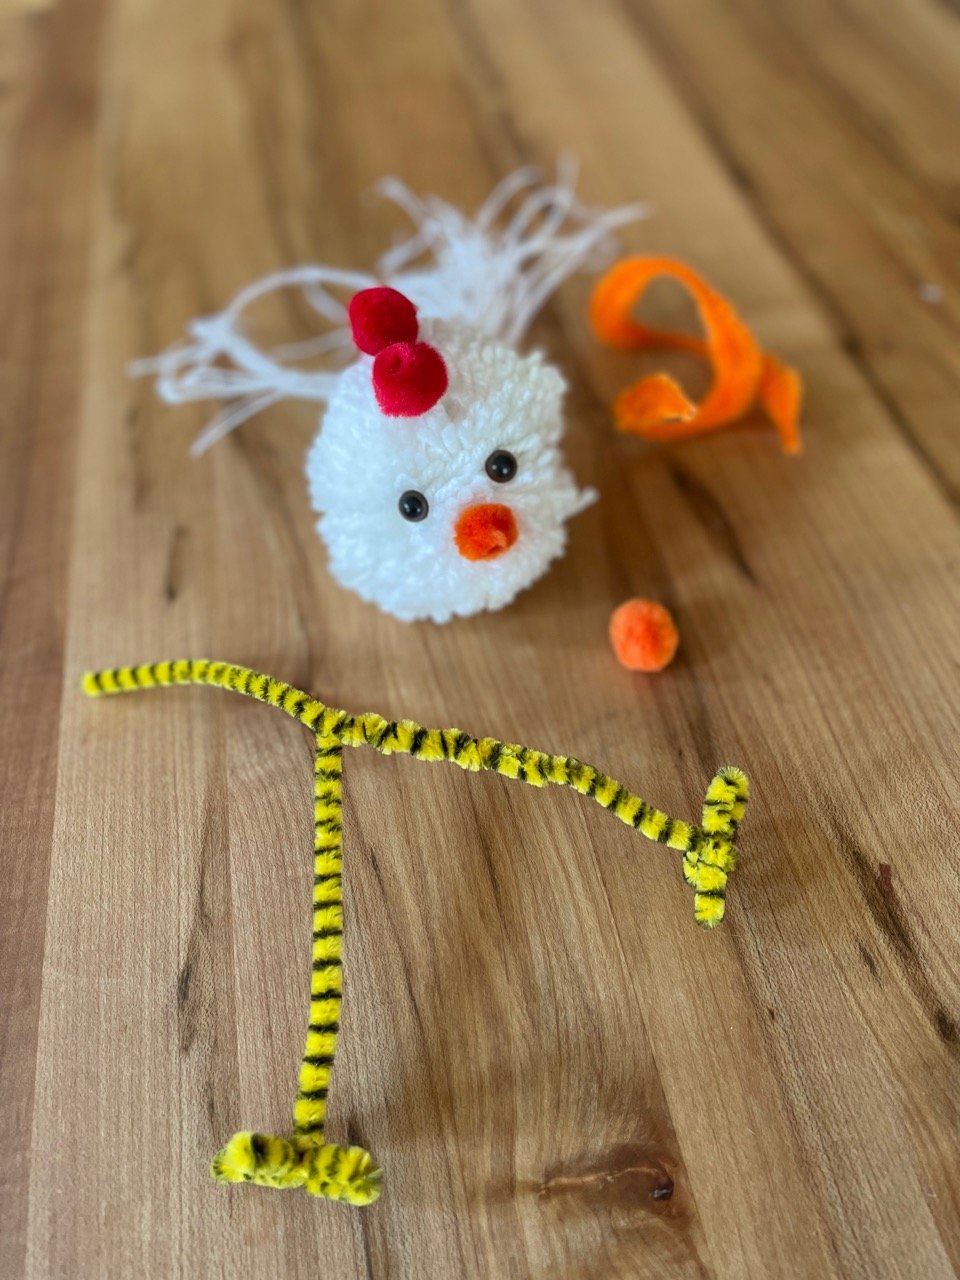
We twisted the stems to form simple feet, trimmed a purchased pom into a beak shape —but an end of orange chenille stem would work as well. We added simple animal eyes, trying everything in place before gluing with water-based glue (school glue or tacky glue will work and are not as messy as hot glue).
The stem or wire legs and feet are wrapped around and into the pom pom tightly so that the fiber covers it all around. We added a bit of ostrich feather for a floofy tail.
Tres chic!
upcycled easter
We are still loving the idea of using what you have on hand, re-using what can be given a second purpose, and cutting back as far as possible on cheap, imported, high carbon-cost decor. Bein’ that it is Spring and we turn to all things renewing, we are going entirely renewable. Take an old wool coat and rehabilitate it as your bunny!
This fellow is stuffed with chopped up, mismatched socks. The carrots are spindles, twine, and last year’s Easter grass combined.


Simple stamped cards to send your happiest thoughts. Stamp and embellish with markers, stickers, or paint.
Wool coat bunny showing the simple, sturdy construction.

We thought he looked a bit downcast, so we brightened him up with needle felted wool accents.

A leftover yarn “ribbon,” and Rabbit is ready!

heron repair— kinda kintsugi
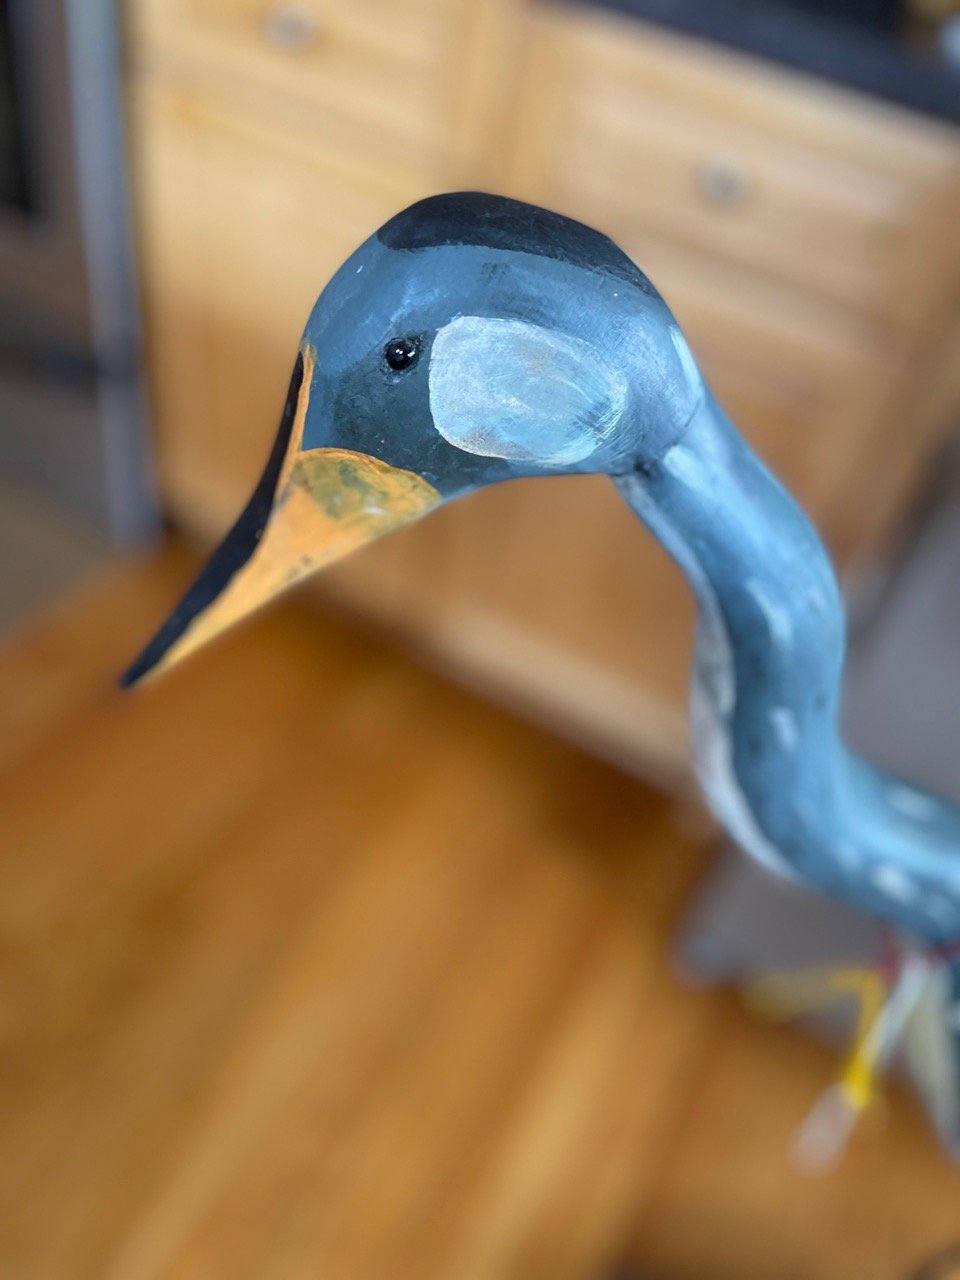
Getting out a bit by wearing a really good, well-fitting mask. Finding a way back to being in business at some point. Hit the local antique mall, one of the few locals left standing after pandemic shutdowns. We came across a neat piece in need of a bit of TLC and invited him home for tea and kintsugi.
At some point this carved and painted folk art heron had a run in with a Tudor dynastic failure or Alice’s Red Queen. The head was re-attached with love, but not skill… and with Super Glue. For the love of all that is Good in the World— DO NOT USE SUPER GLUE. It is overrated, brittle and impossible to remove from a lot of surfaces— hello E/R trip for fingertips or eyelashes…Cyanoacrylate is only super at being the basis for fuming for fingerprints in an sealed aquarium. If you know, you know and you are our peeps— and if you have done more than watched/read/podcasted True Crime and tried this at home? Welcome, tribe.

This really nifty carved bird needed careful surgery and re-gluing. We broke that g-darned brittle seal and picked out the plastic super glue, applied cellulose-based glue which melds with the fibers of the carving, expanding into a nice bond… WOOD glue— the hint is in the name, people...re-fit the head to the neck, and wound it with rubber bands for about 24 hours to hold the pressure seal until the glue was pretty set.

Assemble tools, prepare an area to work— covering vulnerable surfaces, please (We are looking at you, swipes of Super Glue permanently attached to the kitchen countertop by other occupants).

The repair is multi-stage process though. The super glue adhesion formed bubbles outside of repair line and removing it did pull out some wood fiber. We mixed some paint to begin a match. Letting the paint dry over the continuing repair adds to the effect of old paint already on the surface of the heron.
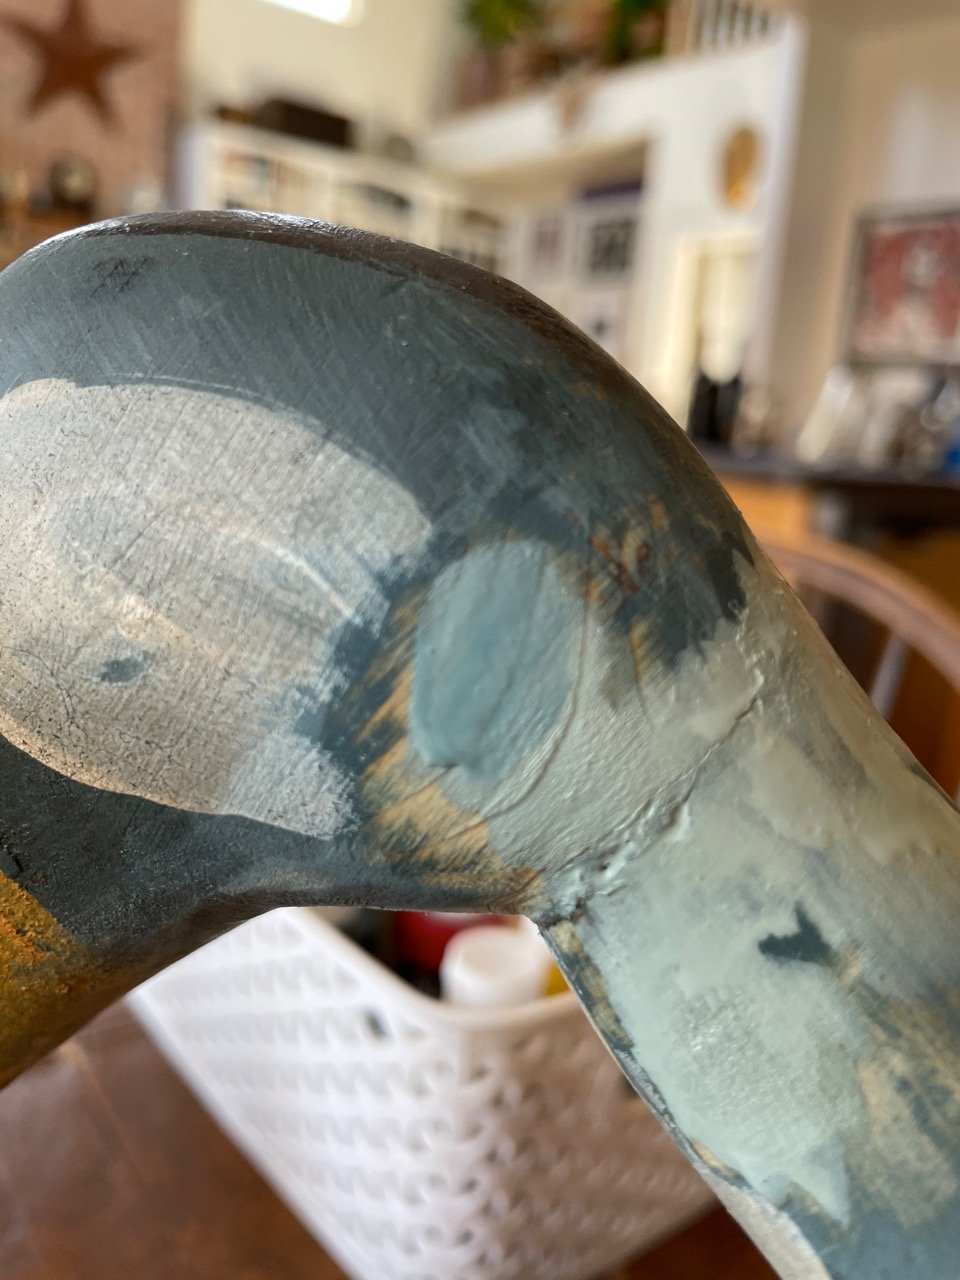

Cured wood glue and dry paint can be gently sanded with small grit sandpaper such that the “seam” is nearly seamless.

Mixing the color of the body of the bird. A house paint sample— flat latex has the chalky finish of paint that has been weathered.

The blue green was a little bright, so to grey down the color— add the opposite on the color wheel. Orange added to blue. We also added in a universal neutral umber brown which “ages” anything right down. Touched up a few of the markings so that it is tough to see that anything was ever amiss. But we did NOT do a conservation repair. Not trying to fool anyone here— just give new life to a deserving piece of art!
Valentine's, Pal O'Mine

Heart it or hate it, the day of Lurve is on the way. You might be celebrating Valentine’s or Galentine’s or Palentine’s, so we have a little “SHOW ME” sesh for making homemade cards that are really cute and truly easy.
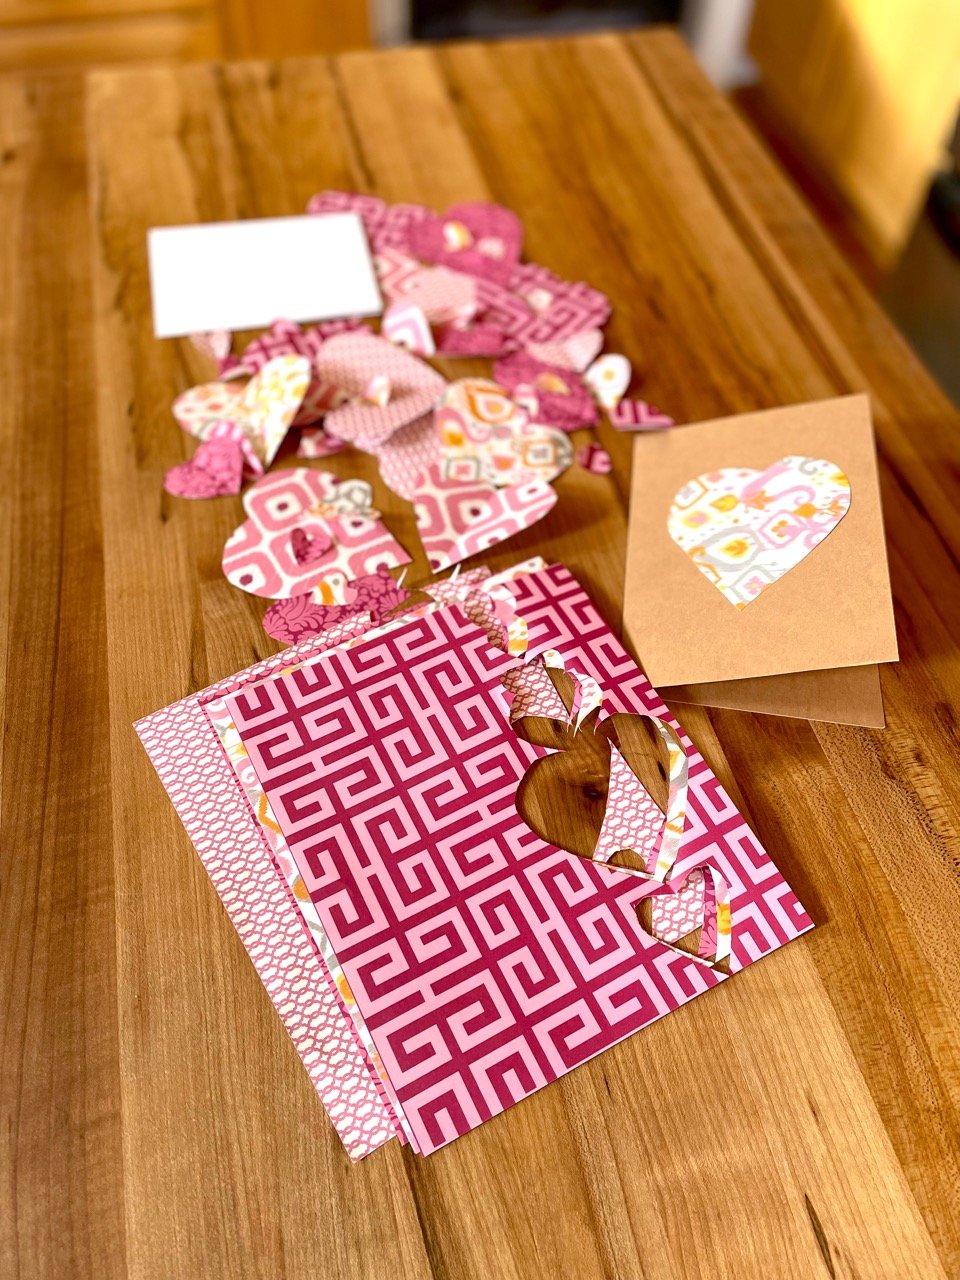
Reuse papers from old envelopes or those stacks of patterns you got that time when you were going to organize all the photos and scrapbook the hell out of mementos… no? yes? no? We’ve given up that idea, too, friends. It’s a GOOD thing.
Take papers of different, related patterns and fold in half. Cut half-heartedly, ah… we mean cut half hearts… along the folded edge such that you end up with a little pile of heart shapes in different sizes and patterns.

If you have blank card stock, glue hearts on the fronts of cards. OR create your own cards and envelopes from trusty kraft paper.
We used bits and bobs from the whole process— parts of leftover paper and the negative space hearts left over from our first cuts, which, as we all know, are always the deepest.
Have fun! Lay out hearts and pieces in different configurations, balancing patterns, values. It is A-Okay to just glue one heart on each card too! It’s the love you are sending, not the art.
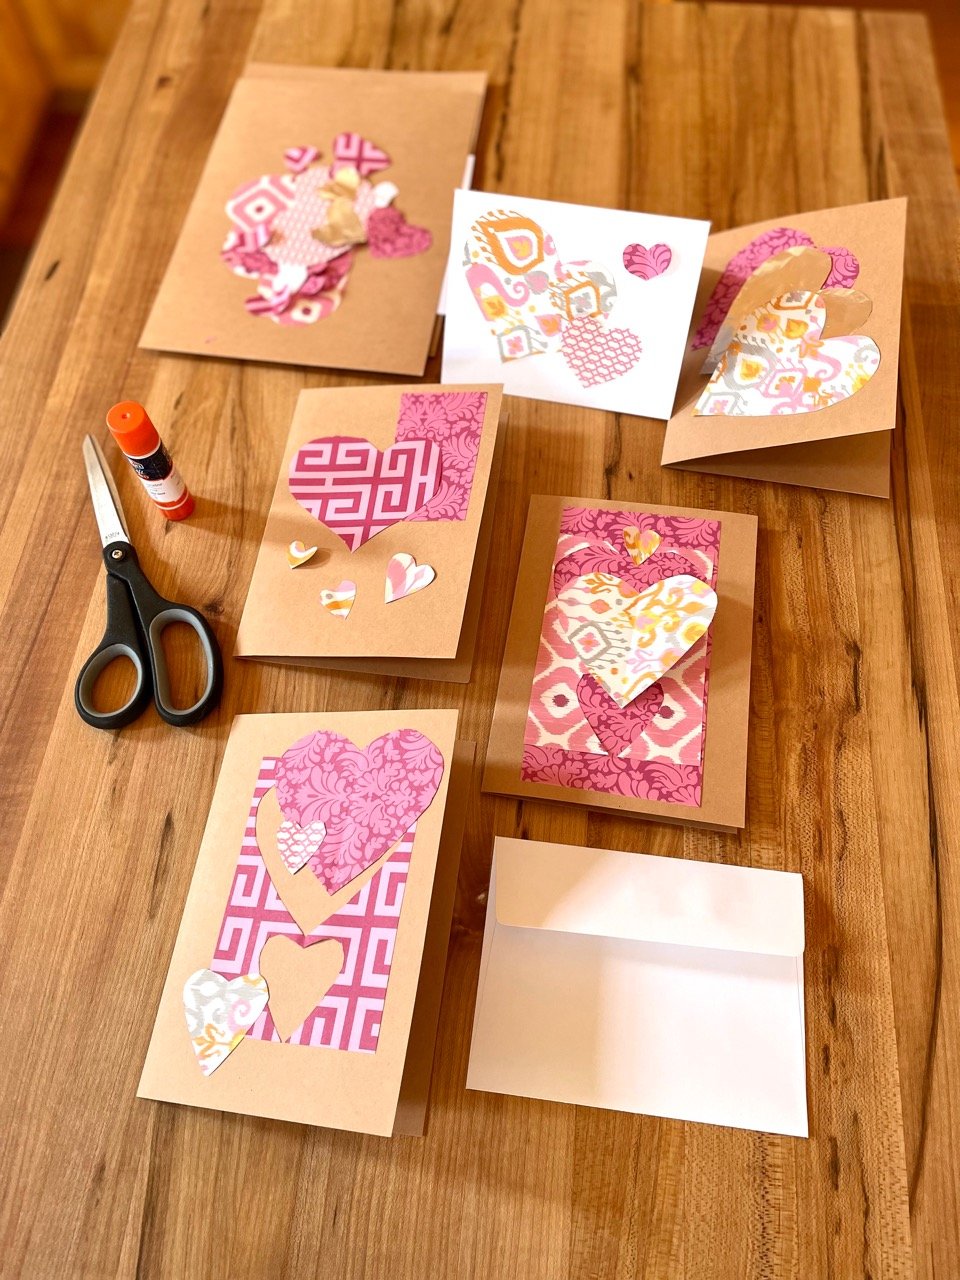
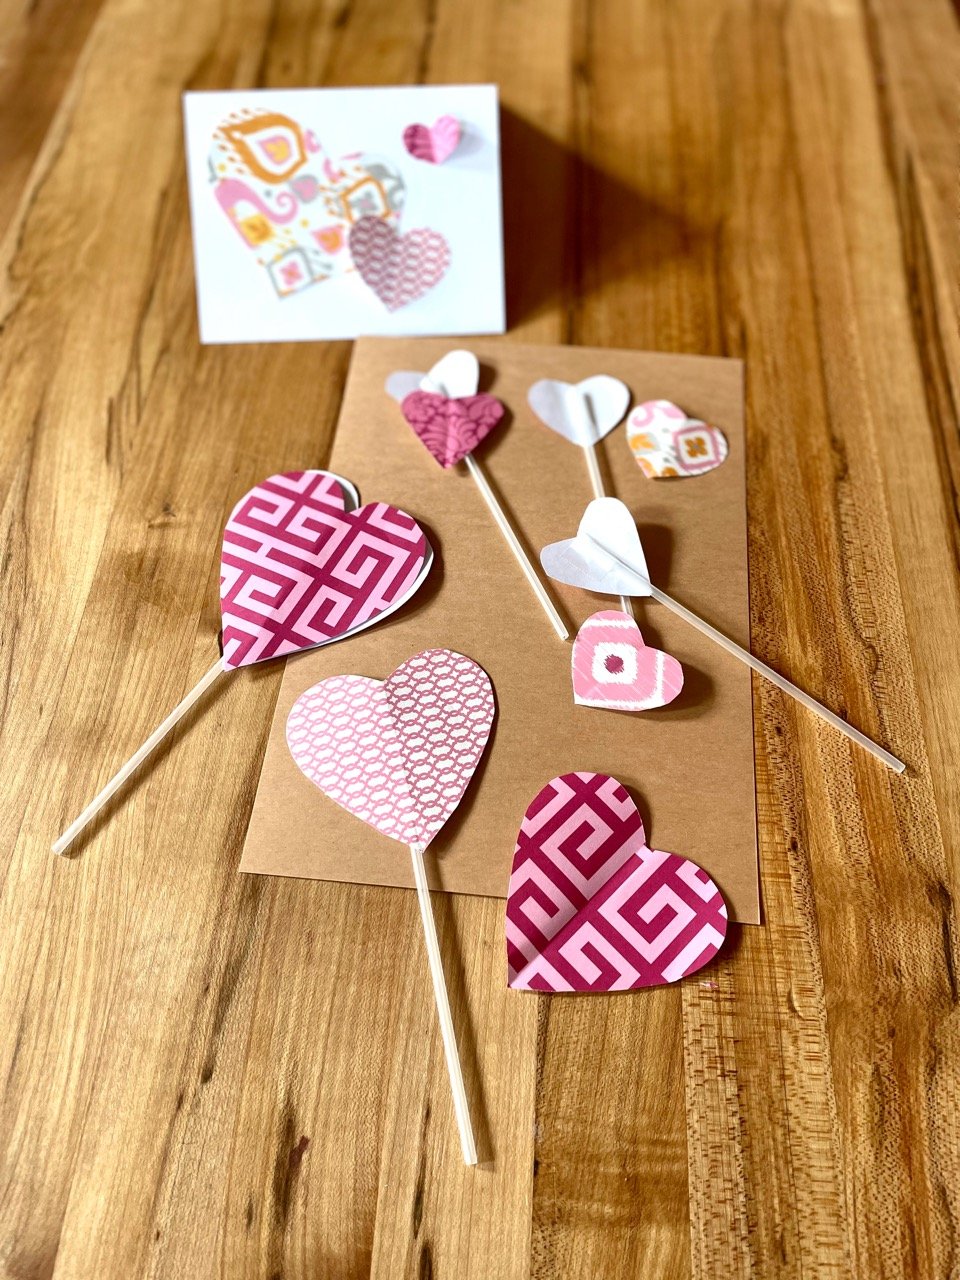
We are playing with 3-D pop-up effects as well. Pop-Up cards are a top trend…. but more on that in a bit.
Whatever you do, make sure you put on enough postage, especially if your envelope is a non-standard form. Last thing: S.W.A.K. (seal it with a lick, because a kiss won’t stick!) Lil bit gross, but goes right to the 9-year-old in you, doesn’t it?
odds and svens

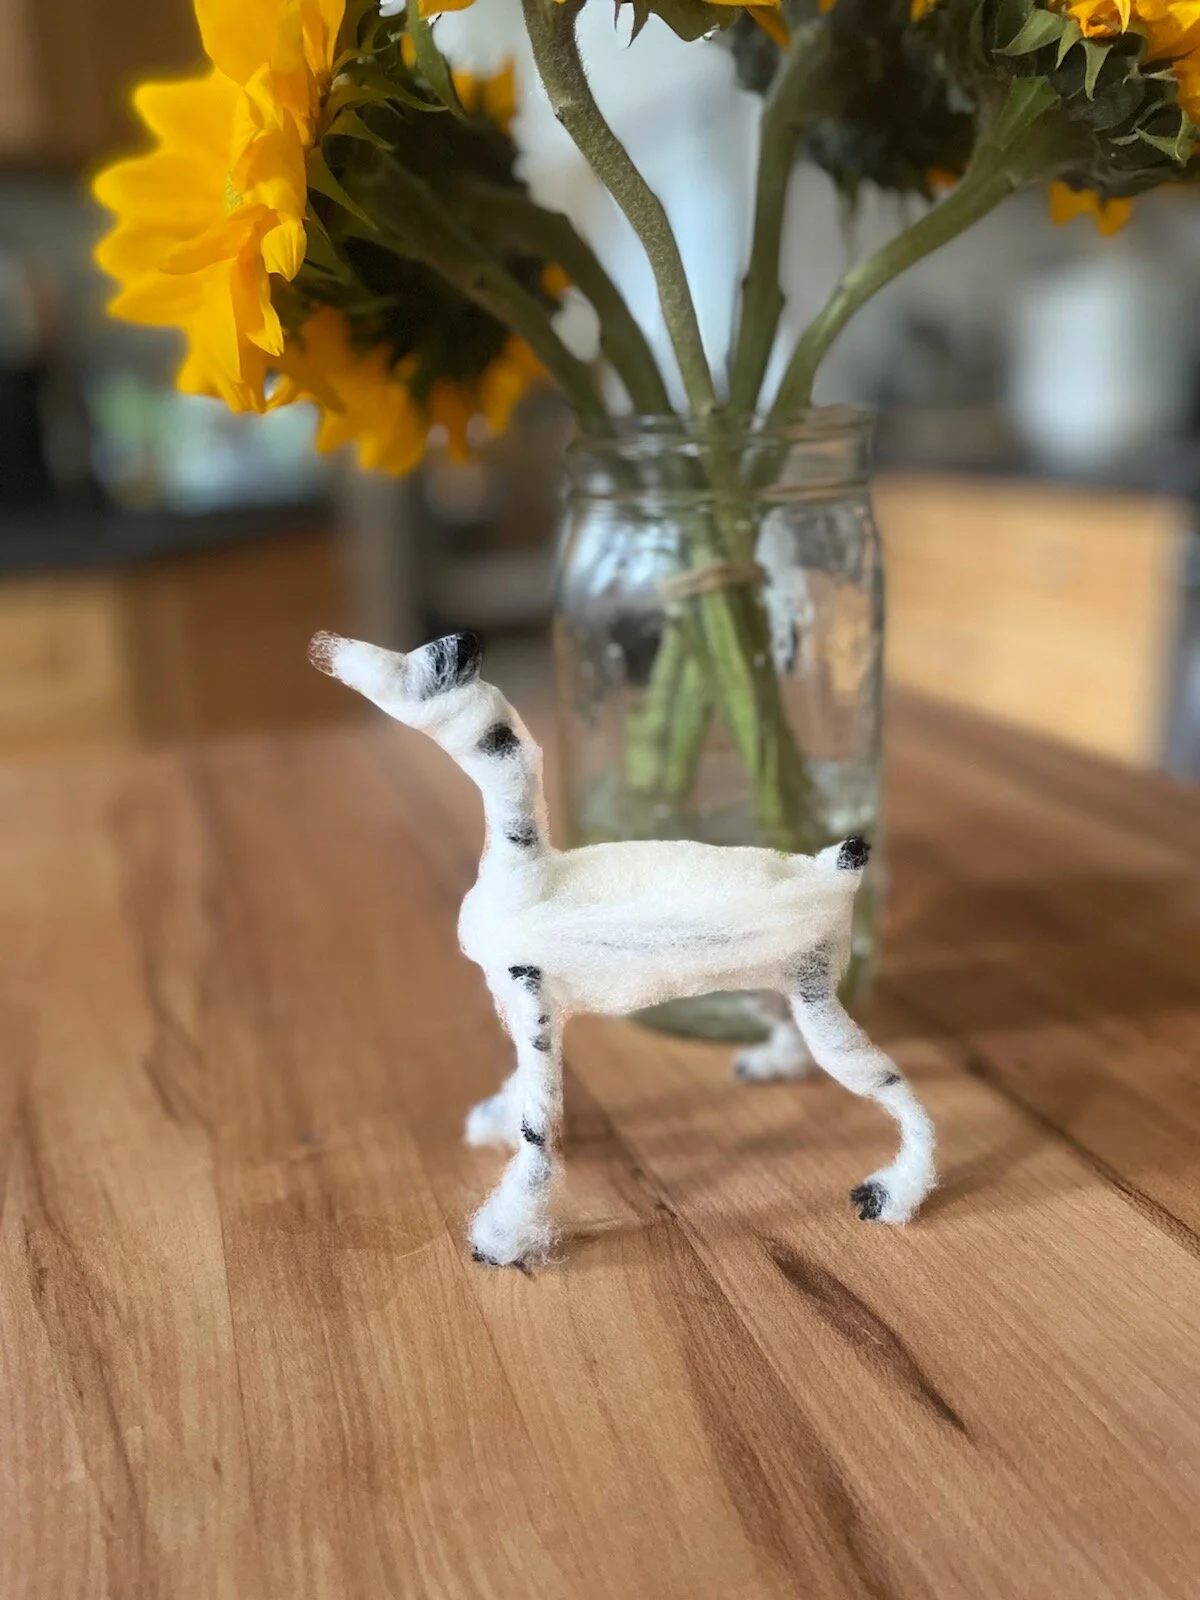
Before this fuzzy dude, lovingly dubbed “Sven,” headed home as a gift, he was a thrift store find in need of a little TLC.
A close-up shot shows the wonky neck and derpy expression of a deer in need of repair/upgrade. Kinda how we all strolled into 2022, amiright?

Here’s the $2 thrift store find in its original condition, along with wool roving that will be carded together to mix the same color of the body as we repair/upgrade the lil fella.


And finally, the finished reindeer retaining a comical expression, but with more colors and features — which, amazingly, just happens to be our wish for all our loves as we step into this new year. Look at that. XOXO
truly doable last minute holiday gifts
Down to the wire with a few holiday gifts? Hello, you gorgeous normal human, you. We got you on this, hon. Here are some truly manageable presents for when you are down to the fa-la-laing g-darned wire.
Bake something from a box— but put it in a reusable container like this breakfast bread with added cranberries, orange zest, and —duly labeled for the allergy potential— nuts, delivered in a fluted baking dish (ready to re-gift this year or next).

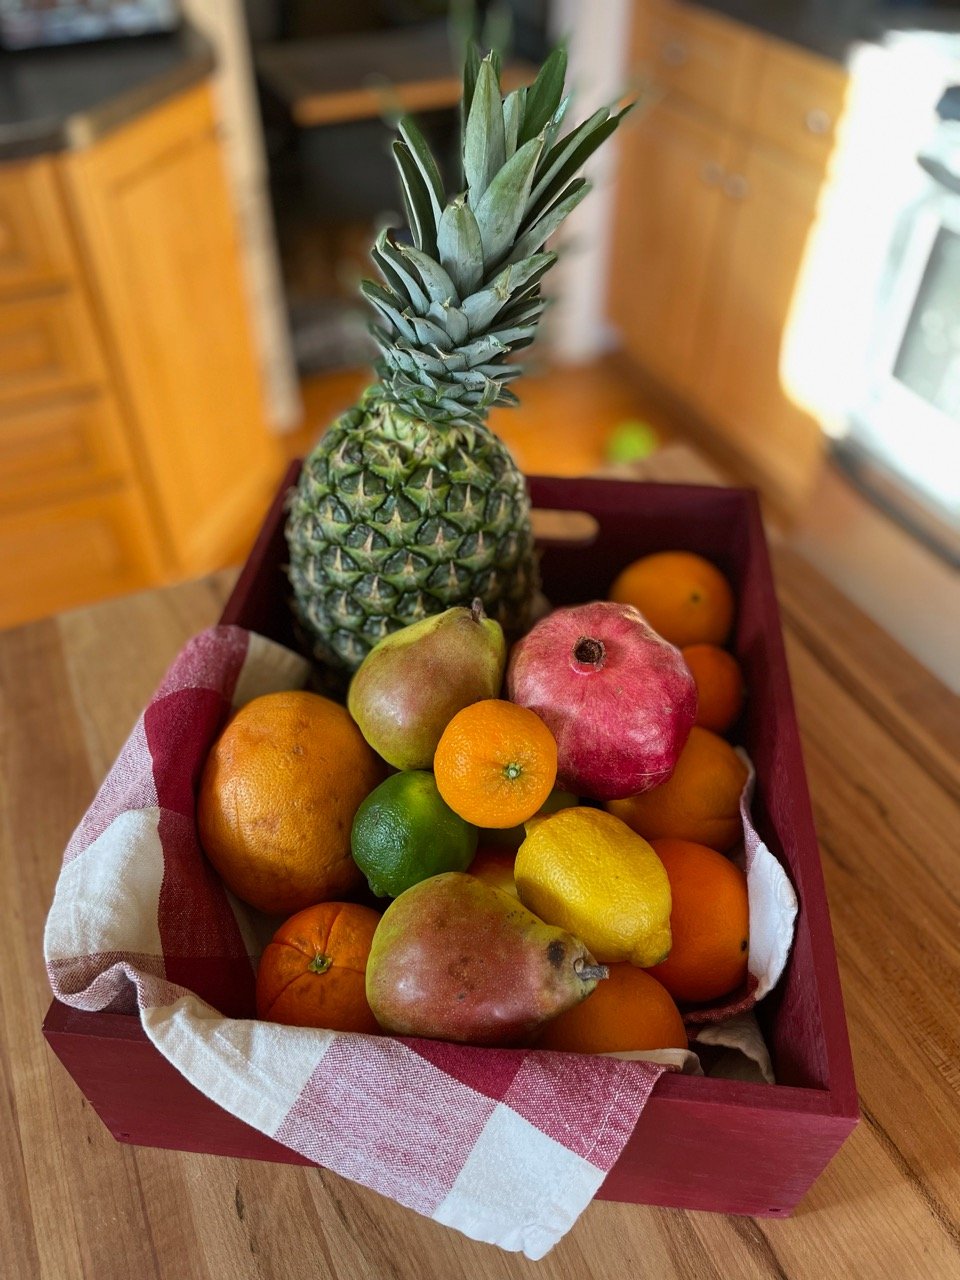
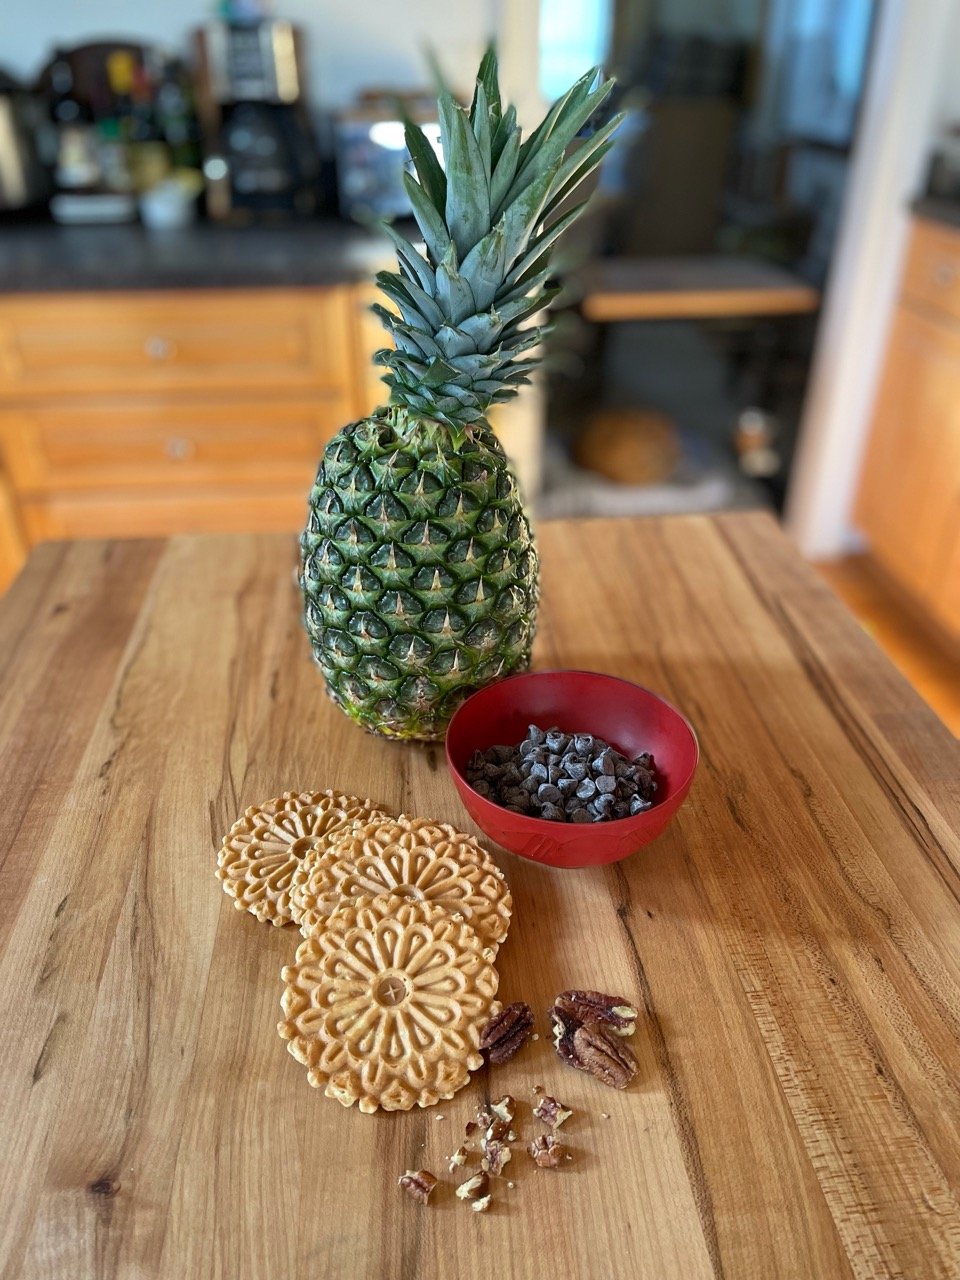
Ye Olde Fruit Bowl, Basket or Box is really a welcome gift for the classic ring and run. Fruit is pretty durable when placed on the porch as long as it is not below zero. Including lots of immune system boosting citrus is an especially good idea this year of all years. Make it extra EXTRA by adding a pineapple. Perfect for the background of your ZOOM interview, right RoomRater?
Don’t have baking skills or time to spend? Buy commercial cookies and dip them in melted chocolate. Semi-sweet morsels in a microwave safe bowl can be melted in minute or two. Lightly coat an aluminum foil sheet with cooking spray or spread a thin layer of vegetable on foil or cookie sheet. Partially dip cookies in melted chocolate and place on treated sheet or pan to harden. For additional flavor or interest, sprinkle on chopped nuts, chopped candied ginger, or orange or tangerine zest while the chocolate is still soft.
Print out or write up a certificate for future gardening sesh in person or Zoomalong. Include seed packets or planting plan with types of plants found nearby and where they can go.

Divide houseplants to share.

Some other suggestions that are always welcome:
Commit to print and inexpensively frame or digicube family or friend pictures, especially for someone who struggles with technology.
Send a donation to the animal shelter or food bank nearest to the gift recipient in their name— or to any charity you know that they hold dear.
Contract with a service to provide and essential service for a shut-in or family who is isolating… meals, cleaning, deliveries, yard services, mobile pet grooming are all good choices.
Pay for a subscription to an online newspaper or local print edition because supporting real journalism matters.
Handmade artwork or cards from kids or grandkids are always heartwarming, welcome surprises.
A mason jar filled with the dry ingredients from your favorite cookie recipe, along with instructions, and a simple bow or tag never disappoints.
hat ornament upgrade: gnome big deal

We are always learning, ya’ll. Sometimes the same lesson over and over! It took a bit of time to create the hat ornament from leftover and recycled materials. We have illustrations below on how to add on elements to create a jolly little gnome.

Perusing the wider webs, we saw so many examples. Gnomes are in! We saw some that were really adorable — and crazily “affordable.” Hard to resist absolutely adorable ornaments for $3. But the real costs are actually higher. Made us think we could not or would not work for such a low return on our time and materials, but somewhere someone has to do so.
Please, all, take a moment and contemplate how little workers everywhere are paid! Work towards changing the corporate approach to labor and supply.

Gather wool roving, cotton fluff, or any fuzzy bit for a gnome beard. Felt up wool roving into a ball for a nose, or use a standard commercially available pom pom.

Use tacky glue, white glue, or hot glue to secure the beard to the inside of the base of the yarn hat ornament, and the felted ball or pom pom to the front just above the beard. We secured the ball and beard with cord for extra stability. Then we added a nice Brooklyn groomed mustachio for extra panache! Go big or go Gnome, right?

clever no-sew hat ornament from leftovers

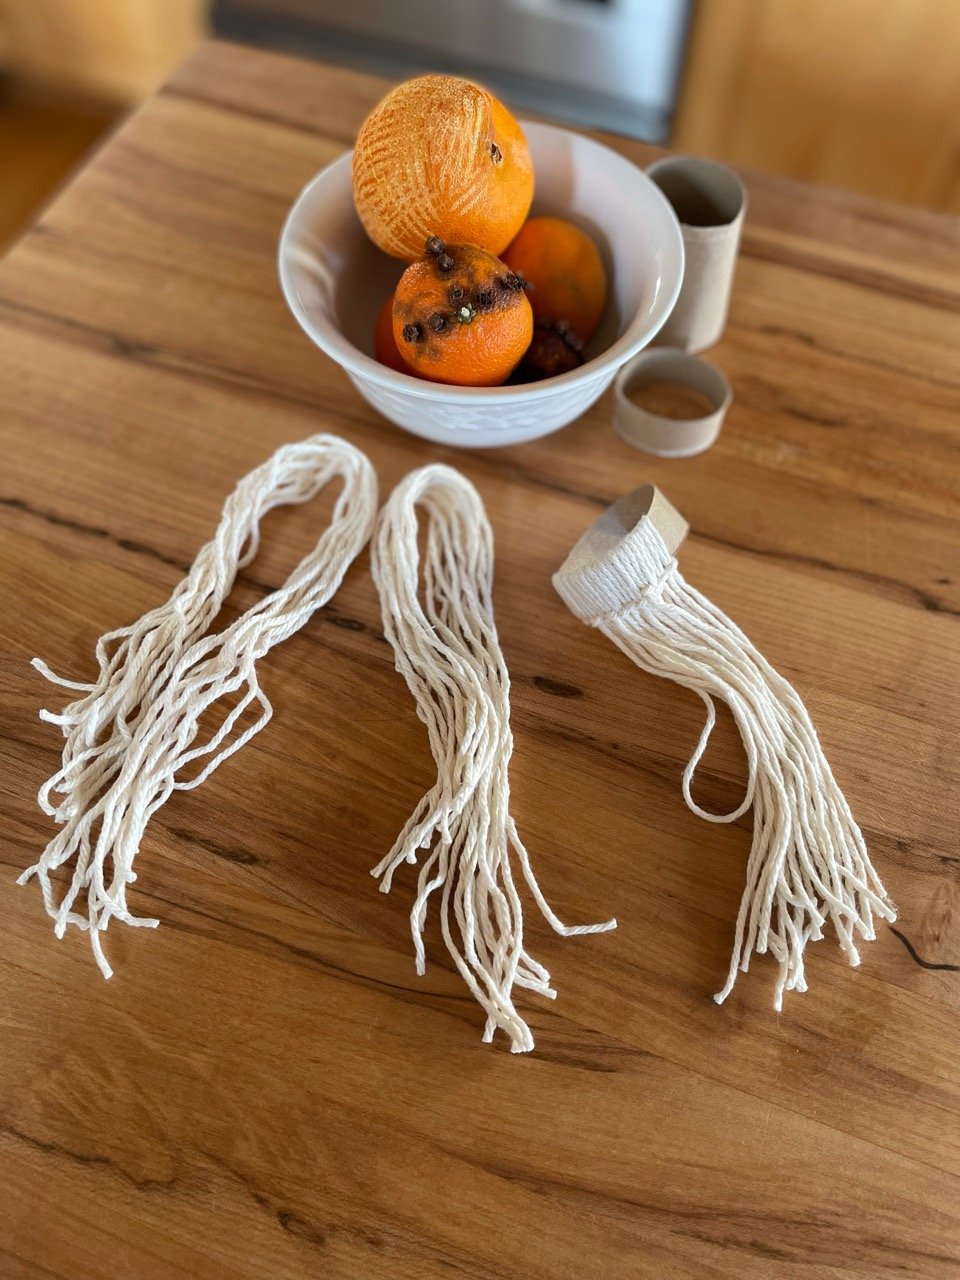
If you have learned one thing about us, it is that we are going to reuse the HELL out of the contents of our recycle bin— especially the cardboard tubes from toilet paper rolls. After all, they are a constantly renewing resource! We saw various posts for adorable hat ornaments made from leftover yarn or string and parts of toilet roll tubes and thought we would give it a go.
Gather materials:
yarn or string— preferably thick enough to grasp easily and cover the cardboard
scissors
toilet roll tube
some bit of time— this takes more time than it looks!

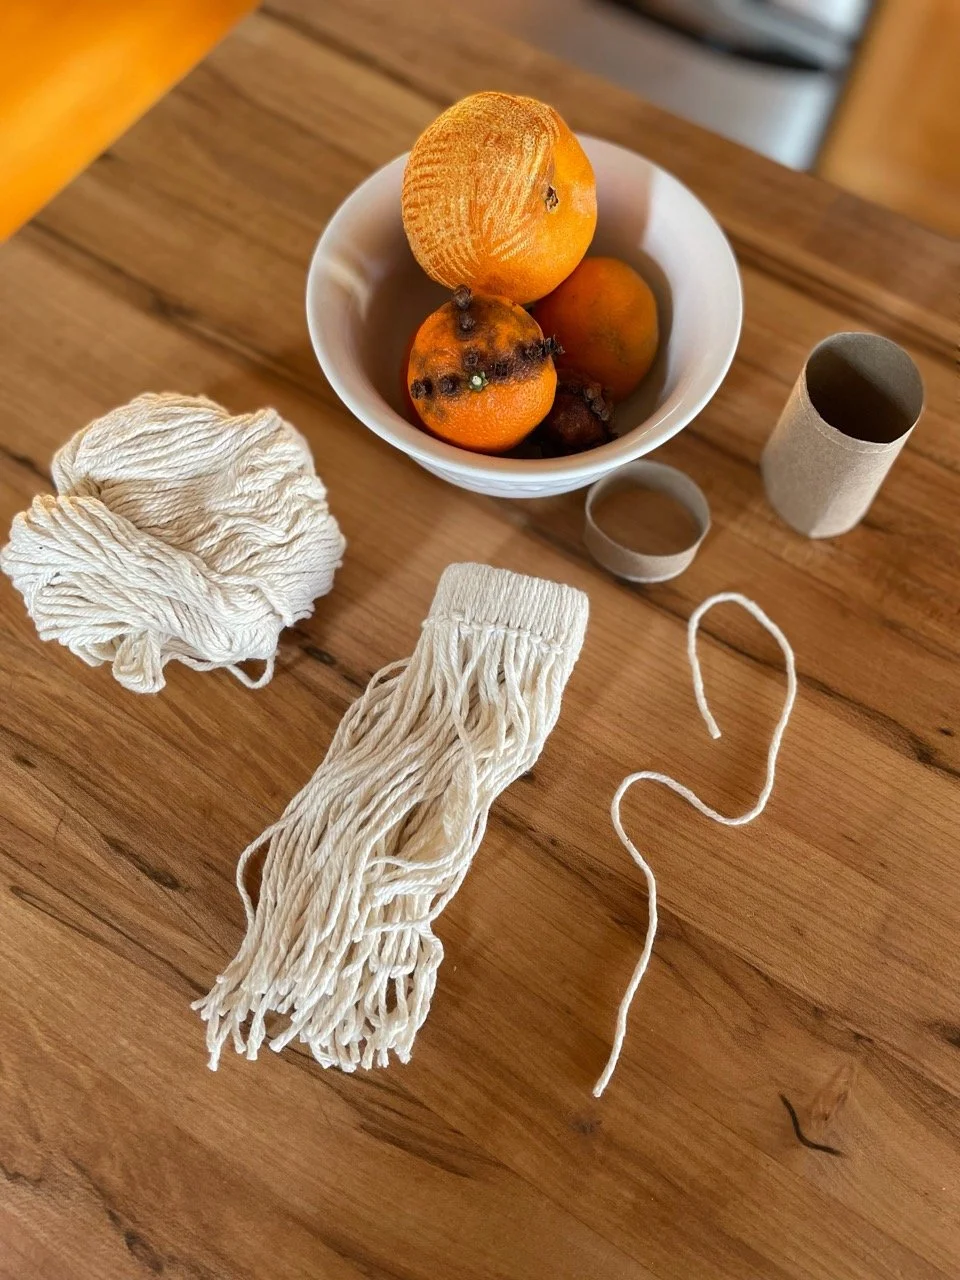
Cut toilet roll tube into approx 1-inch sections. Cut lengths of yarn into 10-11 inch segments.

Fold lengths of string or yarn in half, then wrap the loop formed at the halfway point over the top of the cut section of toilet roll tube. Slip two ends of yarn or string through the loop such that the knot formed snugs up against the two tails at the base of the tube section. This is called a “Larks Head Knot.” Looping the loop over the back and pulling the tails through allows the two sections to lie flat in closed lines. If the knot is tied incorrectly, the lines will be divided and open. Correct ties are shown on the left of the tube. An incorrect tie is illustrated on the left of the picture above.

Correct formation of the Larks Head Knot for this project shown above!
Using a approximately equal lengths of yarn or string, continue tying knots until the tube is completely and snuggly covered.
Once the the tube is completely covered, you either have the beginning of Cthulu, which is a great way to go, if you have a mind… or the next part to the hat.
Hat?
Ok.
Push all the lengths of yarn through the tube, out the top (opposite the knots) and straighten. We know… Cthulu STILL a possibility! But, onwards.

With a length of matching string or yarn securely tie the gathered spaghetti monster…er… strands into a cinched area about hat height from the toilet roll tube brim.

We wrapped twice securing with a non-slip knot like a square knot (right strand over left, then left strand over right).

Using cotton balls, cotton salvaged from medicine bottles, or wool roving, stuff the inside of the hat form.

Trim the top strands to a pom pom or tassel shape. Add a bit of string or twine as hanger.

Adorable lil hat on the tree— squeeeee!

fresh evergreen wreath part 1: prepping material
As with any fresh plant material construction, beginning an evergreen holiday wreath should begin with good preparation. Set up work area, preferably with a work surface tall enough to prevent bending down to table level. Unless you are working in a dedicated workshop, securely cover surfaces with waterproof material such as plastic drop cloths or large garbage bags. A turntable or lazy susan is a great way to rotate any arrangement project, but is especially helpful in working each part of a wreath equally.
It is very possible to use fresh cut evergreen branches and wire to create your own wreath, but with so many things vying for attention at this time of year, we happily recommend using a purchased wreath base — they are widely available at garden centers and grocery stores.

We look for springy, fresh branches on these wreaths and a minimum of falling needles. Once home, we dunk the whole thing down into a tub of water and let the branches absorb moisture. After removing the base and allowing a day to dry, we treat the base with a anti-dessicating spray such as the commercially available brand, Wilt Pruf, or similar, generously spraying BOTH sides of the wreath base and allowing it dry. This one step, though not essential, makes a world of difference for evergreens lasting longer, staying prettier, in winters that are becoming ever warmer.
We like to tidy up the purchased wreath bases with judicious trimming and balancing of branches before any decoration begins.
When your work area is set up, the wreath base is ready, gather together your tools of the trade: pruners, snips, wire cutters, scissors.

Don’t forget additional items which help avoid attachment issues: wooden floral picks, green florist wire, twine, and glue gun with plenty of glue sticks.
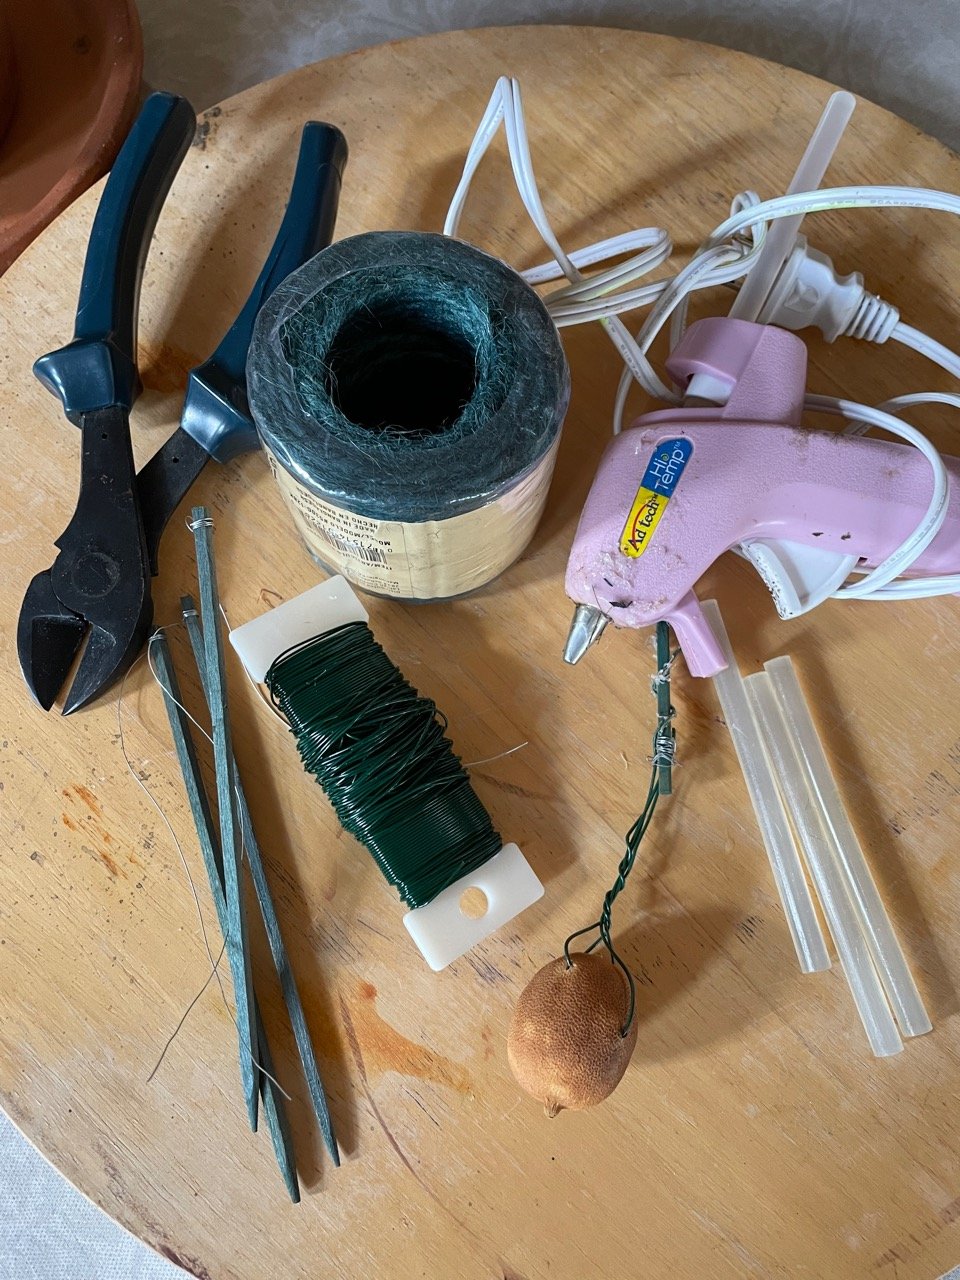
Adding a pick onto almost any element in a wreath provides extra structure for securely attaching to the evergreen branches. Running wire securely through or around cones, fresh fruit, or the tops of ornaments, all help the embarrassment of a wreath yeeting its dec onto unsuspecting guests at the front door.
We pick fresh evergreen elements to add to a commercial wreath. Varying the colors, leaf types, and texture adds to visual interest. We use cut-from-the-yard or bought at the garden center elements that have had a day to sit in containers of cool water so they are conditioned (hardened off from a freshly cut) and ready to insert.
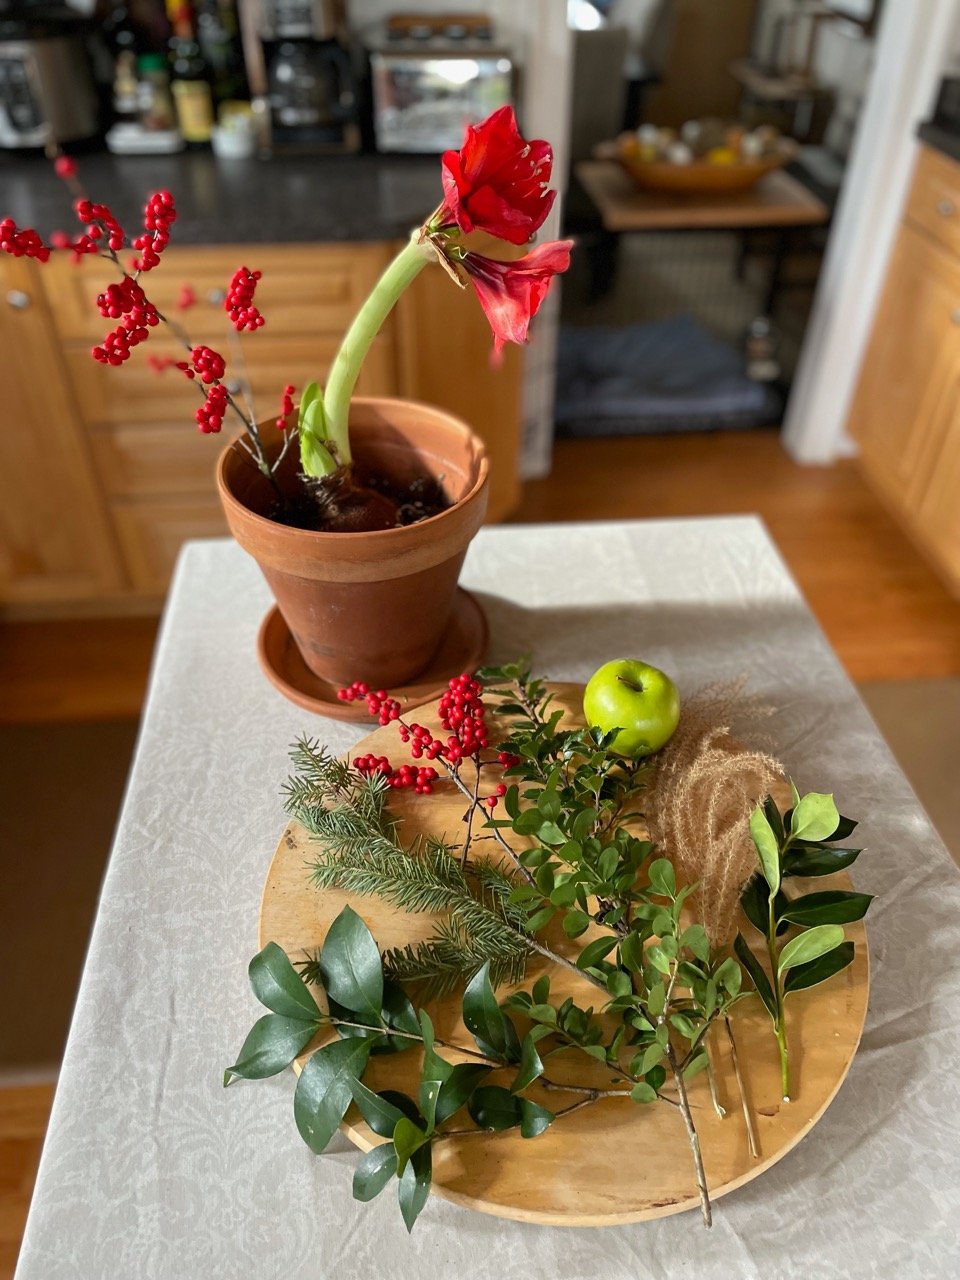
Once the base is tidied and ready to decorate, assemble materials to attach. Start with bundles of found or purchased greens wired on picks and then glued at the base. Leave your newly gorgeous green base as is— OR go for something fun and unusual! Eschew the expected! Leave off the ribbon entirely— be bold!
Feathers, twigs, leaves, nuts, grasses...

Varying the sizes or types of similar items is great way to add pleasing harmony.
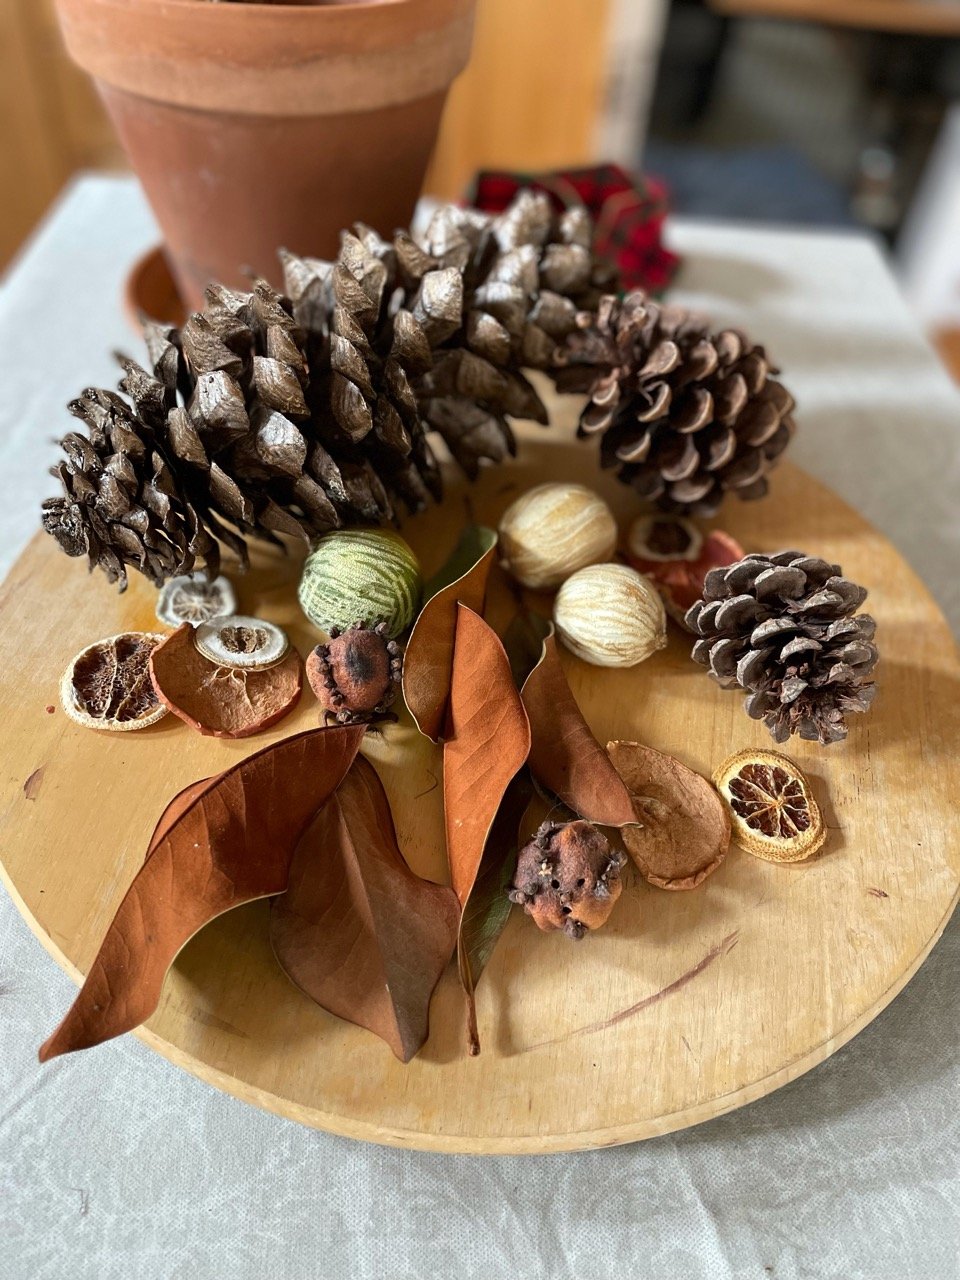
Wreath dec needn’t be traditional cones, fruits etc. Add a variety of elements tailor-made to your style! Avoid the cookie cutter look by adding in actual cookie cutters, ornaments, beads, baubles, spools of thread, faux fruit or berries, tiny tools — whatever fills out the former store bought wreath with your own personal flair. Whatever you add, just make sure it is firmly attached to last the season!!

recycle material turkey centerpiece

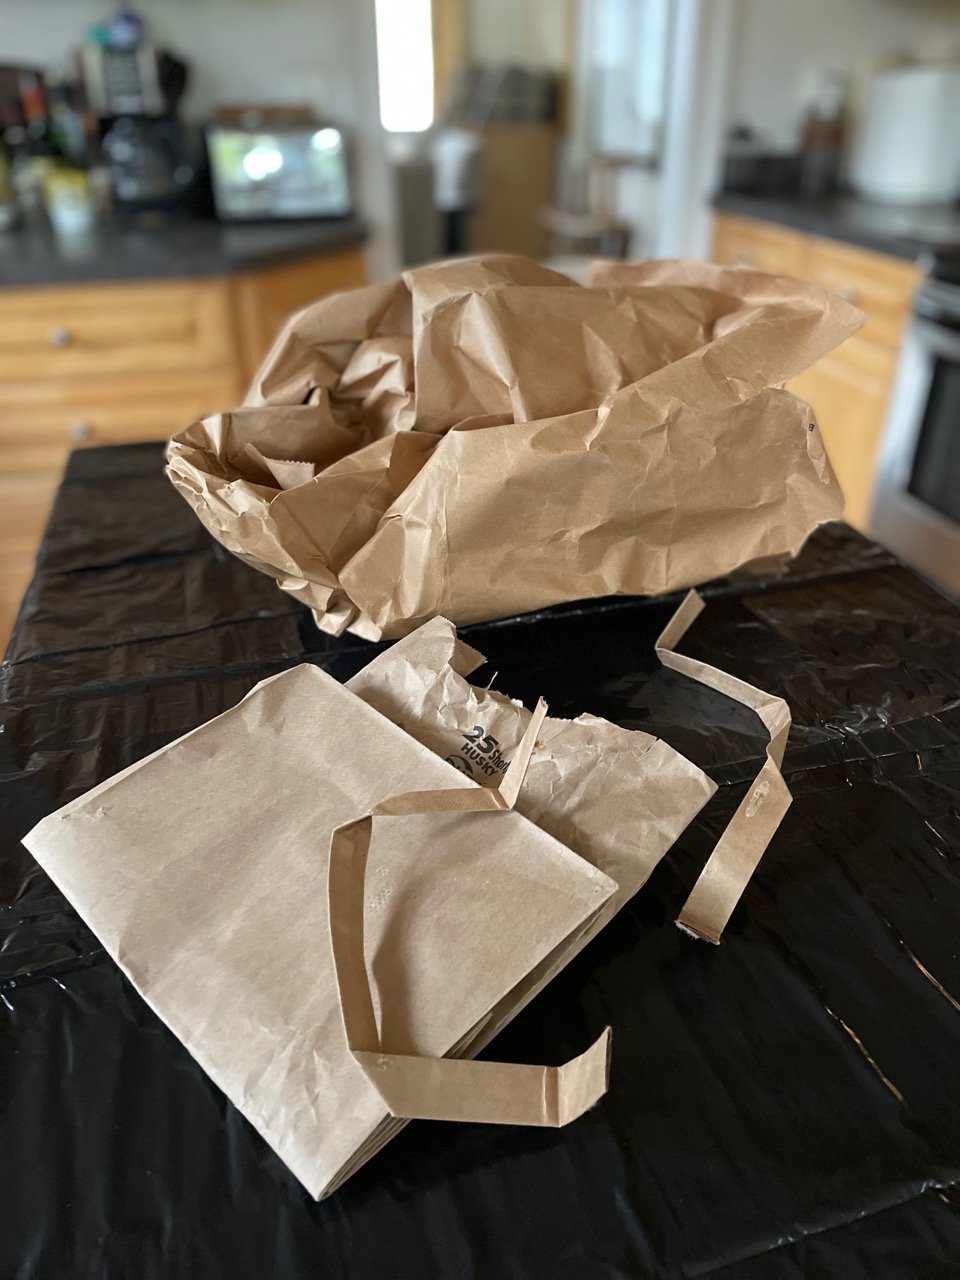
Friendsgiving, Black Friday Eve, Thanksalotapalooza…. however you are celebrating, it is fun to pay tribute to the bird most associated with the fourth Thursday in November, though turkey may or may not have been on the menu for the storied meal shared by the Plymouth Colonists and Pilgrims and the Wampanoag people indigenous to the area. Novelist Sara Josepha Hale popularized the idea of turkey as the main dish for Thanksgiving in the 1820’s with a campaign to make Thanksgiving a national holiday. We are presenting a budget friendly turkey for the center of the table that even your vegan friends and family will approve. Raiding the recycling, we have put together a step by step for a life-size gobbler— no brining, no basting, and no baking required!
You will need 3-4 regular paper grocery bags, kraft paper or kraft paper used for packing, toilet paper rolls and/or paper towel rolls, tape, and glue. A stapler helps expedite the construction — can be used as temporary holds while glue dries and removed later or hidden inside paper folds.
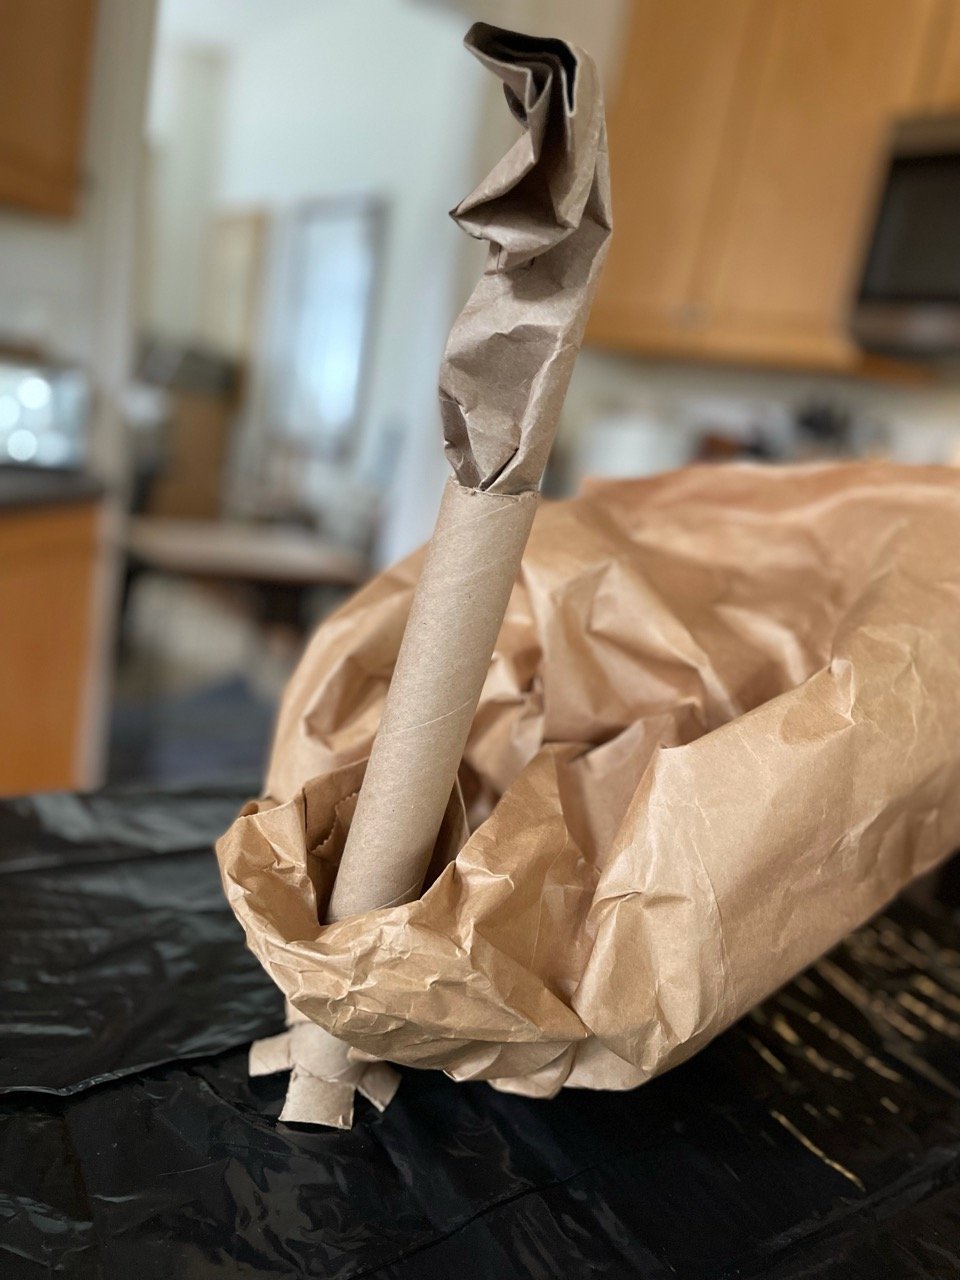
Starting with a kraft paper grocery bag, turn it inside out if it has any printing and puff it out to form the basis of the turkey body.
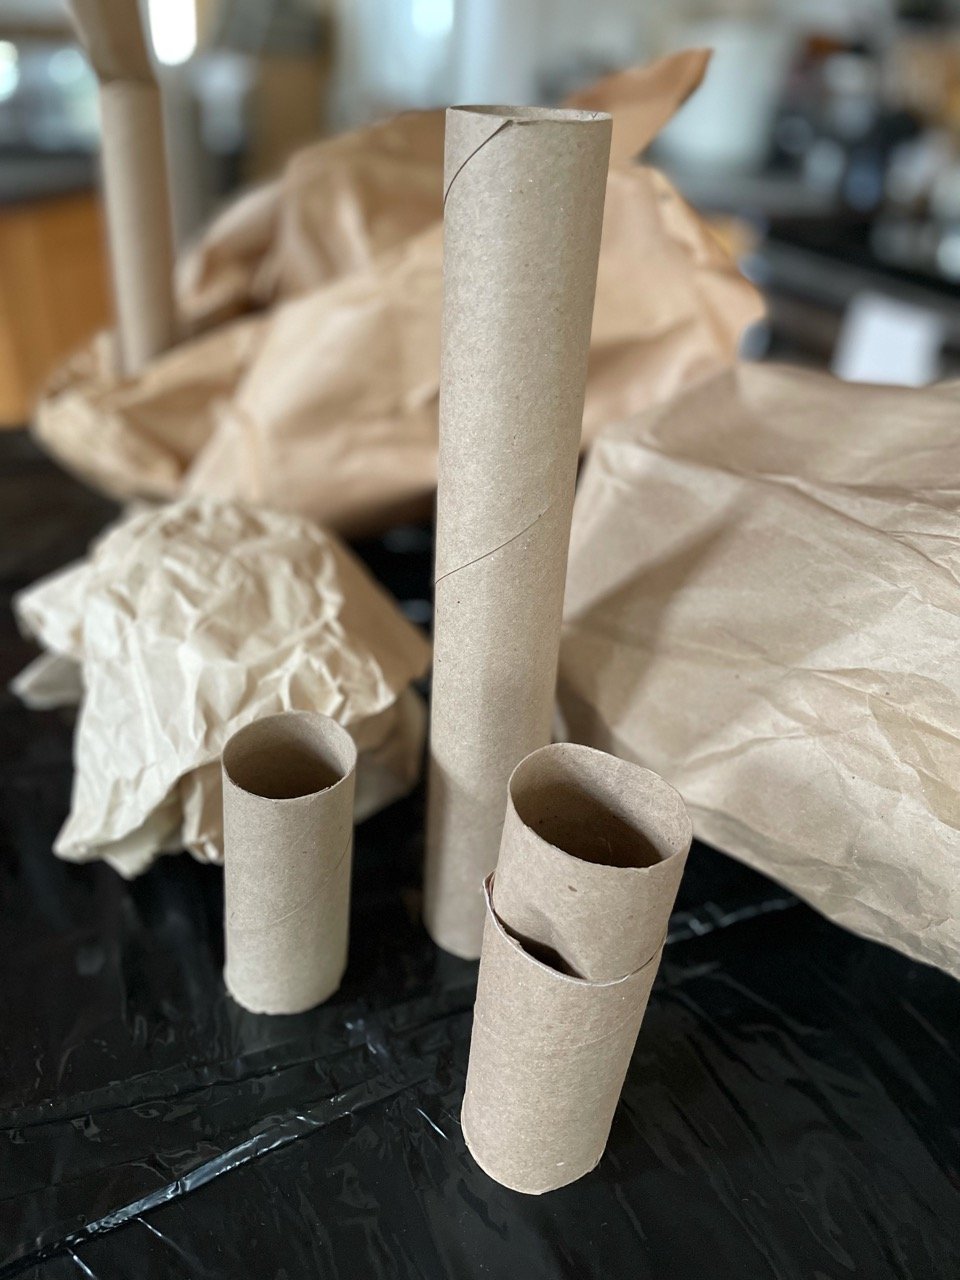
Using the paper towel rolls, scrunch the bottom of one to fit inside the body of another and another to form a support or armature for the turkey’s head and neck.

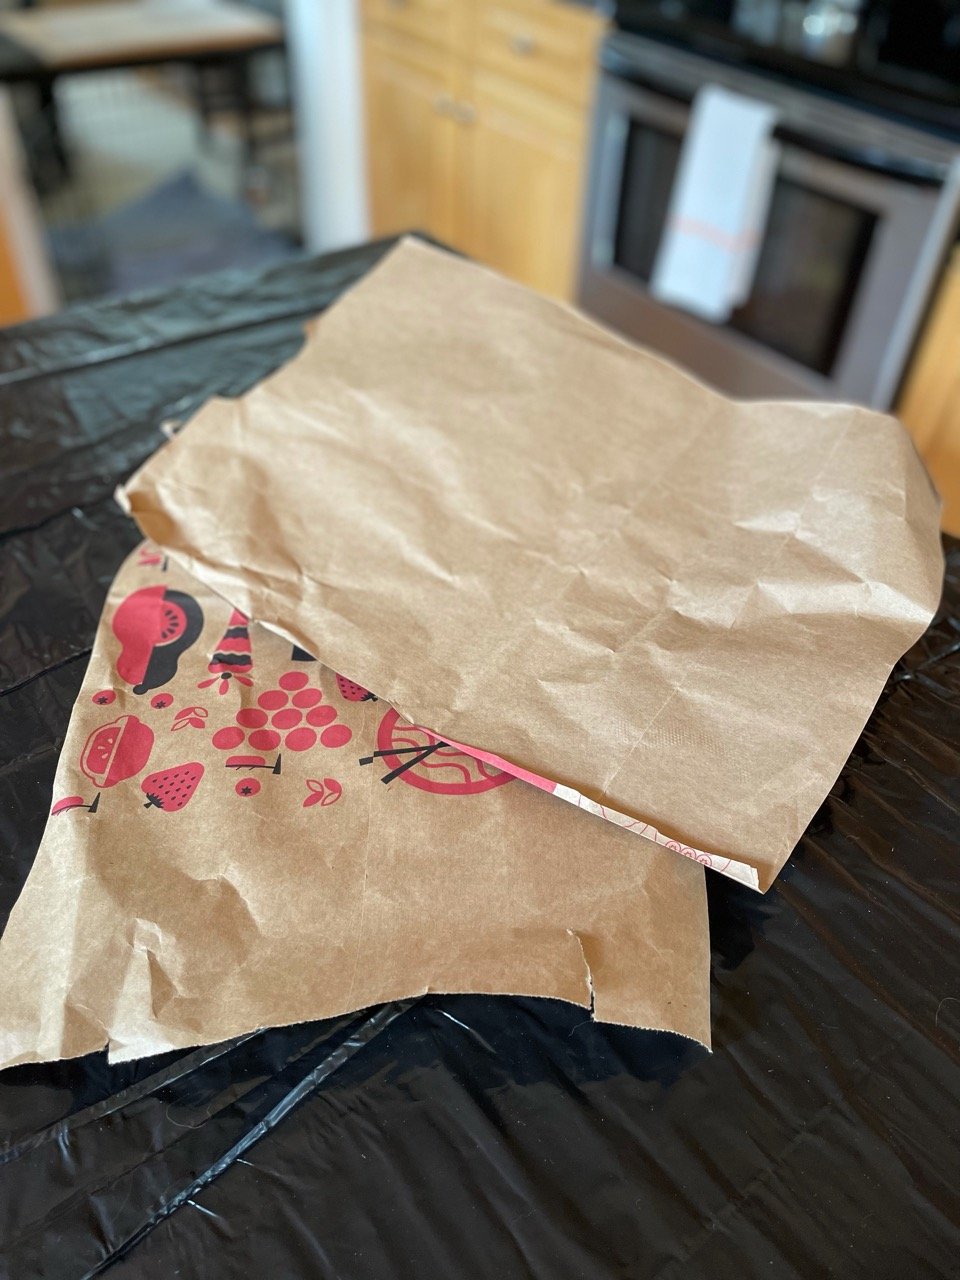
Checking length of the future tail against grocery bag body, cut to same length then accordion pleat or fold kraft paper or packing paper.

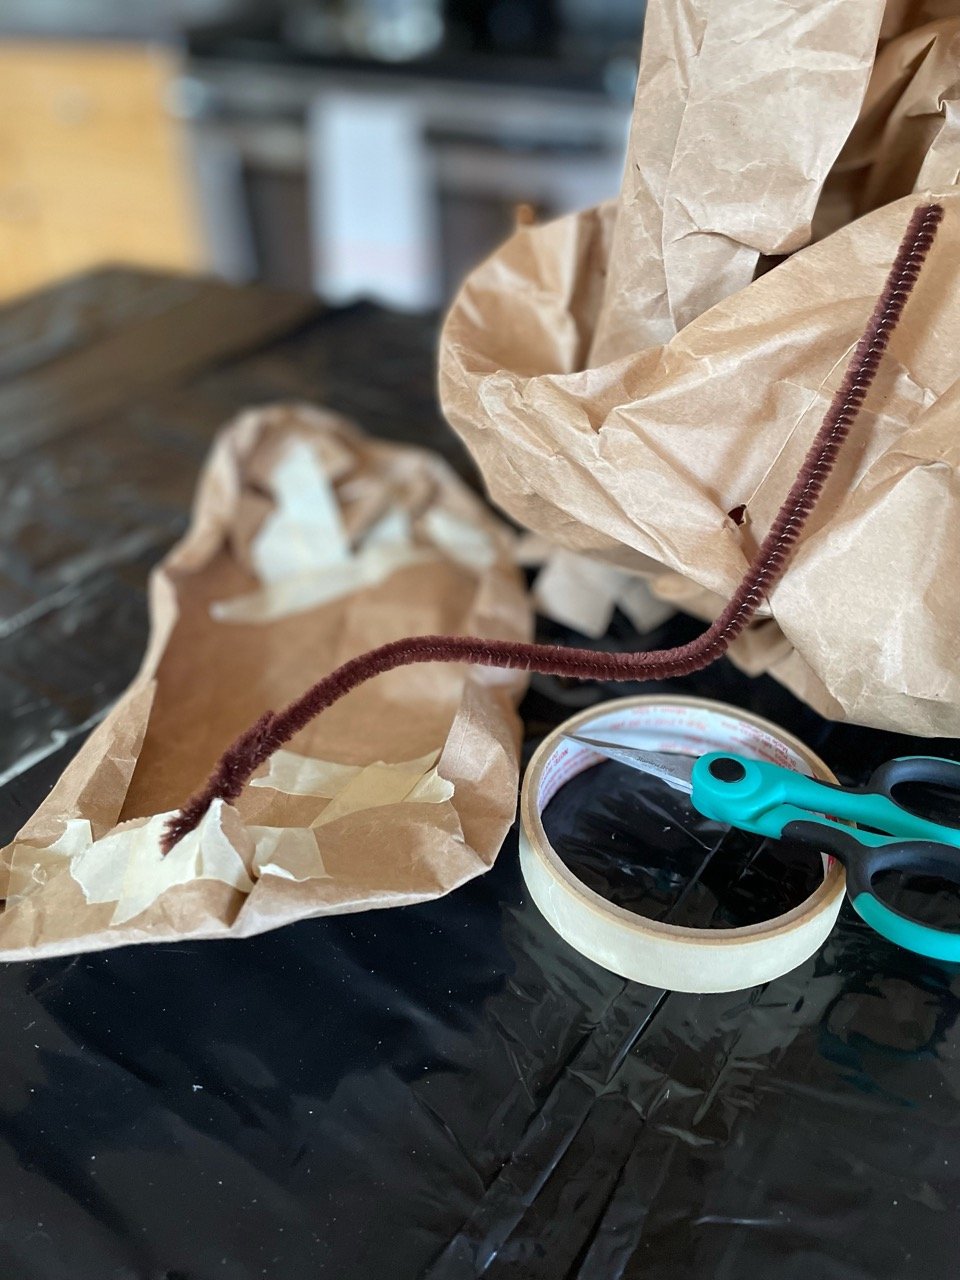
Gather pleated paper together tightly and secure with twine, string, or wire. We used a chenille stem.

Create a hole in the front of the grocery bag turkey body just large enough to pass the paper roll neck/head assembly through. We split the bottom into four flaps and folded them outwards to provide more stability.
Cutting basic kraft grocery bags apart provides working material for wrapping the neck and head, crafting wings and stuffing the body.
We wrapped the neck assembly with kraft paper, leaving excess at the top to form the head. Crush shape the head into an almond shape with a pinched point to make a beak.
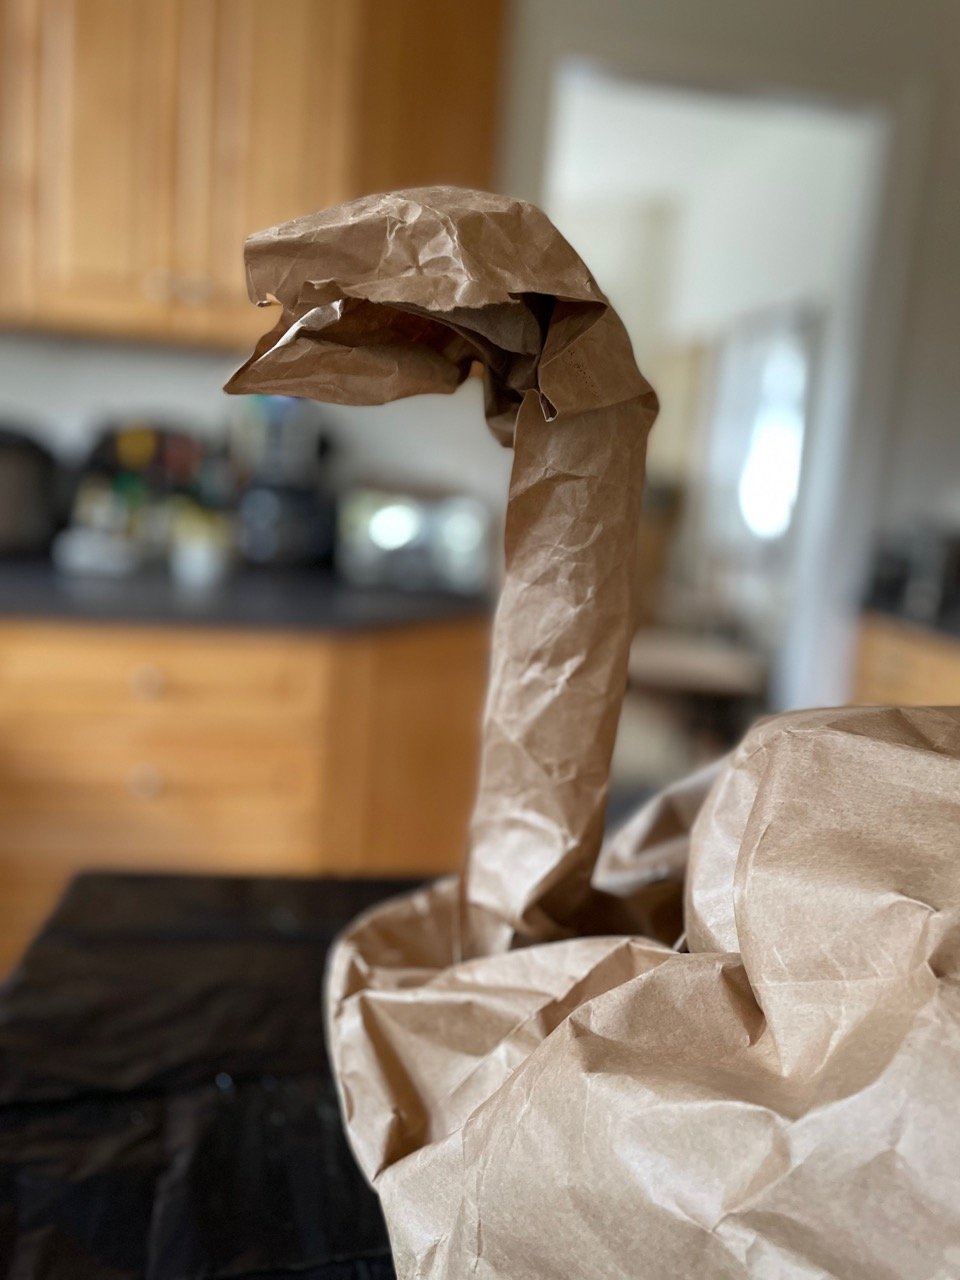
Once the head is in a basic bird shape, glue down folds in the paper to refine. We used chenille stems to stabilize the head until the glue dried.


Taking a cut out side of a kraft paper bag, crush curve the edges to form an oval to attach across the front of the turkey to build out the breast and help hide the mechanics of the paper tube at the bottom of the neck. Tape down the crush rolled edges of the oval. We reinforced spots on each edges of the oval, made an opening, and ran a chenille stem from side to side behind the paper roll neck so the wire can draw tight to be stable.
In the this photo, you can also see the twist of paper added, draped over the beak, to form the distinctive turkey wattle.

Turning to the rear of the turkey, we balled up heavy kraft paper give the body substance, and added pillars of toilet roll paper columns to increase stability in the interior.

Splay out the fans of the accordion pleated paper to form the tail. It helps the paper to stand to attach edges of individual fans together. We made two layers of paper fans so the tail is really full. We attached the tail with brass brads — but could have used tape or glue. As the tail stands by itself, it could be set behind the body sitting as a centerpiece without being attached.

Wings on turkeys are sort of useless, but as a design element on a centerpiece, they add a lot! We cut kraft grocery bags into wing shapes and add symmetrically matching sections imitating rows of feathers, gluing them one over the other. Before gluing, we folded the faux feathers down the center to add textural interest and a give a more featherlike appearance.


Once the layers of feathers were glued and the glue dry, we crushed rolled the outer edges of the wings— the non-feathered edges — to add dimension. We attached the wings with brass brads— but tape or glue works as well
(Hint: clothespins make great tools for softly holding paper edges while glue dries.)

Tom on the table showing the layers of paper added at the front to fill in any gaps, hide any mechanics or attachments and imitate a turkey’s feathered breast.

gnome time like the present
With time change behind us, looooong evenings ahead and certain holidays zooming up quickly— uh hum... we are looking at you, Christmas train— we are taking some time to do small, manageable projects. In order to speed up the process, thereby MAKING these project manageable, we don’t start at zero, but utilize bases that are already started i.e. upcycle readily available decor, but add better materials, or personalized finishes. For example, these thrifted gnomes followed us home and we set to work reusing a much loved, but timeworn sweater to improve their looks.
It’s fun to get something done in an afternoon or two and points for sustainability as well!!

We started by removing as much of the polyester fluff from the thrifted gnomes as possible. Using the existing gnome, we drew a simple pattern on a scrap piece of fabric and set to work. When reusing old sweaters, we prefer real wool or animal fiber, though any type will do. However an animal fiber sweater can be tightened up or felted if it is washed and then tossed in the dryer. This process expands the scales on real wool, helping them catch together, closing openings — or choose one that has already been through that process inadvertently… not that YOU put sweaters in the wash by accident…
We lined the sweater we chose to use with lightweight cotton fabric so that we could speed up the process with a sewing machine. Lining knitwear, especially loose or loopy knits, prevents yarn from catching on the presser foot. All of the sewing for this product can be done by hand with a tapestry needle if you are not proficient with a sewing machine.

In order to cut the sweater arms into gnome legs, we ran seams along a central line — then carefully cut each sleeve into 2 tubes by following the red line in between the sewn seams. Presto! Instant wooly gnome leggings!

In the narrowest portions of the gnome outfit, we clipped the lining at the finished seams to make turning the legs and arms right-side-out and fitting them on the gnome body a little easier.

Lookin’ a leetle creepy there, upcycled sweater parts…. but it gets WAY better!

Choosing some fun leftover yarn— any type, color, or texture will do— we made the SIMPLEST yarn gnome beard ever!! You may have bits of faux fur or alpaca or wool roving or goat hair or cat hair — whichever. Have we mentioned we are not judge-y? We are NOT judge-y. But for these gnomes, we circled the base of the hat with red trim — but could have used rope or twine — and tied on lengths of yarn by checking the length of desired hair or beard, doubling the yarn before cutting, making a loop at the top of the double yarn, placing the loop over the trim circling the hat, and then pulling the two strands of yarn through its own loop and pulling up on the strands until the loop is tight. We have heard it called a "lark’s head knot” but we call it “two strands through a loop thingy.” Po TAY to. Po TA to. Vodka. Whatever works.

Repurposed sweater cut and sewn and gently tacked to repurposed thrifted gnome. Please note the fuzzy bottom of thrifted fellow— tacking on a patch cut from the sweater completes the matching pants. Reusing an existing form, but changing the finish cuts this project time in half!

Mister and Milady, Jingle and Jangle, Him, Her, Them… they are complete!
meant to bee

While we are not fans of time change, early in and out of the chilly darkness, DOES mean it's time for small projects that can be done cuddled up with a blanket on your lap! These "gathering wool" sessions are for a purpose... handmade ornaments are lifetime keepsakes. Knitted, crocheted or felted wool are some of our favorites— but they could be quilled or cut paper or wire and beads!
Here is a knit bee from a Claire Garland pattern available from her website or on Ravelry.

Claire Garland has tutorials available for her techniques, so knitters with basic skills can learn new ways to create for charming results!


Little projects are a nice relief from a long knit, use small amounts of yarn, and building new skills is so satisfying. We really love the lifelike results... bee happy, friends! 🐝

Needle felting wool is another way to make easy, manageable projects like personalized ornaments from sustainable materials.
DIY caramel apple decoration


Assembling materials for a beeswax coated “caramel apple.” We used a wooden faux apple. We don’t recommend pouring hot wax over styrofoam based faux fruit without testing the pour— might make a melty mess!
We are lucky enough to have a source for local beeswax— and the subtle honey smell it emits is heavenly!
We always cover any work surface before starting a project and, in this case, use the right tools to handle HOT tin can and melted wax. Beeswax has a relatively low boiling point, so it melts to a pourable liquid fairly quickly.

Melt beeswax in a double boiler. Take care to use materials that can have wax residue— not the spot for your best pans! We created a candle wax melter by recycling a small tin. We made holes in the sides by carefully tapping a nail through, then threaded the openings with coated wire, creating a handle that would stay cool above boiling water.

Preparing a surface for pouring melted beeswax over a wooden apple. Protected surface. 2 layers of aluminum foil sprayed with a cooking spray for easy release.

We cut a wooden dowel and inserted it in the top of our wooden apple. Our little fruit already had a hole at the top— and was missing a stem, making it a great candidate for this project! We sanded the cut ends of the dowel, carefully whittled the end to be inserted, and added a bit of glue at that end for extra hold.

A kitchen or work glove is a helpful addition for guiding the tin of melted beeswax. We poured over in stages, picking up cooled wax pooled at the base of our apple and remelting to pour once more.

“Caramel” apple!
fast halloween costume: recycled robot
We know it is on the calendar on the same day EACH year… not like Easter, which wanders around Spring dependent on moons and traditions. It’s not like we have to sing the “30 Days HATH September” song. This is it. The BIG 31… we are yapping on about Halloween, of course. October 31st. HELL—ooo: All Hallow’s Eve. A super holiday for Creatives everywhere where it is celebrated. And yet…EVERY year we get down to the wire with what the heck are we going to wear? Or send the kids out in? (And, oh shoot, need to buy some candy— but not TOO soon or it won’t make it to the big day! We are looking at you, Reese’s peanut butter cups.)
For fun, fast and easy costumes, rev up your imagination and raid the recycling bin and kitchen drawers! Here is a tutorial for Robbie, the Recycled Robot. Your guy can and should look different— just use what you have and what you find in the back of the pantry or the Everything Drawer in the kitchen— you know you have one!
Step 1— Assemble some likely materials and create a work space.

In order to create our Robbie Robot costume, we cut the sides out of two kraft paper grocery bags, turned them inside out so no writing was visible and taped them together. It helped to visualize the design to lay the costume robot “tunic” over a sturdy cardboard box turned on its side. We covered two of the cut out sides of the grocery bags in aluminum foil. They will become the adjustable sides of the robot. Then we covered the sandwiched bags that form the front and back of the robot in foil, leaving the top uncovered as that part will be cut out and folded back to fit over the costume wearer’s head.

Grocery bag sides being covered in foil and tape.

Covering the bag “tunic” with foil and tape. It was helpful to have silver duct tape, but regular invisible tape would work as well! We put a dinner plate down on the top of our tunic to draw the circle that will be cut out to go over the head.

The idea is for the creator to enjoy the PROCESS without seeking perfection!
We pulled some things from the pantry, kitchen drawers, wrapping pile, and garage to create robot decoration— reflective material is a bonus for night time trick or treating!

Our fast process for creating Robbie the Robot is great for kids, but can be adjusted for older kids and grown ups.
When all the grocery bag “tunic” is securely covered with foil and tape, cut into the dinner plate circle at the top and carefully fold back the edges to the inside of the “tunic." Secure the edges all the way around with tape.

At this point, try the tunic on the costume wearer to make sure the opening at the top is wide enough to slip over the head. Also, hold up the two foil-covered side pieces to the edge of the base of the front of the “tunic.” Wrapping each side piece towards the back of the “tunic” on the wearer, mark where the the side pieces land on the back. This is where an attachment will be placed so that the costume fits securely and can be removed. We used large chenille stems curled on the back side of the “tunic" and poked through to the front and then through each side piece. A simple curl of the chenille stem forms a removable “button” holding the sides in place!

Using duct tape for a secure hold, we attached a recycled styrofoam box lid over a small LED light string, reflectors and other bits to add to Robbie’s verisimilitude — but anything or nothing will do! (“tunic” shown draped on top of the a sturdy cardboard box to check placement)

Add simple robot makeup or an aluminum foil covered headband for a young child and Robbie is ready to rock out the door in this low cost, simple, adjustable and lightweight homemade Halloween costume!

diy jack-o-lantern candle
Zombie candle returns from the dead: Upcycle a thrifted candle or less-than-perfect closet find.

Remake a damaged piece into Halloween decoration! This candle got a leeetle too warm in storage.
Warped candle, meet runcible spoon — handy stand-in until sculpting tools are located.


In progress…

Set up a work area. Protect surfaces from wax shavings that will ensue. Mark up a design on the damage face and start carving. Use a picture as a guide or your imagination.

Zombie pumpkin ready for table decoration!

diy on a dollar: fall leaves
Another sustainable seasonal idea: Upcycle paper grocery bags into colorful Autumn decorations.

Cut open a grocery bag and fold accordion style. Use stencils, trace real leaves, or, heck, just take a guess! Then cut out multiples to scrunch and crunch around centerpieces, use in wreaths, or scatter on the table.

Use the bottom of the bag as a palette and sponge color onto a few or all.

You are doing DIY on a Dollar! You've got FALL in the bag 🍁 🍃 🍂
diy on a dollar: fall ideas

Dryer vent tube secured with hot glue, painted with acrylic paint. Add leftover faux leaves and/or dried material. Twist of paper and cut grocery bag leaves.

More pumpkin fun with simple, economical materials. Pots migrating inwards after summer? Repurpose them for Fall with paint inspired from vintage cards or felt cut outs — bring on the Kawaii smiles!

Any craft is welcome therapy, especially if the kiddos are involved! Perfection is soooo not the goal... but PROCESS! Much loved pumpkin from preschool days has pride of place.