


heart-felted friends for adventures near and far
Just as in our post about creating animal ornaments with needle felted wool, we began our hopeful emissary with a chenille stem armature wound with 100% wool roving. Once the form was fleshed out, we sewed on glass bead eyes, then felted on wool ears, paws, and pink nose. In order to replicate a true field mouse’s coat of browns and greys, it was necessary to comb together a blend of wool fibers.

Undermouse ready for felting on the details! Needle felting uses a special barbed needle to entangle the fibers together pretty permanently.

This entanglement allows for great details. The more the fiber is felted, the tighter the wool. Light felting allows for fuzzy fur etc.

We added nylon thread whiskers as a finishing touch! We were following the model of Augustine Mouse from the Instagram account story unfolding @augustineamouse, but this little one went as an encouraging pick-me-up to a good friend and Augustine fan working through chemotherapy in lieu of flowers or a card.


The original Augustine and her stunt double, Resilient Mouse hanging out between takes.

Resilient Mouse (above) in her duplicate gear heading out to bring some cheer.

Augustine rolling along in her story post.
whacking in a garden
SO, you all have your winter-weathered compost pile turned and that garden spade with a strong smooth handle and a clean sharp blade at the ready, right? Us? Not so much. We always have ambitions for a black gold yielding compost from our zero waste kitchen goings-on, but have fallen short— defeated by inefficient countertop containers (hullo, bugs and smell) or underperforming barrel tumblers (who has the arm strength to dig that thing out? who?).
We have largely embraced porch containers for those things we most want to pluck: tomatoes, usually small, peppers, and herbs. Benign neglect being the order of the day, anything planted in the greater garden must do well pretty much on its own— and, since, there is serious debate about how much tilling is good for the planet, were are erring on the side of low disturbance of the soil.

We have come round to not only saving the soil, but eliminating the unnatural lawn as much as possible. We’ll be getting into the whys and wherefores from the effects of the devastating loss of insect life to the benefits of healthy biodiversity. We have eliminated much of the mown grass on our patch, planted for seasonal picking and use for birds, wildlife— and, oh, us as well!

Healthy planting areas are alive with motion— bees, beetles, worms, butterflies and birds, birds, birds…

Enough for all and plenty to share.
hold fast to what matters
The rings were all converging this past weekend, were they not? Those who follow the Abrahamic religions were observing and/or celebrating Easter, Passover and Ramadan— plus it was a full moon, the pink moon, as it happens… or the "pink, lavender, pale blue, and other pastel springtime holiday” moon AKA "Reese’s peanut butter eggs for breakfast” moon…
The world, no less tenuous, no more peaceful, did seem a little cheerier as widely available Covid tests meant many people got together to celebrate.
We did.
And we absolutely forgot how to function at a Sunday dinner in the (gasp) DINING ROOM.
Boxes, storage bins, and unoccupied cobwebs were safely cleared to reveal a vault of a room. In the center, a flat surface surrounded by chairs clearly intended for convening and comestibles. We entered this unremembered temple to sharing a meal as cautiously and with the breathless exultation of Howard Carter and his Egyptian team headed into Tutankhamen’s tomb for the first time, but with (all toes and fingers crossed) fewer viral results.
Could not find the linen napkins, couldn’t be bothered with the china— but with a bit of last minute clipping from outside and a recycled Easter basket, there WAS a centerpiece. Needn’t be much. You can do it, too. The important thing was to have those laughs and love those faces that could make it.
Plus also, sent some cards, some chicks, some chocolate, and bunny beans to those who we gathered close in our hearts if not our arms.

Recycled wool chicks, carefully created blown out Araucana eggs— and the beautiful work of Ukrainian artists.

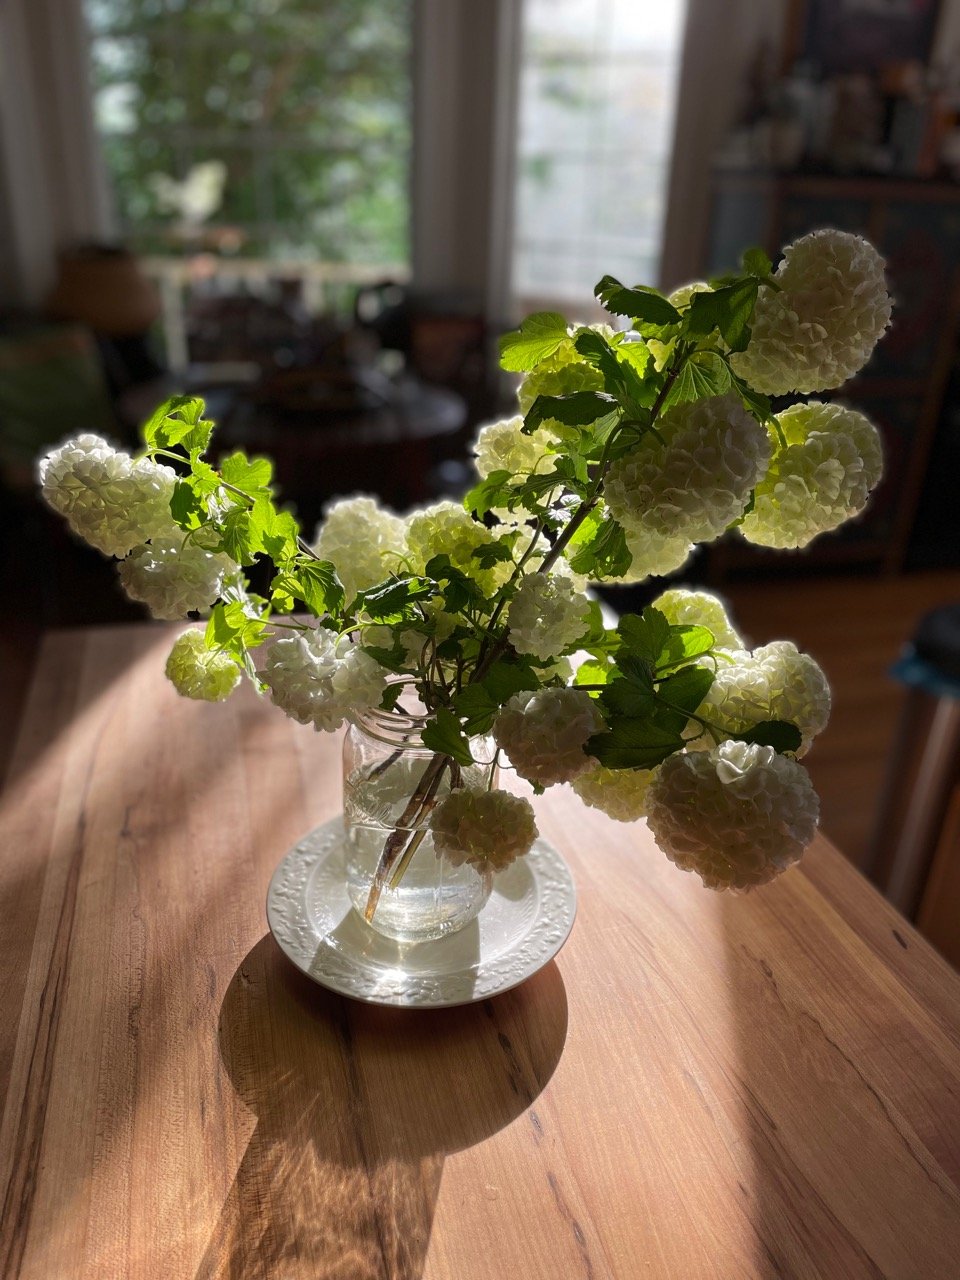
Centerpiece of repurposed ribbon, sprigs of viburnum, and real eggs in the (gasp) DINING ROOM, surrounded by viburnum branches in a bourbon bottle and sheep headed for the yarn shop.

Eggs have always represented new potential, new beginnings. We wish you better days, safety, and the surety of peace and plenty.
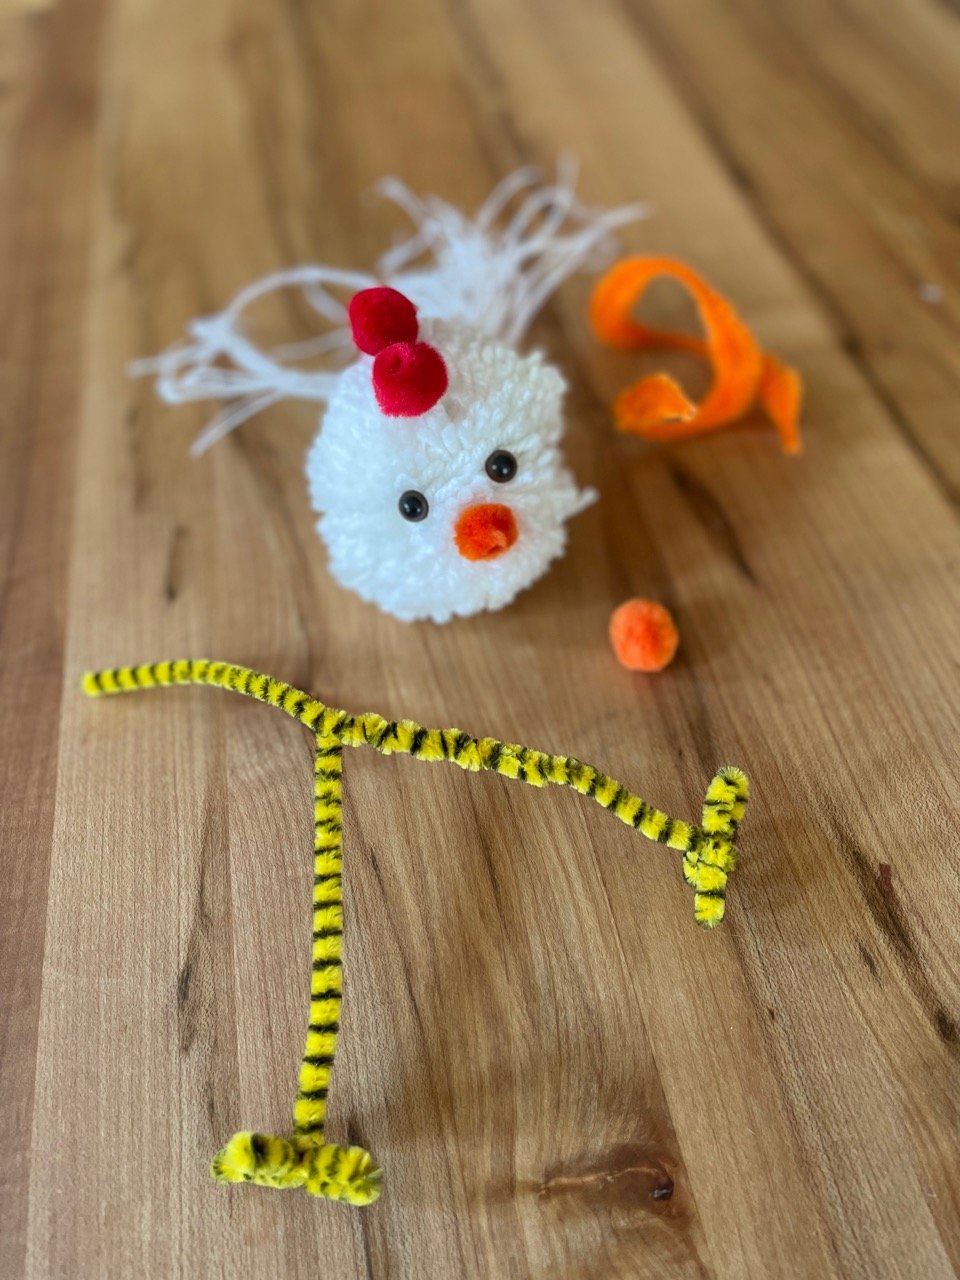
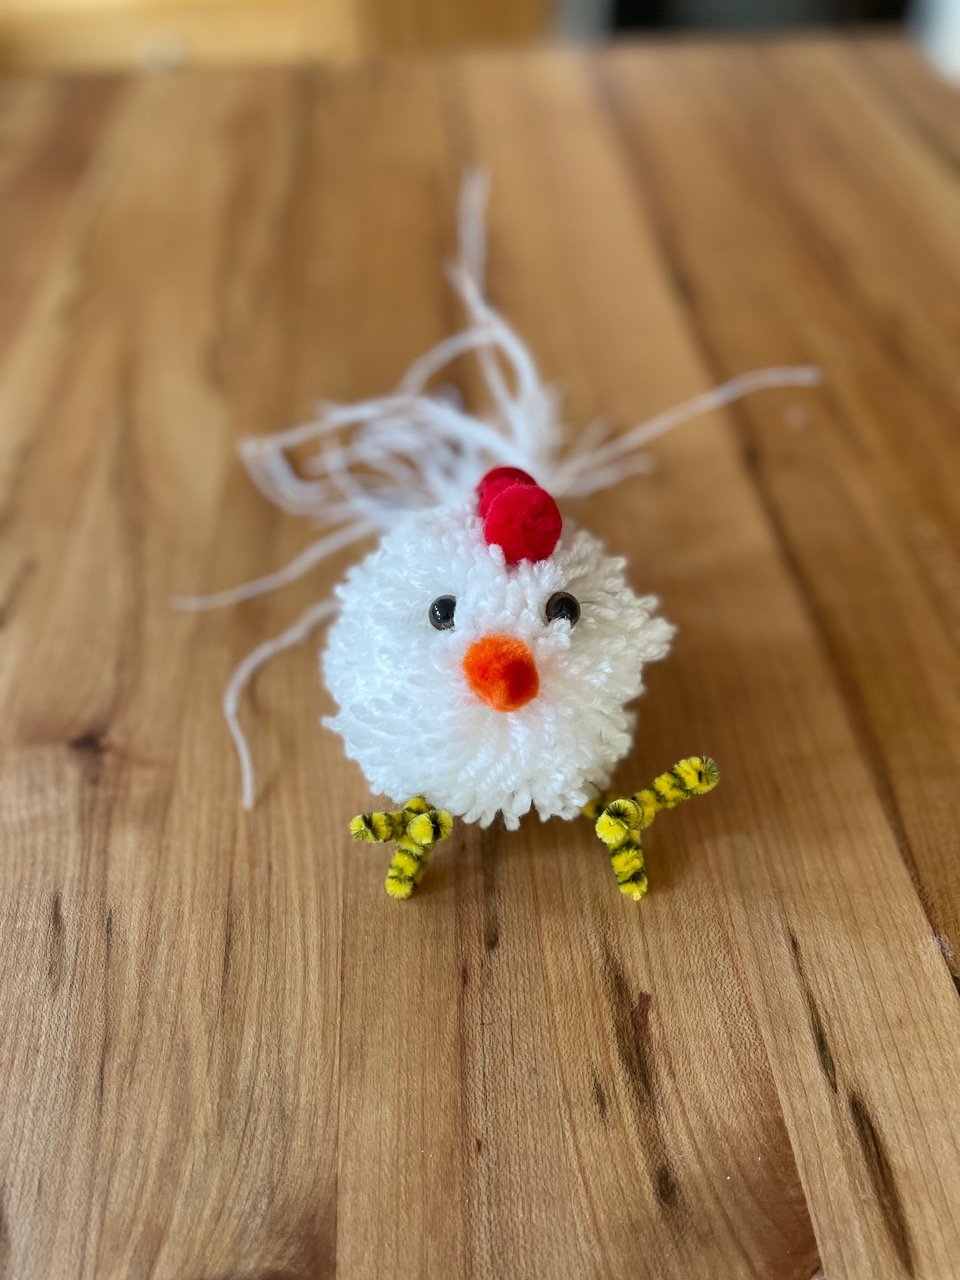
we are not just a one chick pony
We’ve been working around the cluck… ahem… to get some tutorials up for easy peasy spring decor. If you thought the pom poms could only be used one way? Yolks on you— Chick this out: same pom, different chicken.
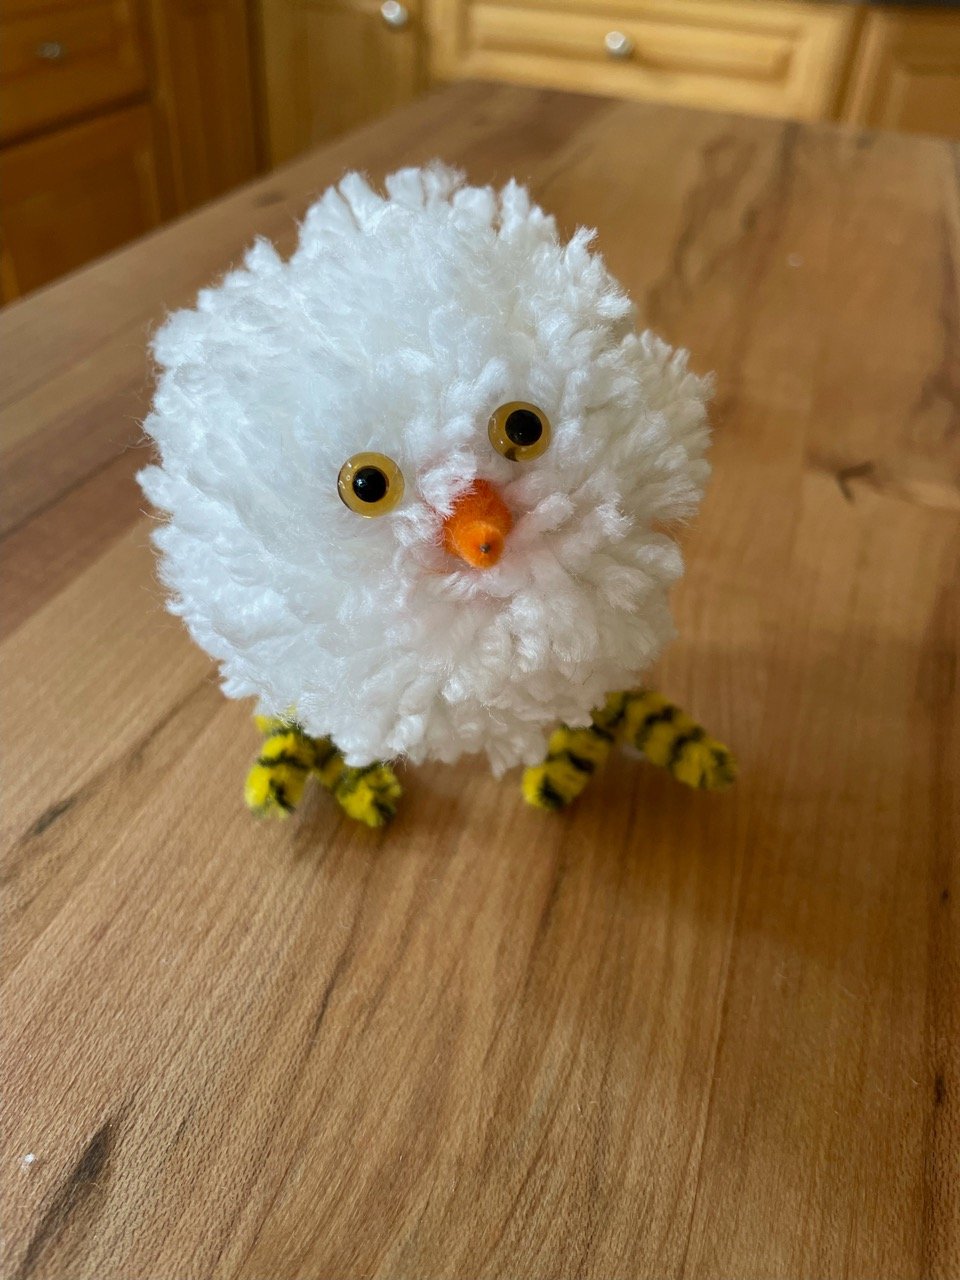
We used the same techniques as our spring chicken post. A store-bought or homemade yarn pom pom, eyes, a beak, then encircled with wire or chenille stems for legs and feet, embedded down in the fiber approximately halfway on the sphere, and made secure fairly tightly. A new twist on chicken legs!

Defying eggspectations, we changed it up and dyed the yarn chickie-yellow, using easy-to-hand food coloring. Hint: leave off gluing on eyes and beak until after the dyeing and drying process is complete.
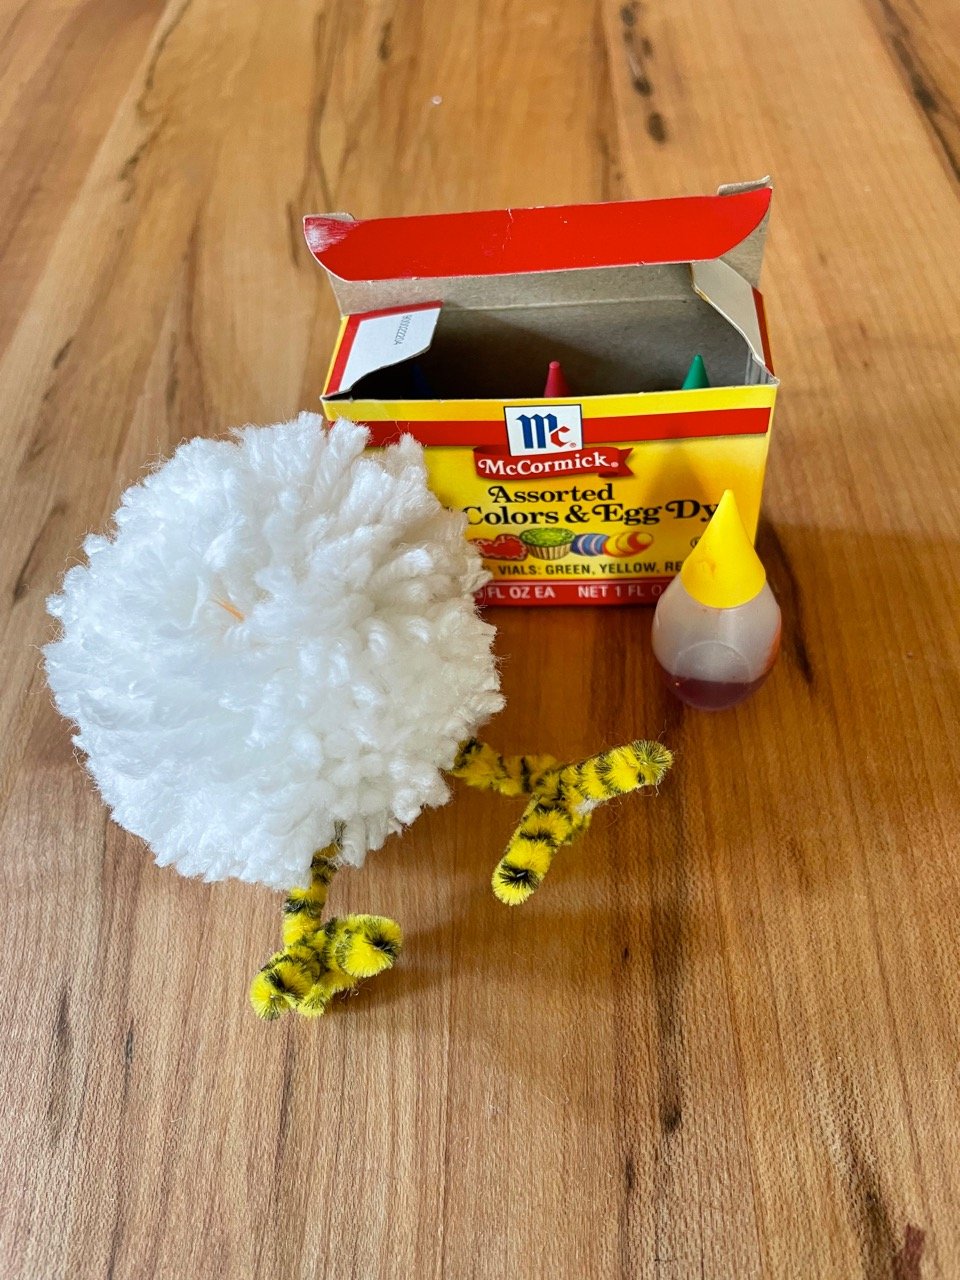
So we got up to our old chicks, covered our work surface, protected our clothes, and put on some plastic gloves in preparation for operation Tres Chic II…Hensome Lad: Son of a Biscuit.

We mixed yellow food coloring and water in a small bowl.
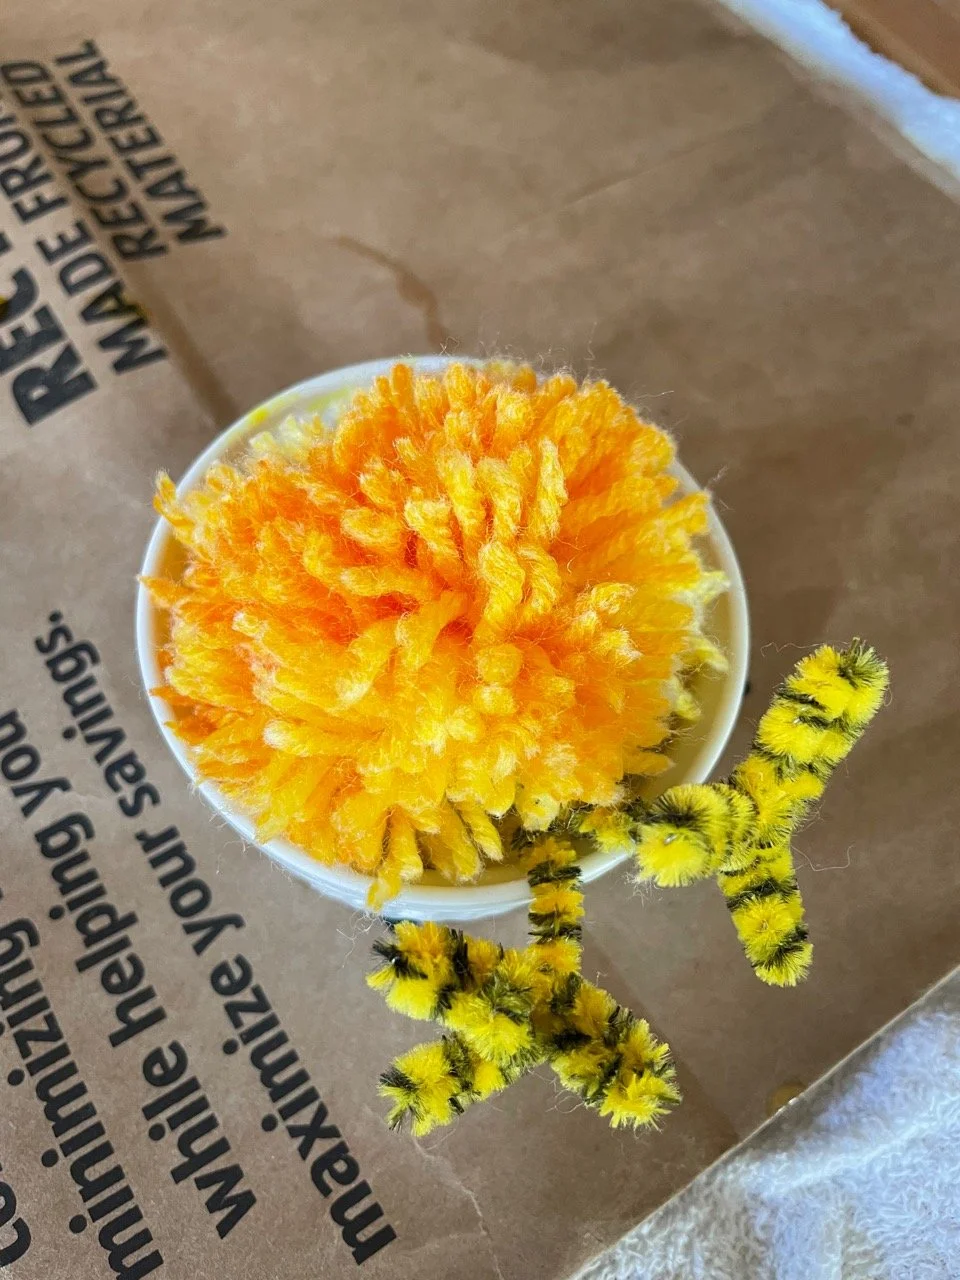
In a poultry amount of time, the yarn became saturated with dye by turning the pom a couple times. We rinsed the dyed pom in cool water, wrung it out carefully, then put it in the dryer with a couple old towels (the dye will come off until it is fully dry and set).

Trimming out some of the fiber to add some shaping, gives our chick some definition.

Talk is cheep… pictures say it best: this little one is im-peck-able!

Don’t mind us. Everyone around here is a comedi-hen. The best chicken puns don’t fall far from the poul-tree and we have all been dealing with not one, but several, eggs-istential crises, so we had to get them all in. Can’t wing for losing…
We’ll show ourselves to the eggs-it…
this IS a spring chicken
Adding handmade Spring decorations to your home or someone’s basket is easy and fun! Use homemade or purchased yarn pom poms as a start for this simple Spring Chicken.

Small pom poms, which can be made or store-bought, chenille stems or simple wire, any type of eyes— combine to make this adorable little Easter tree ornament or basket stuffer.
We twisted the stems to form simple feet, trimmed a purchased pom into a beak shape —but an end of orange chenille stem would work as well. We added simple animal eyes, trying everything in place before gluing with water-based glue (school glue or tacky glue will work and are not as messy as hot glue).
The stem or wire legs and feet are wrapped around and into the pom pom tightly so that the fiber covers it all around. We added a bit of ostrich feather for a floofy tail.
Tres chic!
upcycled easter
We are still loving the idea of using what you have on hand, re-using what can be given a second purpose, and cutting back as far as possible on cheap, imported, high carbon-cost decor. Bein’ that it is Spring and we turn to all things renewing, we are going entirely renewable. Take an old wool coat and rehabilitate it as your bunny!
This fellow is stuffed with chopped up, mismatched socks. The carrots are spindles, twine, and last year’s Easter grass combined.


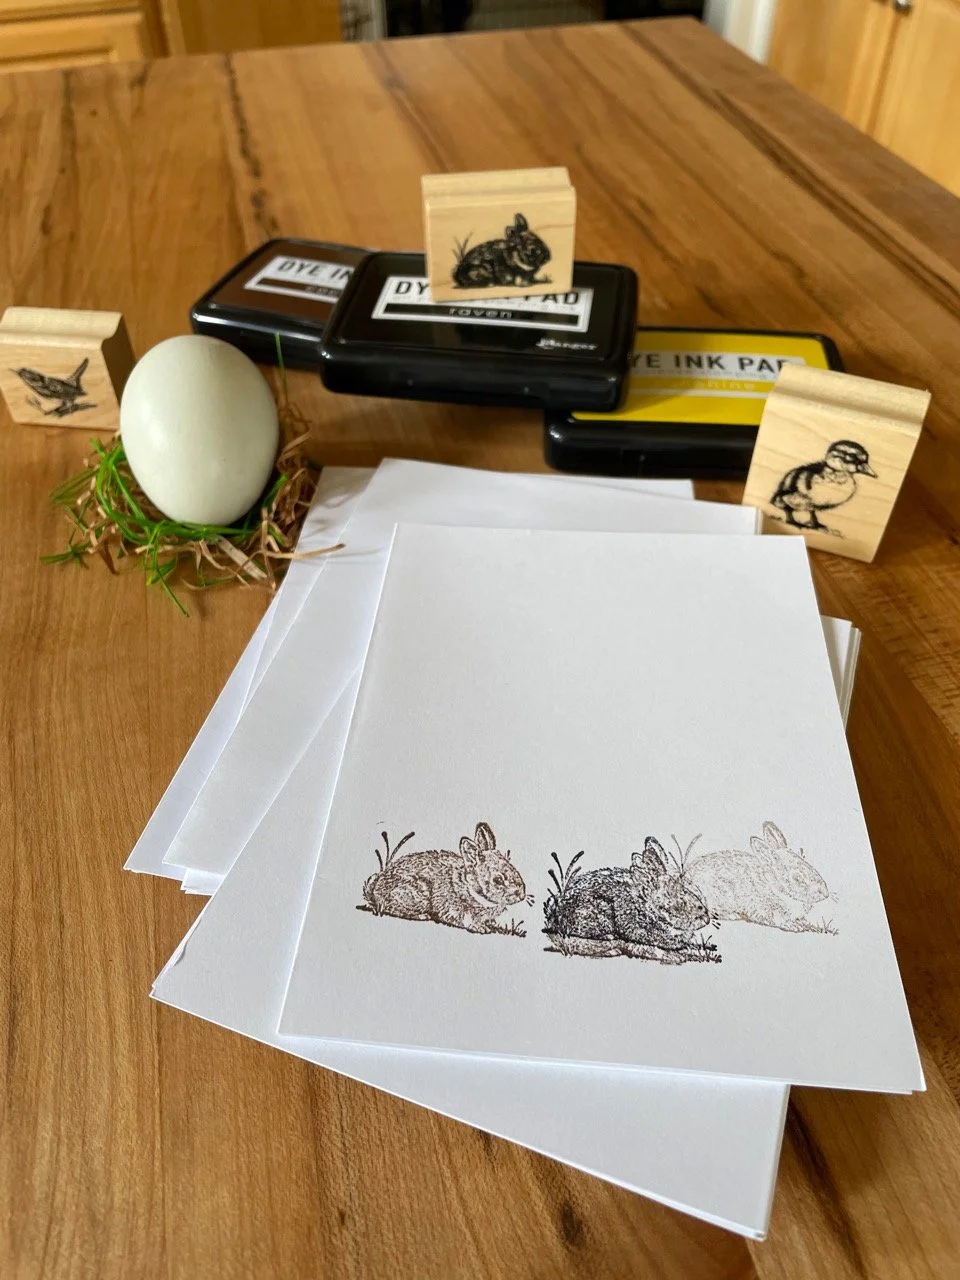
Simple stamped cards to send your happiest thoughts. Stamp and embellish with markers, stickers, or paint.
Wool coat bunny showing the simple, sturdy construction.

We thought he looked a bit downcast, so we brightened him up with needle felted wool accents.

A leftover yarn “ribbon,” and Rabbit is ready!

the strength and symbolism of flowers

As sunflower pictures, emojis, and seed packets appear everywhere in solidarity with Ukraine, we are reminded daily of the power of flowers as symbols. Especially at this time of year in the Northern Hemisphere when bulbs bloom, and trees burst forth in blossom. Puts us all in mind of winter’s end, new growth. Hope… Renewal… Solace… Gifting flowers is a powerful way to express care and concern, or to share joy. Or, in the case of Absolute Hero Ukrainian Grandma, to sow Resistance and Revenge.
🌻
And, as the Pandemic has not left, but only been pushed to levels where we seek to live with it, we have sent flowers to too many funerals in recognition and celebration of departed friends and consolation to their families.
Having a yard full of giving greens means that we can get something ready at a moment’s notice — for too many moments already this year. We add in store-bought blooms and do our best.
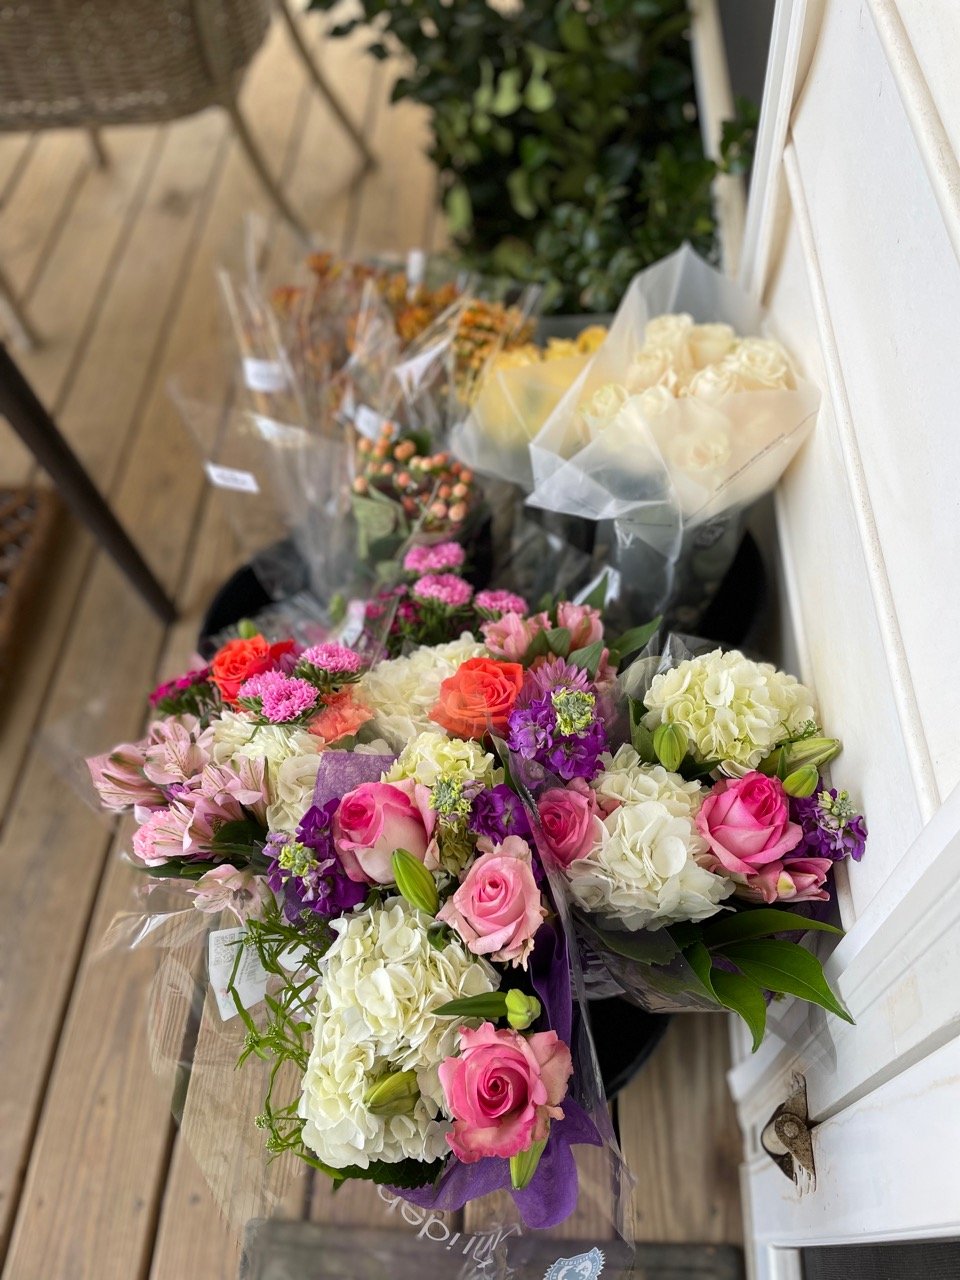
From even the most unexpected bunches and color combination, flowers just send their hope-filled message.

We’ll watch for droop and adjust a bit as flowers drink up water and move a bit— but just looking should lift hearts a bit! We are programmed that way.
A basket of long lived blooms to keep company in a sadly new turned soil.

So, henceforth, a refresher on flower arranging for all the many things for which flower power is wanted:
If you have the opportunity to plant, plant that which is useful for cutting— greens, perennials, or annuals that can take on a second use (thereby reducing the amount of floral material that is purchased from far away with a huge carbon footprint).
We have curly privet, Chesapeake holly, laurels, and other shrubs that stay evergreen and useful for most of the year. Unfortunately, at this time of year, we do have to rely on purchased blooms to fill out arrangements, but try to plant so that the rest of the year keeps this at a minimum.
Set up a protected work area.
Attach a waterproof container to receive soaked floral foam.

Cut greens and condition in a clean bucket (preferably cutting the day before use and allowing the greens to soak up water and harden off so they stay vibrant in an arrangement).
"Greening up” — filling most of an arrangement with cut greens minimizes the number of purchased blooms that have to be used to make a gorgeous, full arrangement. It also gives the desired shape to the floral piece, as well as sets proportions.
Divide and allot cut or purchased material for an all around arrangement or concentrate on one side, if for an altar or mantel (but always finish all the way around so that none of the “mechanics” show!).
Start with large elements and add in smaller, balancing shape and texture, and contrasting color elements.

Arrangement in a sturdy basket, with a waterproof bottom, filled with long-lasting blooms— almost ready to travel to brighten someone’s day!

heron repair— kinda kintsugi
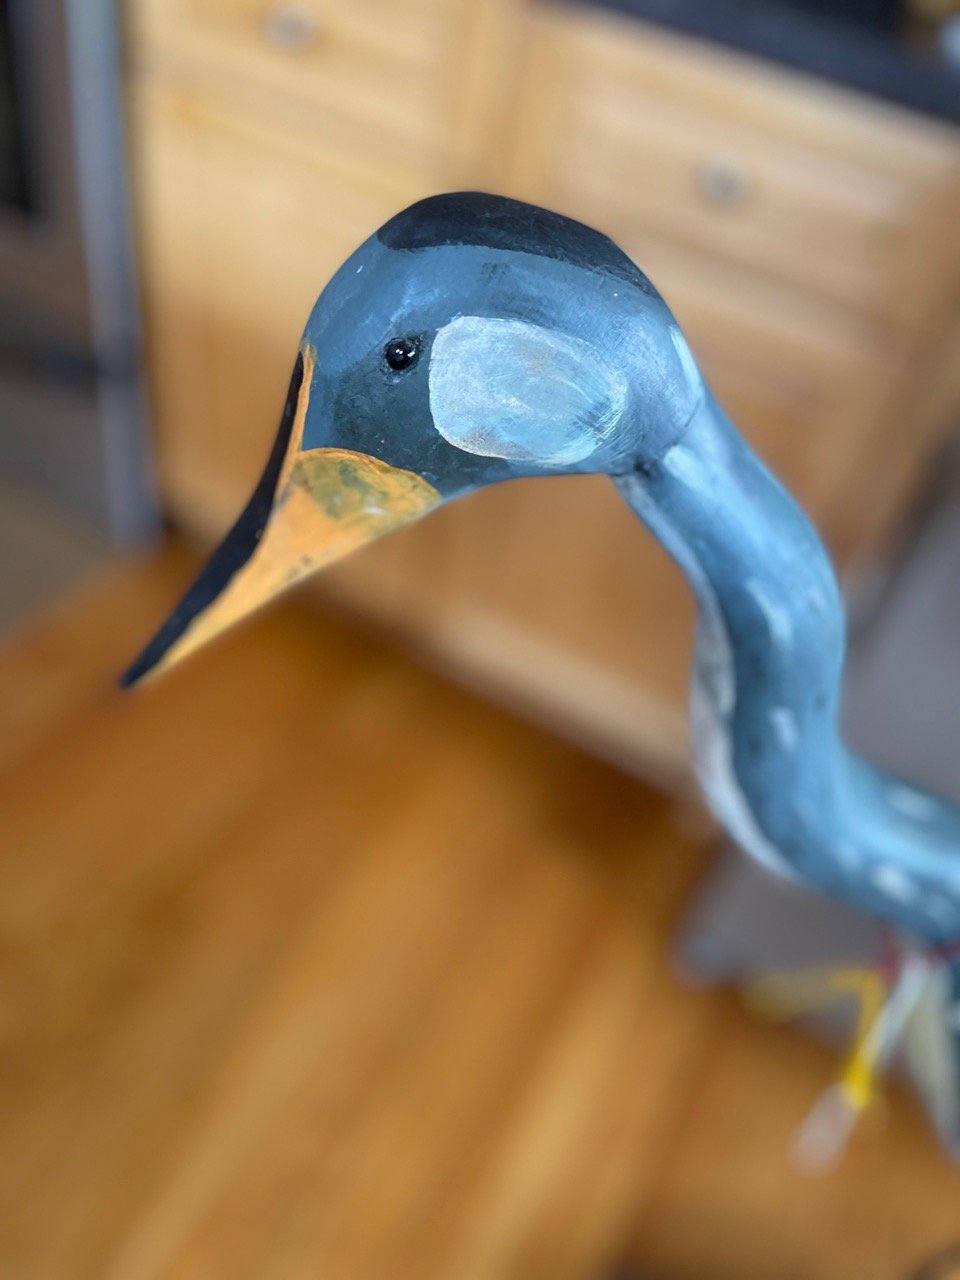
Getting out a bit by wearing a really good, well-fitting mask. Finding a way back to being in business at some point. Hit the local antique mall, one of the few locals left standing after pandemic shutdowns. We came across a neat piece in need of a bit of TLC and invited him home for tea and kintsugi.
At some point this carved and painted folk art heron had a run in with a Tudor dynastic failure or Alice’s Red Queen. The head was re-attached with love, but not skill… and with Super Glue. For the love of all that is Good in the World— DO NOT USE SUPER GLUE. It is overrated, brittle and impossible to remove from a lot of surfaces— hello E/R trip for fingertips or eyelashes…Cyanoacrylate is only super at being the basis for fuming for fingerprints in an sealed aquarium. If you know, you know and you are our peeps— and if you have done more than watched/read/podcasted True Crime and tried this at home? Welcome, tribe.

This really nifty carved bird needed careful surgery and re-gluing. We broke that g-darned brittle seal and picked out the plastic super glue, applied cellulose-based glue which melds with the fibers of the carving, expanding into a nice bond… WOOD glue— the hint is in the name, people...re-fit the head to the neck, and wound it with rubber bands for about 24 hours to hold the pressure seal until the glue was pretty set.

Assemble tools, prepare an area to work— covering vulnerable surfaces, please (We are looking at you, swipes of Super Glue permanently attached to the kitchen countertop by other occupants).

The repair is multi-stage process though. The super glue adhesion formed bubbles outside of repair line and removing it did pull out some wood fiber. We mixed some paint to begin a match. Letting the paint dry over the continuing repair adds to the effect of old paint already on the surface of the heron.
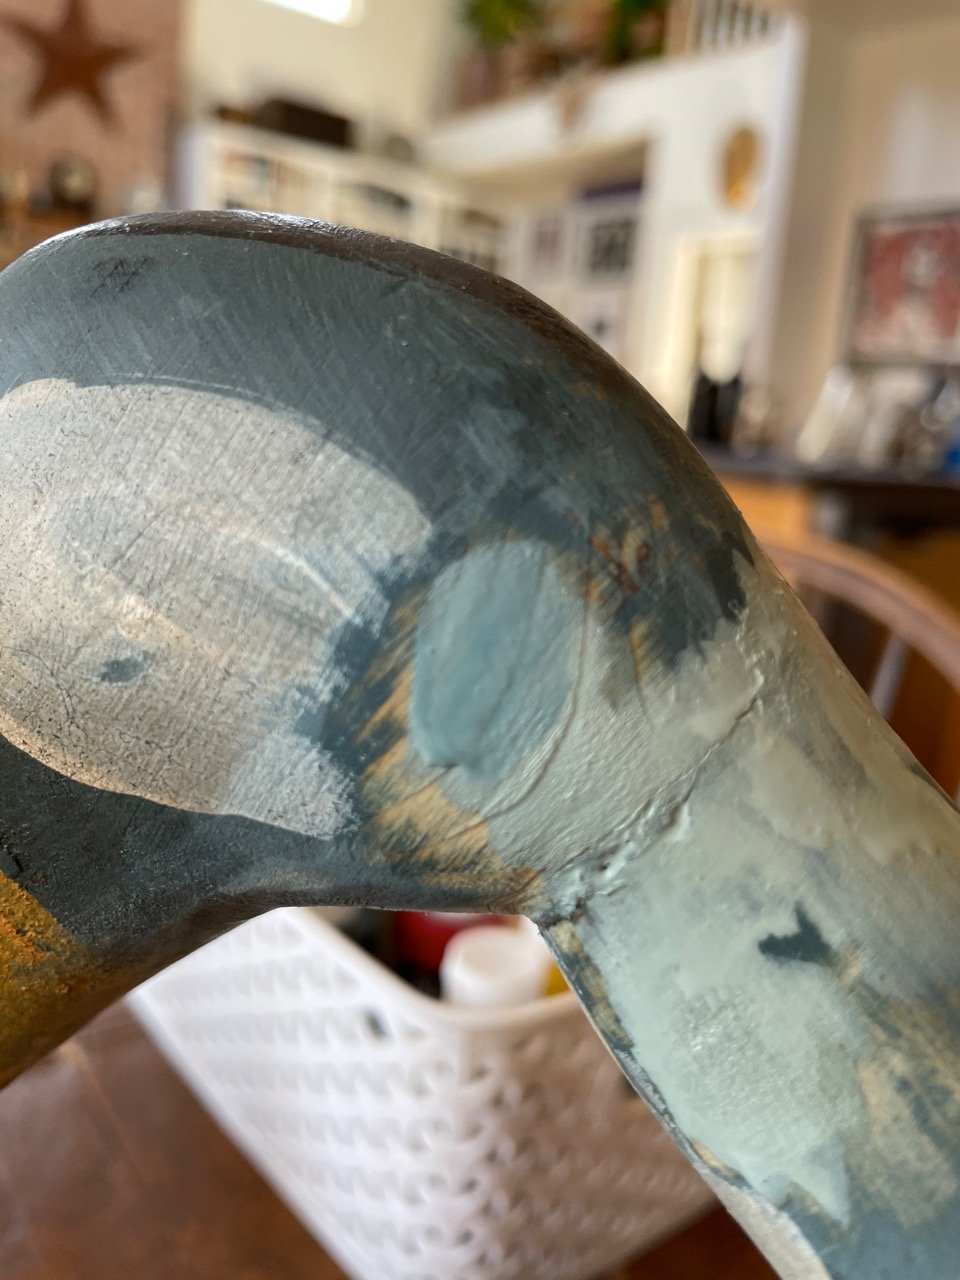

Cured wood glue and dry paint can be gently sanded with small grit sandpaper such that the “seam” is nearly seamless.

Mixing the color of the body of the bird. A house paint sample— flat latex has the chalky finish of paint that has been weathered.

The blue green was a little bright, so to grey down the color— add the opposite on the color wheel. Orange added to blue. We also added in a universal neutral umber brown which “ages” anything right down. Touched up a few of the markings so that it is tough to see that anything was ever amiss. But we did NOT do a conservation repair. Not trying to fool anyone here— just give new life to a deserving piece of art!
Valentine's, Pal O'Mine

Heart it or hate it, the day of Lurve is on the way. You might be celebrating Valentine’s or Galentine’s or Palentine’s, so we have a little “SHOW ME” sesh for making homemade cards that are really cute and truly easy.
Reuse papers from old envelopes or those stacks of patterns you got that time when you were going to organize all the photos and scrapbook the hell out of mementos… no? yes? no? We’ve given up that idea, too, friends. It’s a GOOD thing.
Take papers of different, related patterns and fold in half. Cut half-heartedly, ah… we mean cut half hearts… along the folded edge such that you end up with a little pile of heart shapes in different sizes and patterns.

If you have blank card stock, glue hearts on the fronts of cards. OR create your own cards and envelopes from trusty kraft paper.
We used bits and bobs from the whole process— parts of leftover paper and the negative space hearts left over from our first cuts, which, as we all know, are always the deepest.
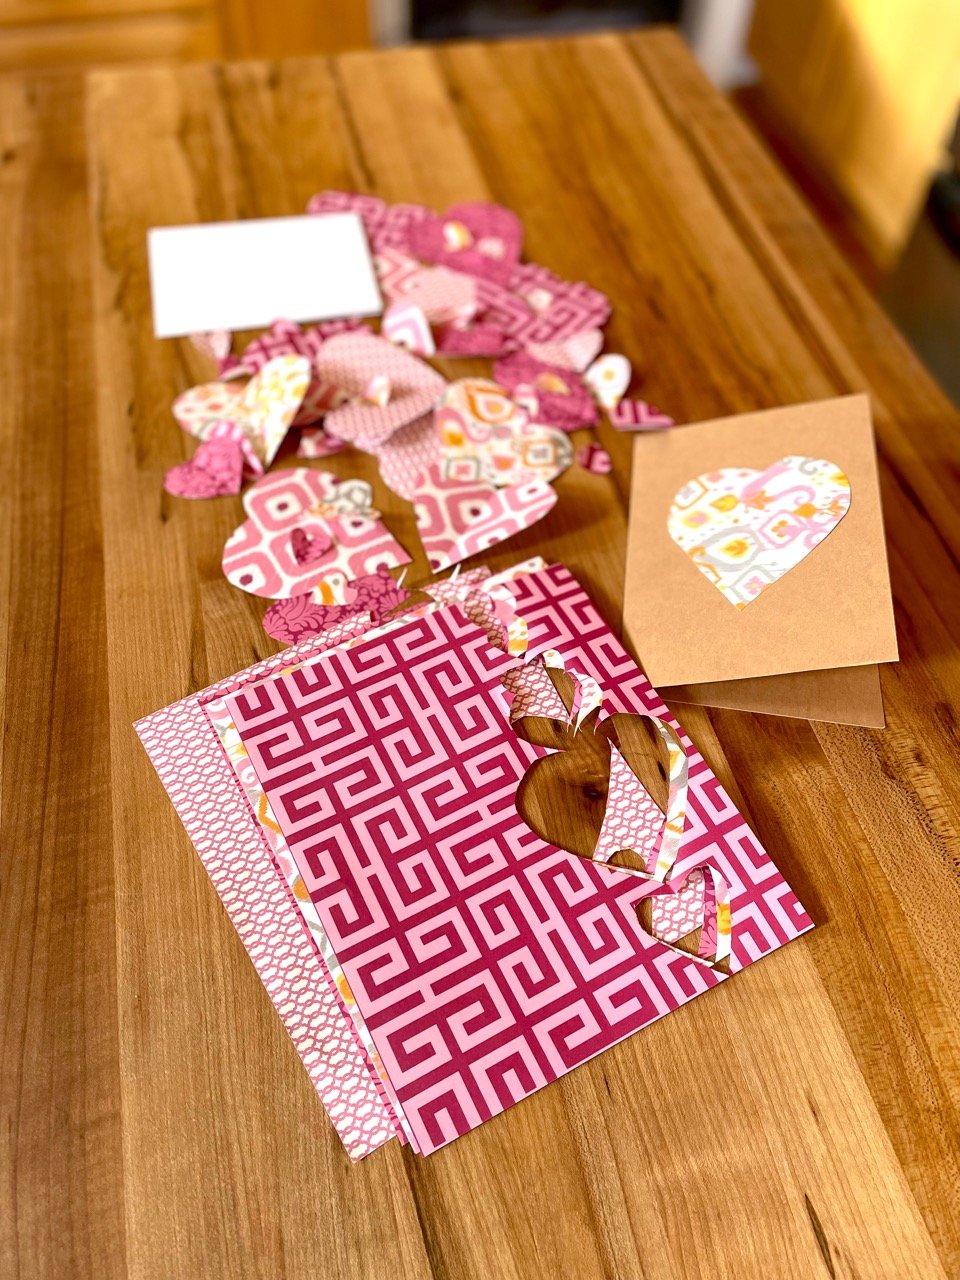
Have fun! Lay out hearts and pieces in different configurations, balancing patterns, values. It is A-Okay to just glue one heart on each card too! It’s the love you are sending, not the art.
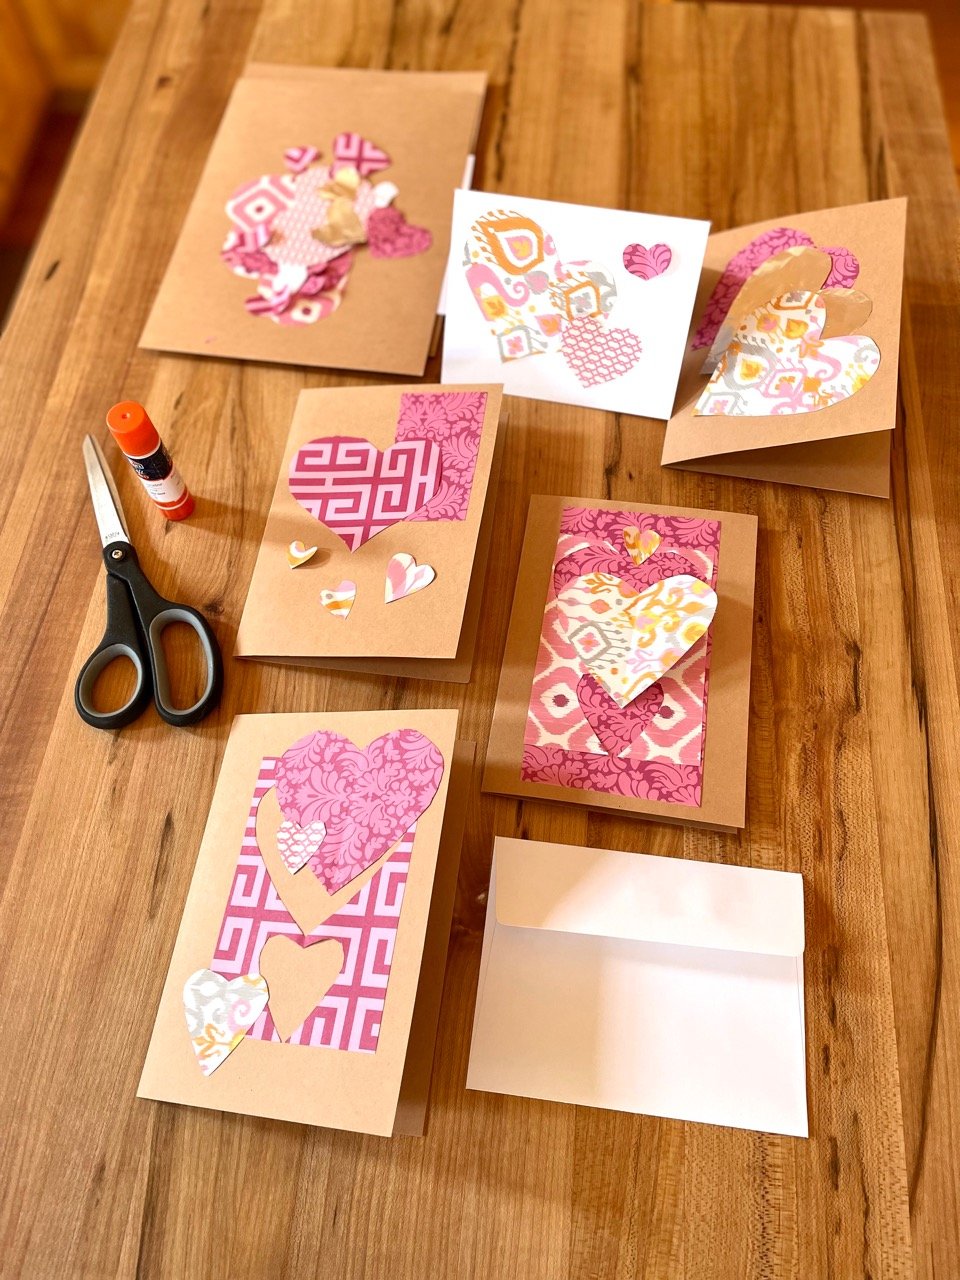
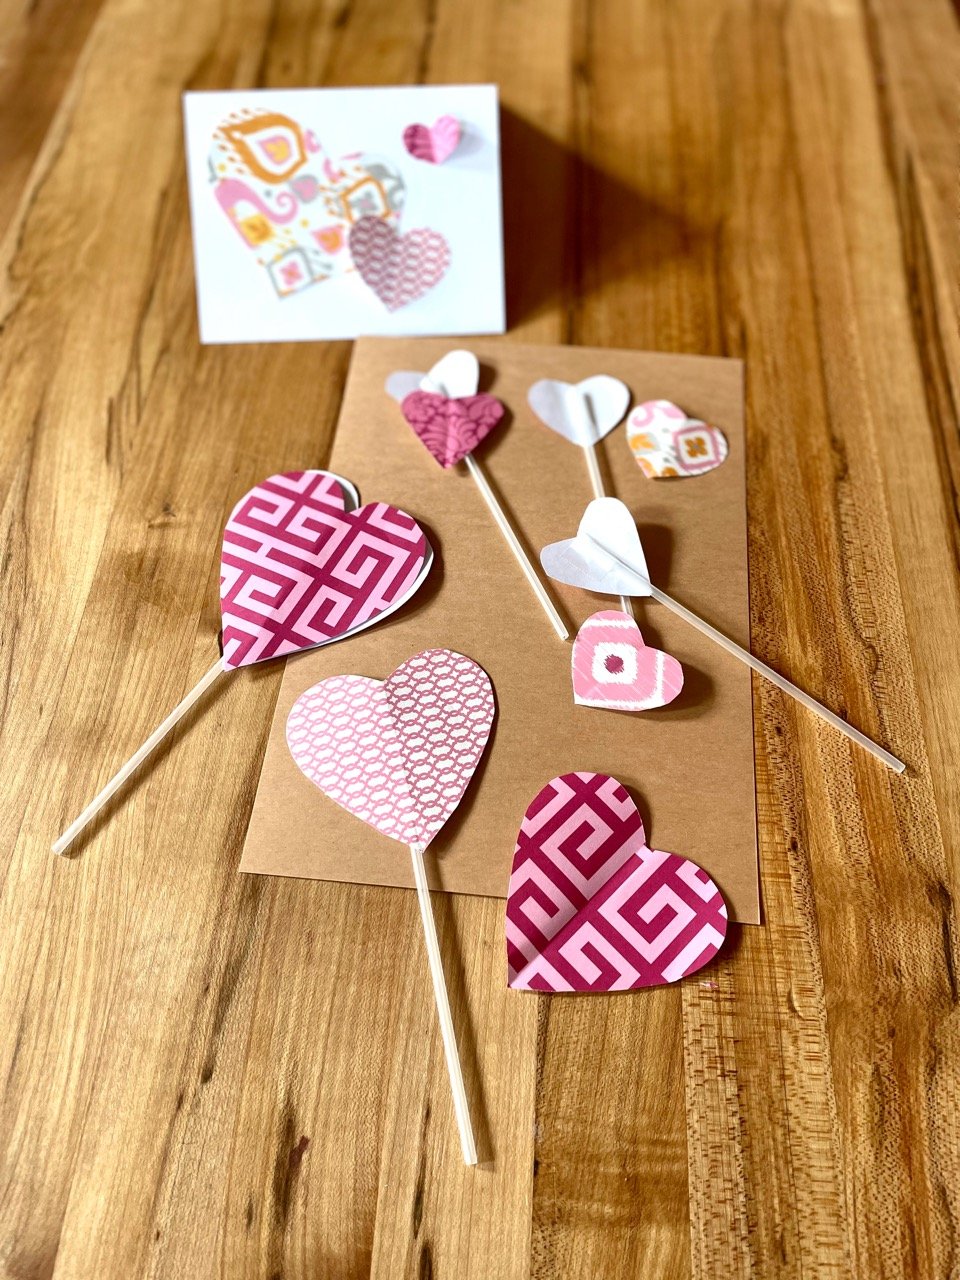
We are playing with 3-D pop-up effects as well. Pop-Up cards are a top trend…. but more on that in a bit.
Whatever you do, make sure you put on enough postage, especially if your envelope is a non-standard form. Last thing: S.W.A.K. (seal it with a lick, because a kiss won’t stick!) Lil bit gross, but goes right to the 9-year-old in you, doesn’t it?
odds and svens

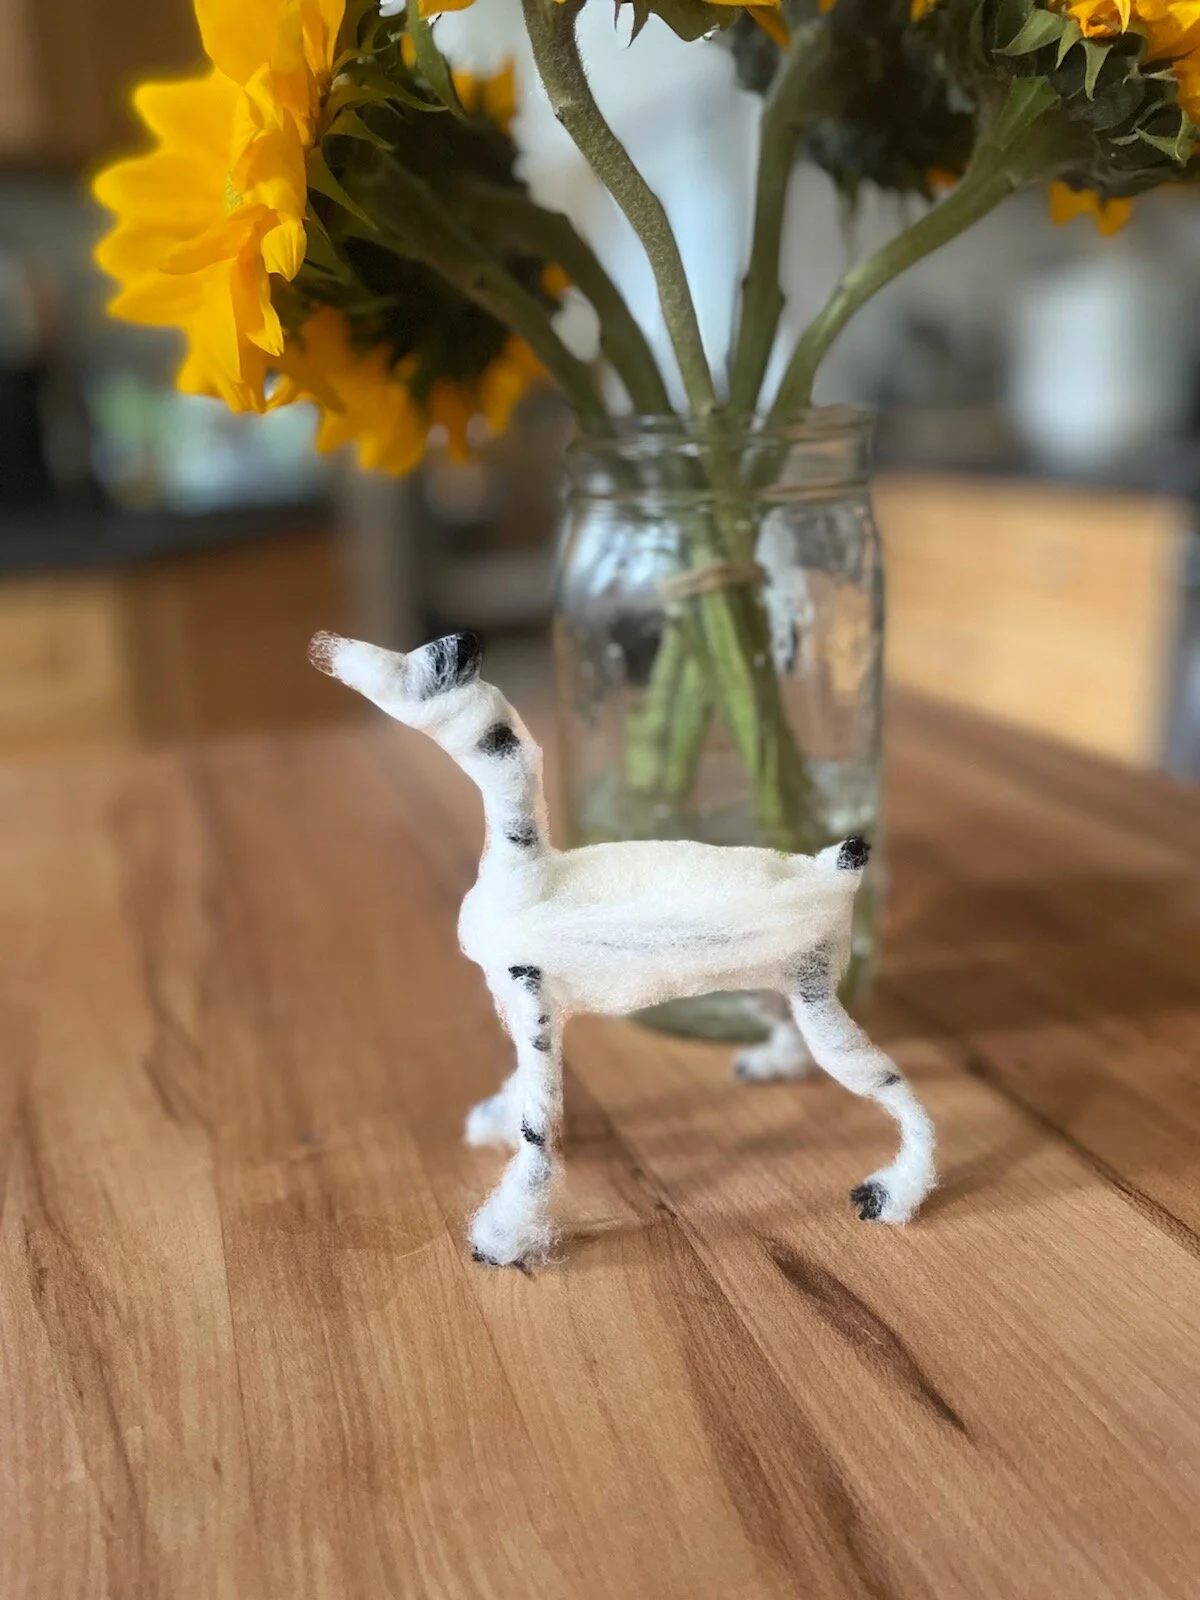
Before this fuzzy dude, lovingly dubbed “Sven,” headed home as a gift, he was a thrift store find in need of a little TLC.
A close-up shot shows the wonky neck and derpy expression of a deer in need of repair/upgrade. Kinda how we all strolled into 2022, amiright?

Here’s the $2 thrift store find in its original condition, along with wool roving that will be carded together to mix the same color of the body as we repair/upgrade the lil fella.


And finally, the finished reindeer retaining a comical expression, but with more colors and features — which, amazingly, just happens to be our wish for all our loves as we step into this new year. Look at that. XOXO
chocolate is the only true currency…
… in this bankrupt world. And because we are kitchen witches in love with the alchemy of chocolate, these are some of our favorite go-tos when putting together quick holiday treats.
Maybe you don’t have a lot of baking skills or time to spend. No problem. Buy commercial cookies and dip them in melted chocolate. Semi-sweet morsels in a microwave safe bowl can be melted in minute or two. Lightly coat an aluminum foil sheet with cooking spray or spread a thin layer of vegetable on foil or cookie sheet. Partially dip cookies in melted chocolate and place on treated sheet or pan to harden. For additional flavor or interest, sprinkle on chopped nuts, chopped candied ginger, or orange or tangerine zest while the chocolate is still soft.


The fastest fudge.
- 3 cups of semi sweet chocolate morsels (1 1/2 standard bags— leaving some left for melting to drizzle and plenty to eat while you mix up a batch of fudge)
- 1 14 oz can sweetened condensed milk (note: NOT evaporated milk— the syrupy super sweet stuff)
- 1-2 tsps vanilla extract
- pinch of salt
- butter, cooking spray, or parchment paper for pan for fudge mixture
Prepare pan for fudge mixture to rest in in for chilling.
Line an 8x8 baking pan or aluminum foil pan with parchment paper or foil. Soften butter and coat the bottom and 1/2 sides of foil or paper OR spray with cooking spray.
In a large sauce pan over VERY LOW heat, combine 14 oz of sweetened condensed milk and 3 cups of chocolate morsels. Add vanilla and a pinch of salt. Stir gently with a spatula or wooden spoon until morsels are all coated then let the mixture sit until morsels start to lose their form. Stir gently. Once most of the chocolate is melted, remove pan from heat and continue stirring until mixture is glossy and fudge-y. This takes just a couple minutes, so don’t walk away and have the prepared pan ready before beginning mixture.
Pour into prepared 8x8 pan and spread mixture gently with wooden spoon or spatula to all edges. Cover with cling wrap and chill for at least 1 hour before slicing.
Once chilled, lift out fudge block and slice squares to share!
We added pecans to the top of one batch— pressing them into the fudge while still warm just before chilling.
We stirred small marshmallows and chopped pecans into to the slightly cooled fudge mixture while it was still in the pan before pouring into the prepared foil for rocky road fudge.

Mint plaid nearly instant fudge... no candy thermometer required!
We created plaid peppermint icing for one batch by creating 3 colors and flavors of icing and drizzling them on in layers once the fudge was cool.
Plaid peppermint drizzle:
- white chocolate baking bar dived into thirds
- 1/4 cup semi sweet chocolate morsels
- butter: 1 TB per color
- peppermint or spearmint extract: 1 drop
- green food coloring: drop
Melt 1/3 of white chocolate baking bar with 1 TB of butter by microwaving in 10 second increments until all the bits are melted and stir easily. Baking bars take longer to melt than morsels.
Melt 1/4 cup semi sweet morsels in microwave with 1 TB of butter by microwaving in 10 second increments until all the bits are melted and stir easily.
For peppermint drizzle: melt 1/3 of white chocolate baking bar with 1 TB of butter by microwaving in 10 second increments until all the bits are melted and stir easily. Once stirred, add a scant drop of green food coloring and a drop of peppermint or spearmint extract, and stir until smooth.
Fill baggies with each of 3 flavors. Cut a small corner of each baggie in succession and drizzle small lines of each flavor over the cooled fudge block. Re-chill to set the icing before slicing.
Divide into pretty boxes, then spread chocolate joy to neighbors and friends!


Packaged and ready for delivery. Happy holidays — especially to all the hardworking elves who make it all possible!
truly doable last minute holiday gifts
Down to the wire with a few holiday gifts? Hello, you gorgeous normal human, you. We got you on this, hon. Here are some truly manageable presents for when you are down to the fa-la-laing g-darned wire.
Bake something from a box— but put it in a reusable container like this breakfast bread with added cranberries, orange zest, and —duly labeled for the allergy potential— nuts, delivered in a fluted baking dish (ready to re-gift this year or next).

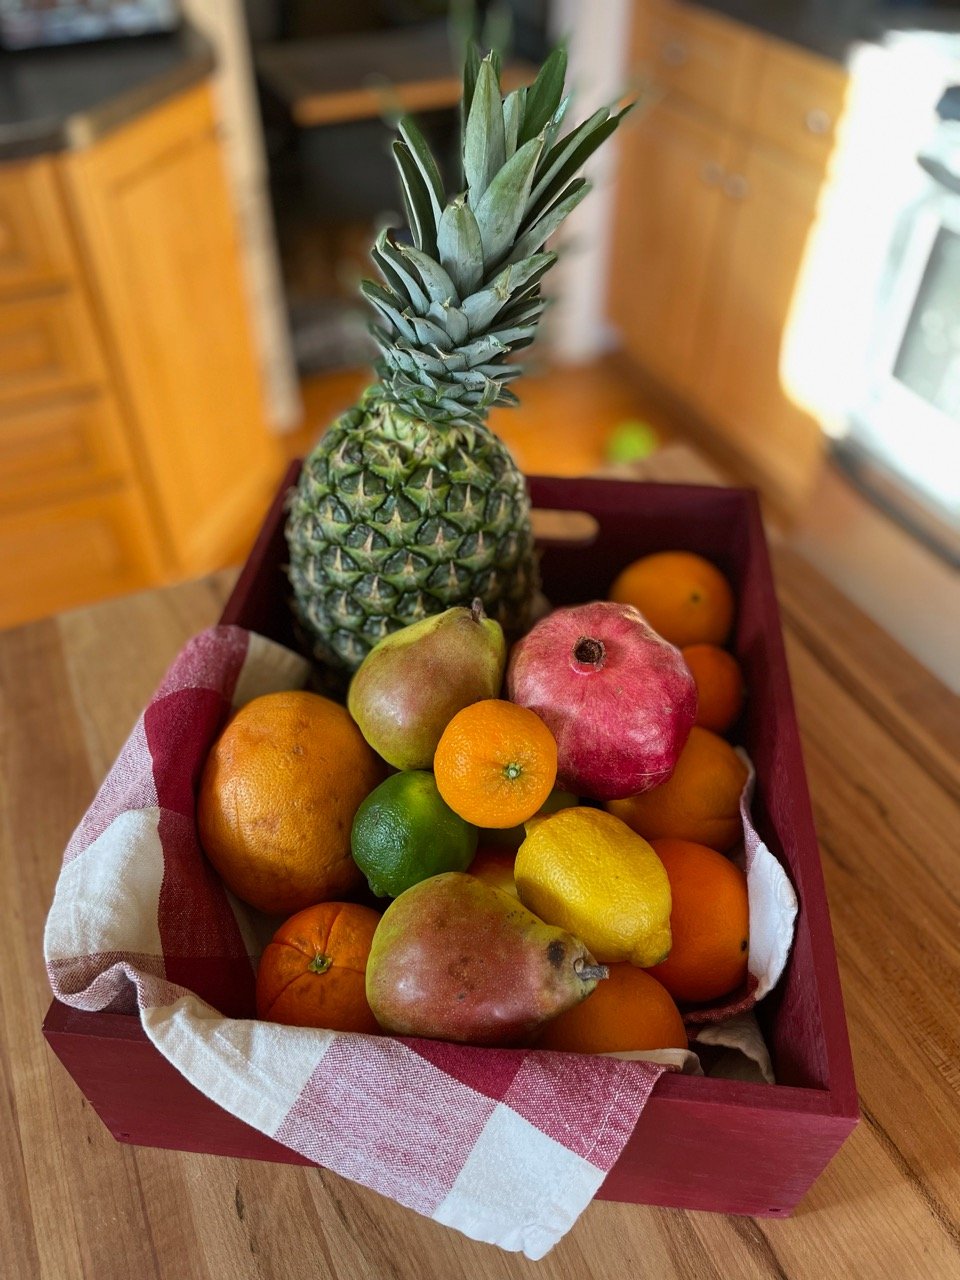
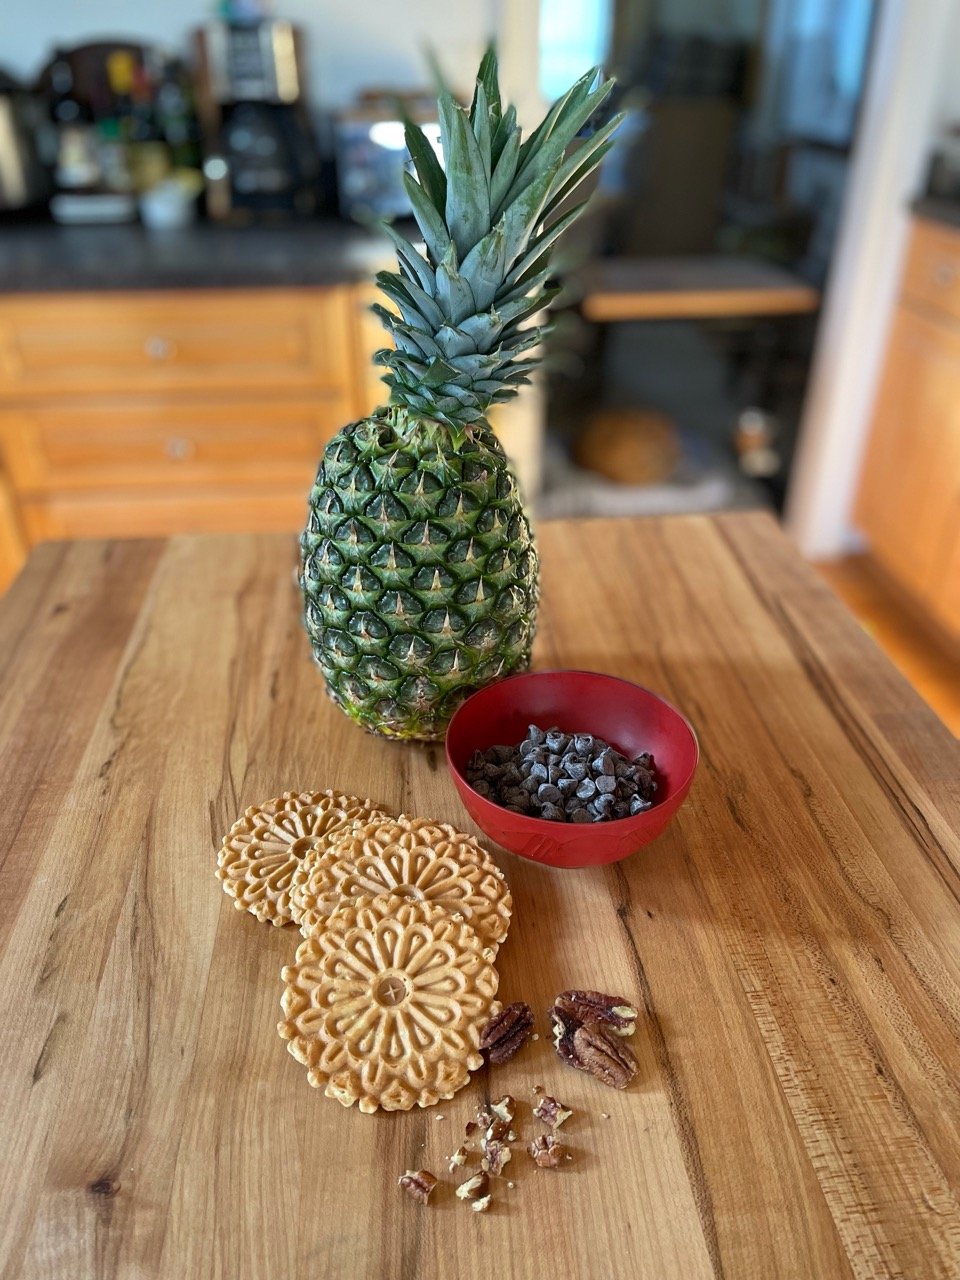
Ye Olde Fruit Bowl, Basket or Box is really a welcome gift for the classic ring and run. Fruit is pretty durable when placed on the porch as long as it is not below zero. Including lots of immune system boosting citrus is an especially good idea this year of all years. Make it extra EXTRA by adding a pineapple. Perfect for the background of your ZOOM interview, right RoomRater?
Don’t have baking skills or time to spend? Buy commercial cookies and dip them in melted chocolate. Semi-sweet morsels in a microwave safe bowl can be melted in minute or two. Lightly coat an aluminum foil sheet with cooking spray or spread a thin layer of vegetable on foil or cookie sheet. Partially dip cookies in melted chocolate and place on treated sheet or pan to harden. For additional flavor or interest, sprinkle on chopped nuts, chopped candied ginger, or orange or tangerine zest while the chocolate is still soft.
Print out or write up a certificate for future gardening sesh in person or Zoomalong. Include seed packets or planting plan with types of plants found nearby and where they can go.

Divide houseplants to share.

Some other suggestions that are always welcome:
Commit to print and inexpensively frame or digicube family or friend pictures, especially for someone who struggles with technology.
Send a donation to the animal shelter or food bank nearest to the gift recipient in their name— or to any charity you know that they hold dear.
Contract with a service to provide and essential service for a shut-in or family who is isolating… meals, cleaning, deliveries, yard services, mobile pet grooming are all good choices.
Pay for a subscription to an online newspaper or local print edition because supporting real journalism matters.
Handmade artwork or cards from kids or grandkids are always heartwarming, welcome surprises.
A mason jar filled with the dry ingredients from your favorite cookie recipe, along with instructions, and a simple bow or tag never disappoints.
hat ornament upgrade: gnome big deal

We are always learning, ya’ll. Sometimes the same lesson over and over! It took a bit of time to create the hat ornament from leftover and recycled materials. We have illustrations below on how to add on elements to create a jolly little gnome.

Perusing the wider webs, we saw so many examples. Gnomes are in! We saw some that were really adorable — and crazily “affordable.” Hard to resist absolutely adorable ornaments for $3. But the real costs are actually higher. Made us think we could not or would not work for such a low return on our time and materials, but somewhere someone has to do so.
Please, all, take a moment and contemplate how little workers everywhere are paid! Work towards changing the corporate approach to labor and supply.

Gather wool roving, cotton fluff, or any fuzzy bit for a gnome beard. Felt up wool roving into a ball for a nose, or use a standard commercially available pom pom.

Use tacky glue, white glue, or hot glue to secure the beard to the inside of the base of the yarn hat ornament, and the felted ball or pom pom to the front just above the beard. We secured the ball and beard with cord for extra stability. Then we added a nice Brooklyn groomed mustachio for extra panache! Go big or go Gnome, right?

clever no-sew hat ornament from leftovers

If you have learned one thing about us, it is that we are going to reuse the HELL out of the contents of our recycle bin— especially the cardboard tubes from toilet paper rolls. After all, they are a constantly renewing resource! We saw various posts for adorable hat ornaments made from leftover yarn or string and parts of toilet roll tubes and thought we would give it a go.
Gather materials:
yarn or string— preferably thick enough to grasp easily and cover the cardboard
scissors
toilet roll tube
some bit of time— this takes more time than it looks!

Cut toilet roll tube into approx 1-inch sections. Cut lengths of yarn into 10-11 inch segments.

Fold lengths of string or yarn in half, then wrap the loop formed at the halfway point over the top of the cut section of toilet roll tube. Slip two ends of yarn or string through the loop such that the knot formed snugs up against the two tails at the base of the tube section. This is called a “Larks Head Knot.” Looping the loop over the back and pulling the tails through allows the two sections to lie flat in closed lines. If the knot is tied incorrectly, the lines will be divided and open. Correct ties are shown on the left of the tube. An incorrect tie is illustrated on the left of the picture above.

Correct formation of the Larks Head Knot for this project shown above!
Using a approximately equal lengths of yarn or string, continue tying knots until the tube is completely and snuggly covered.
Once the the tube is completely covered, you either have the beginning of Cthulu, which is a great way to go, if you have a mind… or the next part to the hat.
Hat?
Ok.
Push all the lengths of yarn through the tube, out the top (opposite the knots) and straighten. We know… Cthulu STILL a possibility! But, onwards.

With a length of matching string or yarn securely tie the gathered spaghetti monster…er… strands into a cinched area about hat height from the toilet roll tube brim.

We wrapped twice securing with a non-slip knot like a square knot (right strand over left, then left strand over right).

Using cotton balls, cotton salvaged from medicine bottles, or wool roving, stuff the inside of the hat form.

Trim the top strands to a pom pom or tassel shape. Add a bit of string or twine as hanger.

Adorable lil hat on the tree— squeeeee!

fresh evergreen wreath part 2: putting it all together
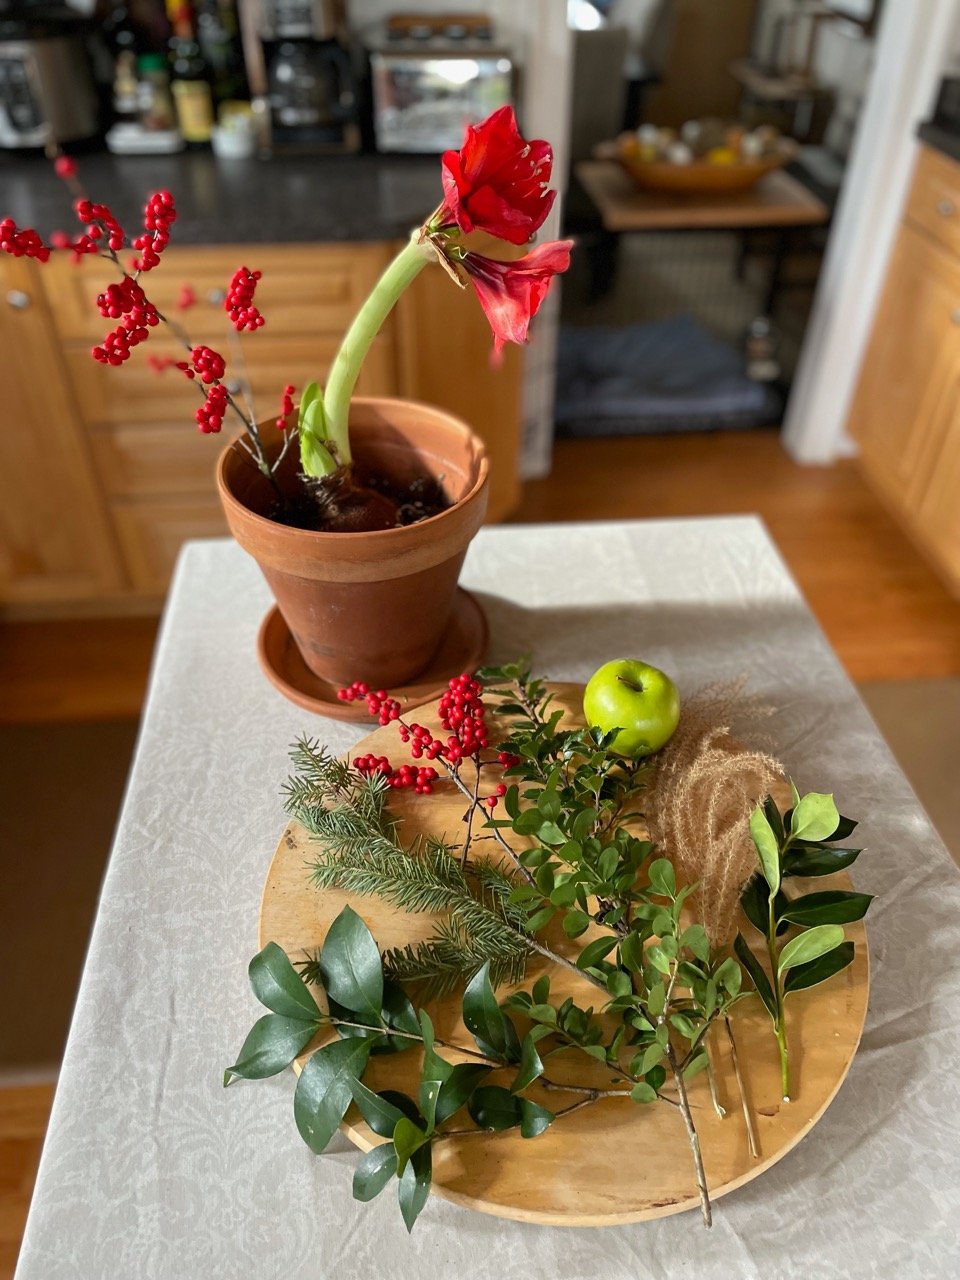
Spend some time with the wreath base you want to amend and decorate— look at it from every angle to assess where judicious editing of wild ass branch construction will help with overall balance. Truly, it is a rare piece that comes into the workshop that doesn’t need a little grooming!

Trim leggy branches and anything that looks wilty or sad, clip out areas that are overrepresented, and add in where branches are thin. A turntable or lazy susan on the work surface helps with this process immensely. Once the base is in overall good shape, turn it over and put a strong holder on the back— preferably wire and preferably in a contrasting color to the wreath itself so it is easy to locate. Do this BEFORE you spend an enormous amount of time wiring and gluing potentially crushable decor to the the front of the wreath. Trust.
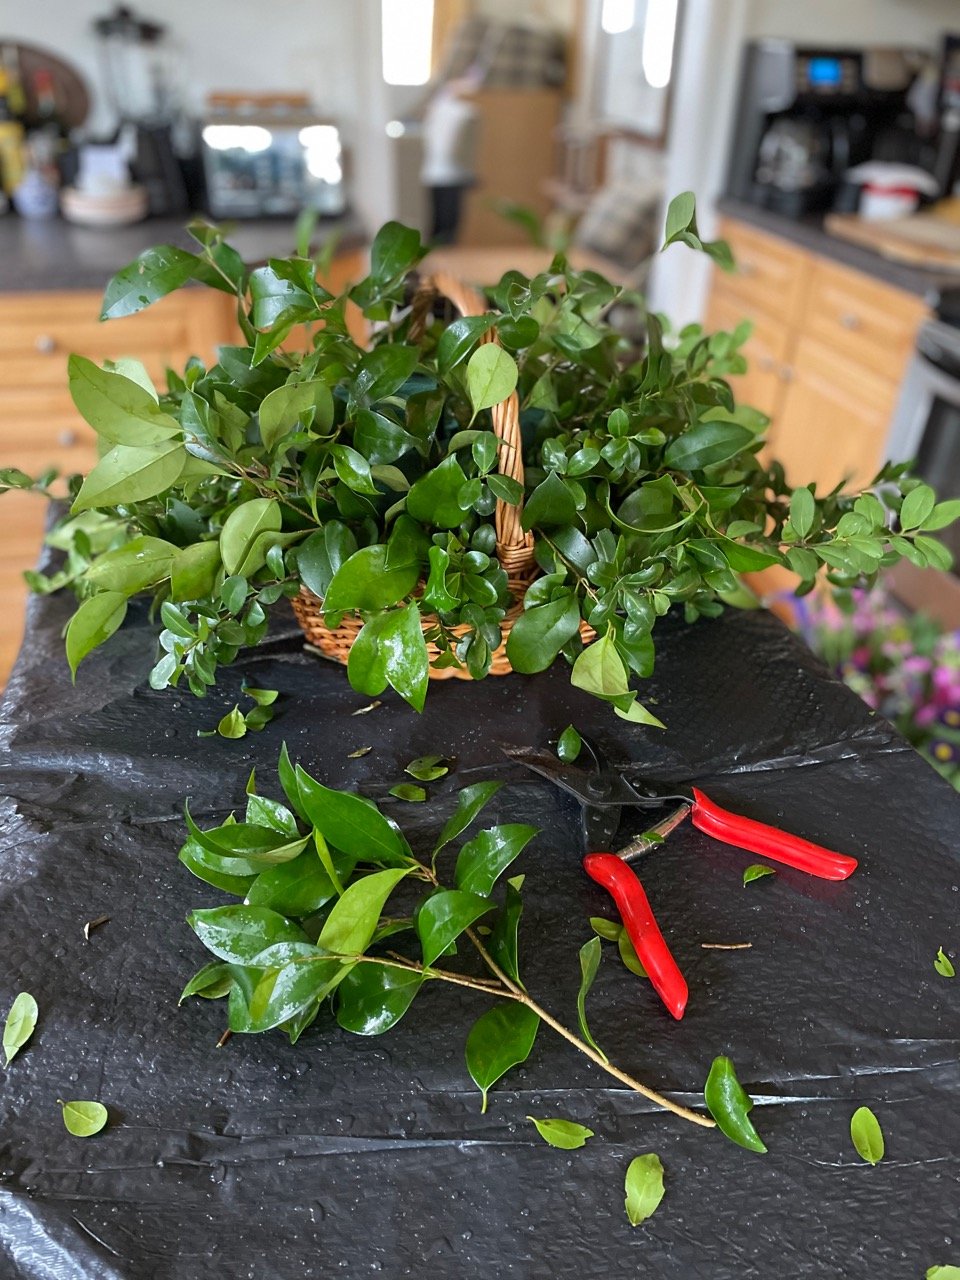
Assemble the greens to amend the basic base. We suggest picking greens a day or two ahead of wreath production, placing the cut branches into water and allowing the greens to harden off —or condition— before use.

Then pick, wire, or glue branches of greens around the whole wreath until it is full and fluffy.

We customize wreath orders to suit their new homes. Have fun and be creative with elements on your own!
These are ready to ship— same base, completely different looks:


ANY wreath base benefits from attention to balance. As we can attest when we play: Faux or No? on a front door.

fresh evergreen wreath part 1: prepping material
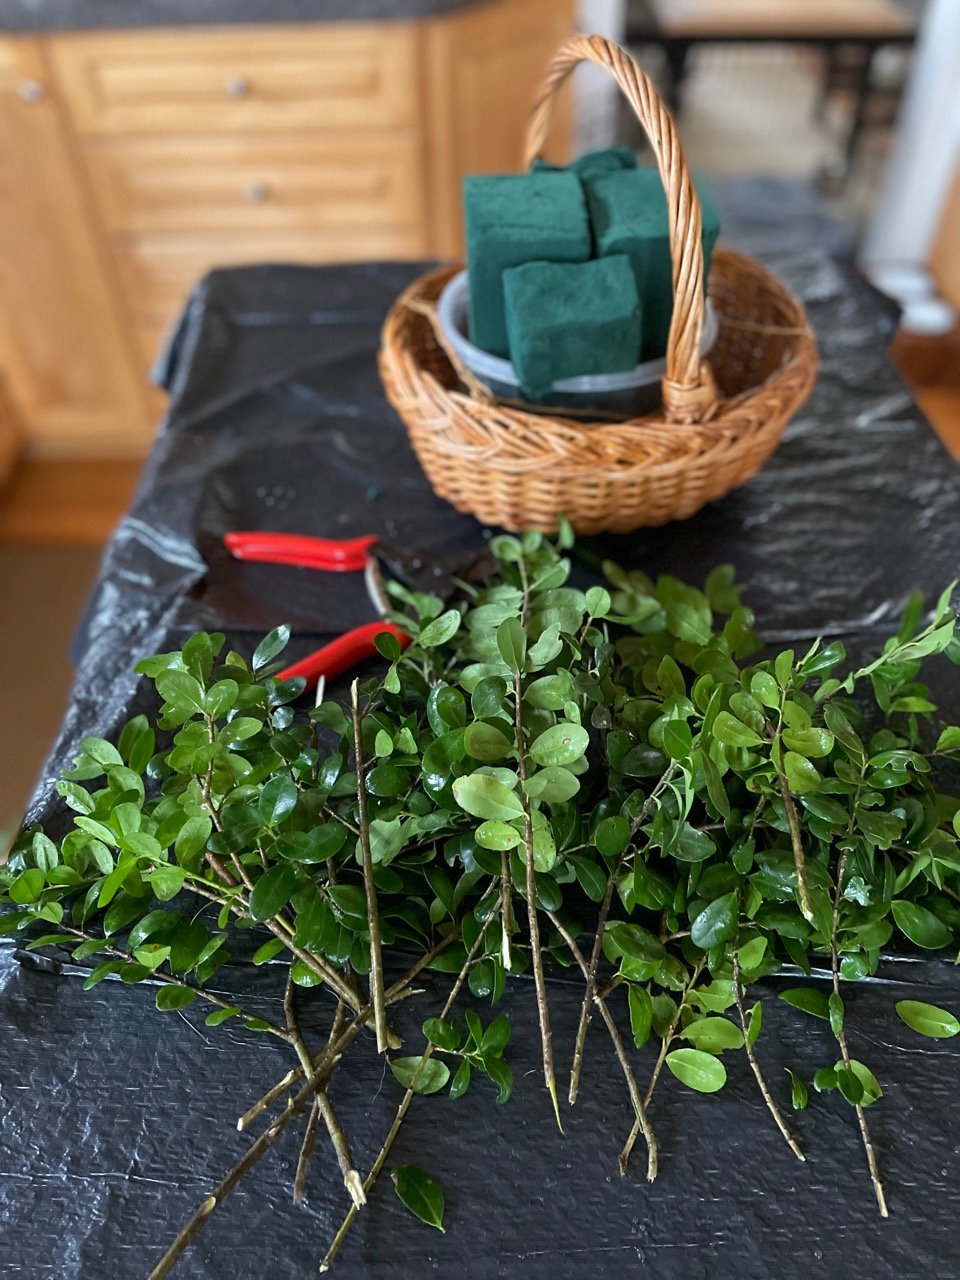
As with any fresh plant material construction, beginning an evergreen holiday wreath should begin with good preparation. Set up work area, preferably with a work surface tall enough to prevent bending down to table level. Unless you are working in a dedicated workshop, securely cover surfaces with waterproof material such as plastic drop cloths or large garbage bags. A turntable or lazy susan is a great way to rotate any arrangement project, but is especially helpful in working each part of a wreath equally.
It is very possible to use fresh cut evergreen branches and wire to create your own wreath, but with so many things vying for attention at this time of year, we happily recommend using a purchased wreath base — they are widely available at garden centers and grocery stores.

We look for springy, fresh branches on these wreaths and a minimum of falling needles. Once home, we dunk the whole thing down into a tub of water and let the branches absorb moisture. After removing the base and allowing a day to dry, we treat the base with a anti-dessicating spray such as the commercially available brand, Wilt Pruf, or similar, generously spraying BOTH sides of the wreath base and allowing it dry. This one step, though not essential, makes a world of difference for evergreens lasting longer, staying prettier, in winters that are becoming ever warmer.
We like to tidy up the purchased wreath bases with judicious trimming and balancing of branches before any decoration begins.
When your work area is set up, the wreath base is ready, gather together your tools of the trade: pruners, snips, wire cutters, scissors.

Don’t forget additional items which help avoid attachment issues: wooden floral picks, green florist wire, twine, and glue gun with plenty of glue sticks.
Adding a pick onto almost any element in a wreath provides extra structure for securely attaching to the evergreen branches. Running wire securely through or around cones, fresh fruit, or the tops of ornaments, all help the embarrassment of a wreath yeeting its dec onto unsuspecting guests at the front door.
We pick fresh evergreen elements to add to a commercial wreath. Varying the colors, leaf types, and texture adds to visual interest. We use cut-from-the-yard or bought at the garden center elements that have had a day to sit in containers of cool water so they are conditioned (hardened off from a freshly cut) and ready to insert.
Once the base is tidied and ready to decorate, assemble materials to attach. Start with bundles of found or purchased greens wired on picks and then glued at the base. Leave your newly gorgeous green base as is— OR go for something fun and unusual! Eschew the expected! Leave off the ribbon entirely— be bold!
Feathers, twigs, leaves, nuts, grasses...

Varying the sizes or types of similar items is great way to add pleasing harmony.
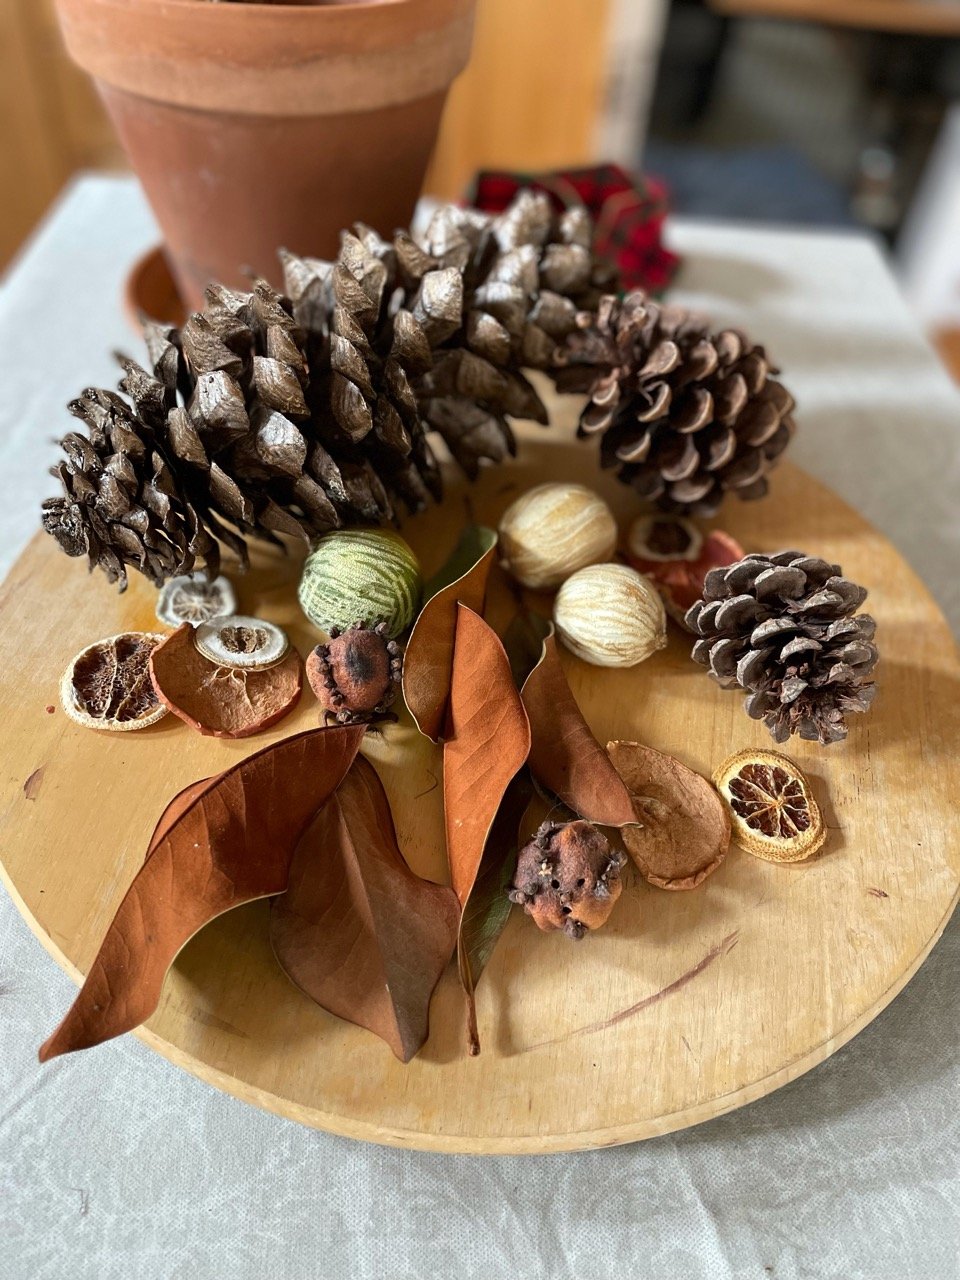
Wreath dec needn’t be traditional cones, fruits etc. Add a variety of elements tailor-made to your style! Avoid the cookie cutter look by adding in actual cookie cutters, ornaments, beads, baubles, spools of thread, faux fruit or berries, tiny tools — whatever fills out the former store bought wreath with your own personal flair. Whatever you add, just make sure it is firmly attached to last the season!!

recycle material turkey centerpiece

Friendsgiving, Black Friday Eve, Thanksalotapalooza…. however you are celebrating, it is fun to pay tribute to the bird most associated with the fourth Thursday in November, though turkey may or may not have been on the menu for the storied meal shared by the Plymouth Colonists and Pilgrims and the Wampanoag people indigenous to the area. Novelist Sara Josepha Hale popularized the idea of turkey as the main dish for Thanksgiving in the 1820’s with a campaign to make Thanksgiving a national holiday. We are presenting a budget friendly turkey for the center of the table that even your vegan friends and family will approve. Raiding the recycling, we have put together a step by step for a life-size gobbler— no brining, no basting, and no baking required!
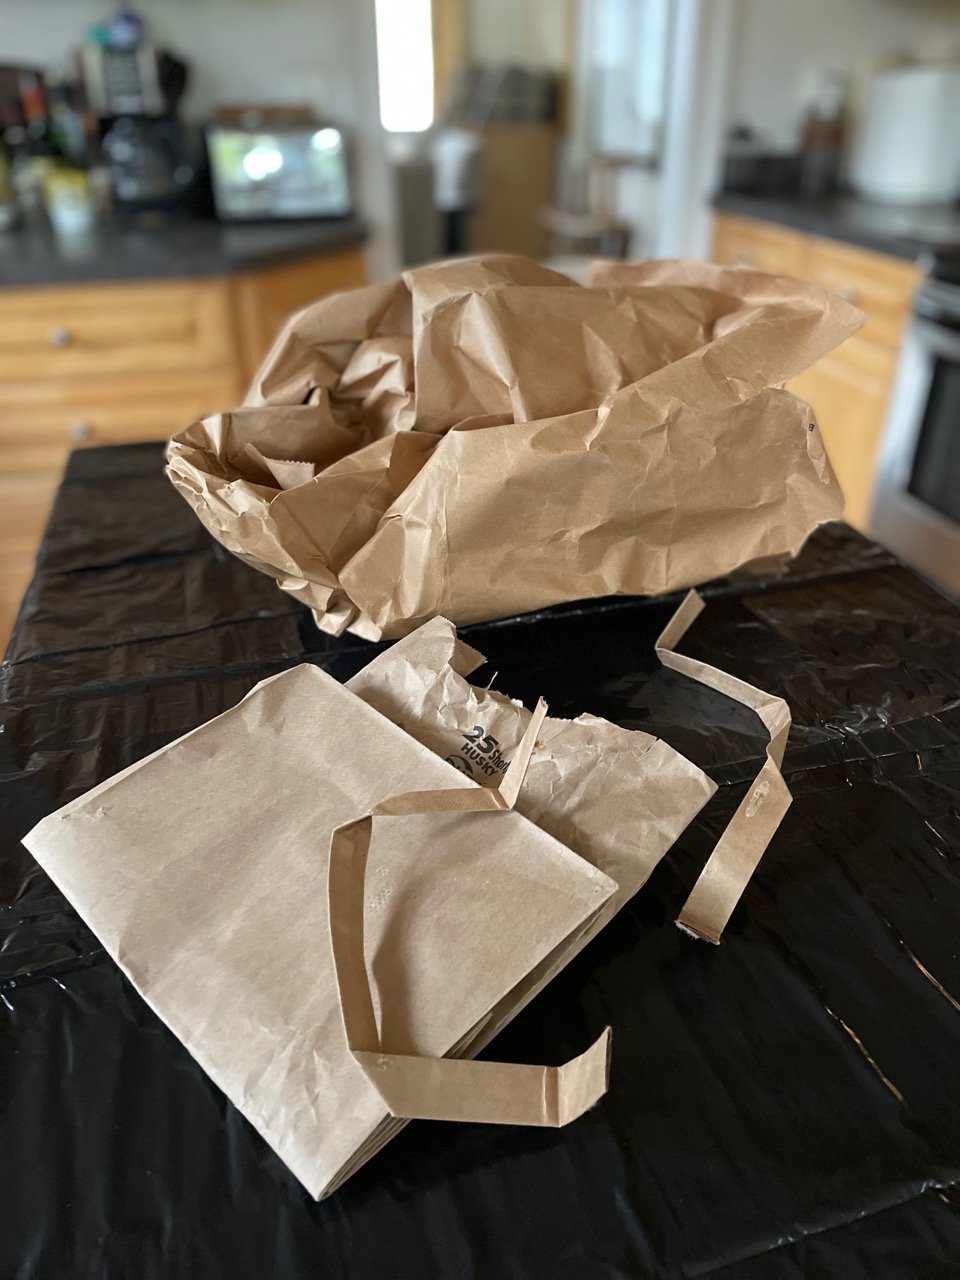
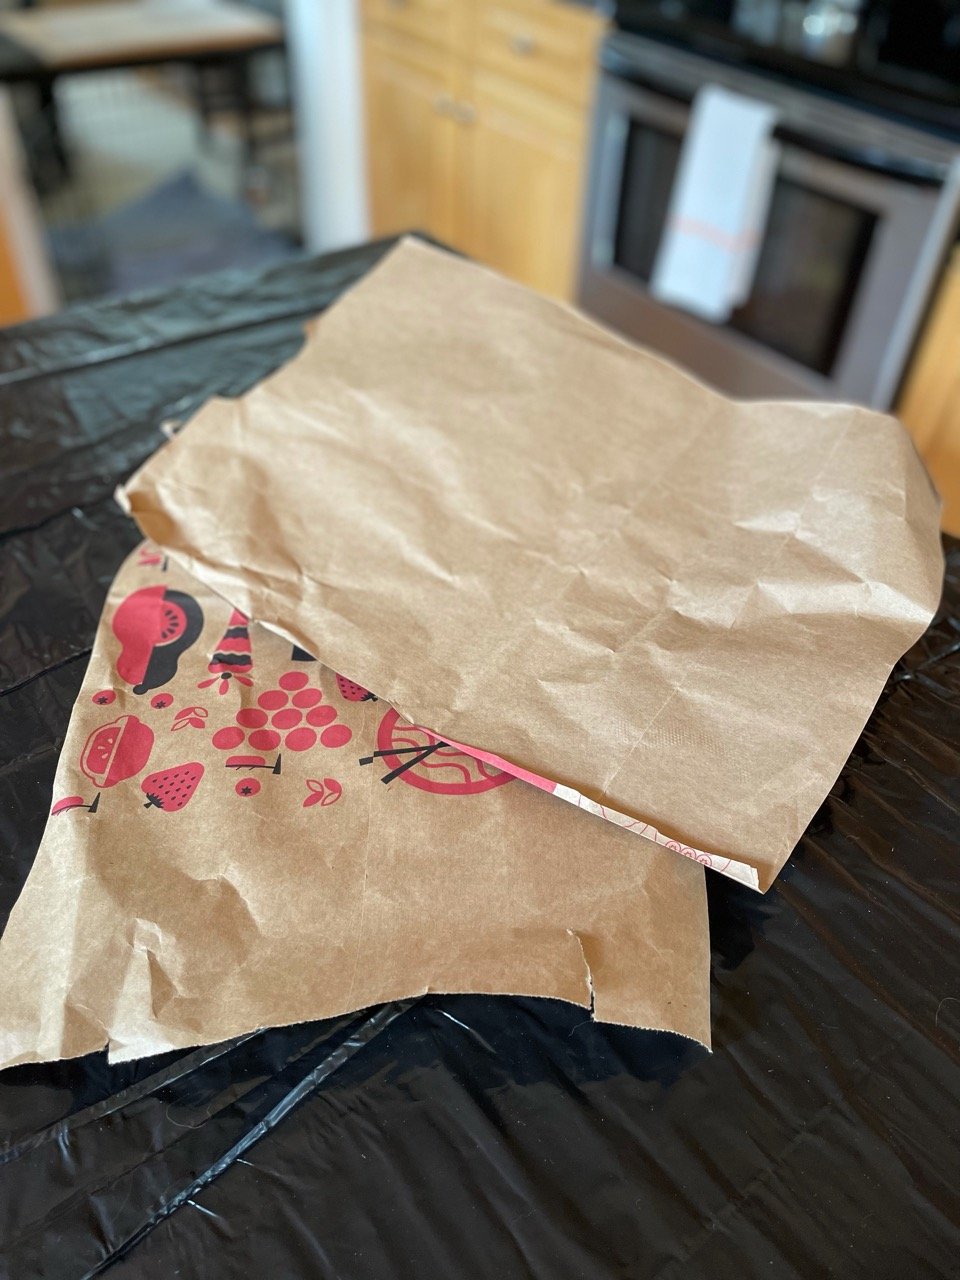
You will need 3-4 regular paper grocery bags, kraft paper or kraft paper used for packing, toilet paper rolls and/or paper towel rolls, tape, and glue. A stapler helps expedite the construction — can be used as temporary holds while glue dries and removed later or hidden inside paper folds.
Starting with a kraft paper grocery bag, turn it inside out if it has any printing and puff it out to form the basis of the turkey body.
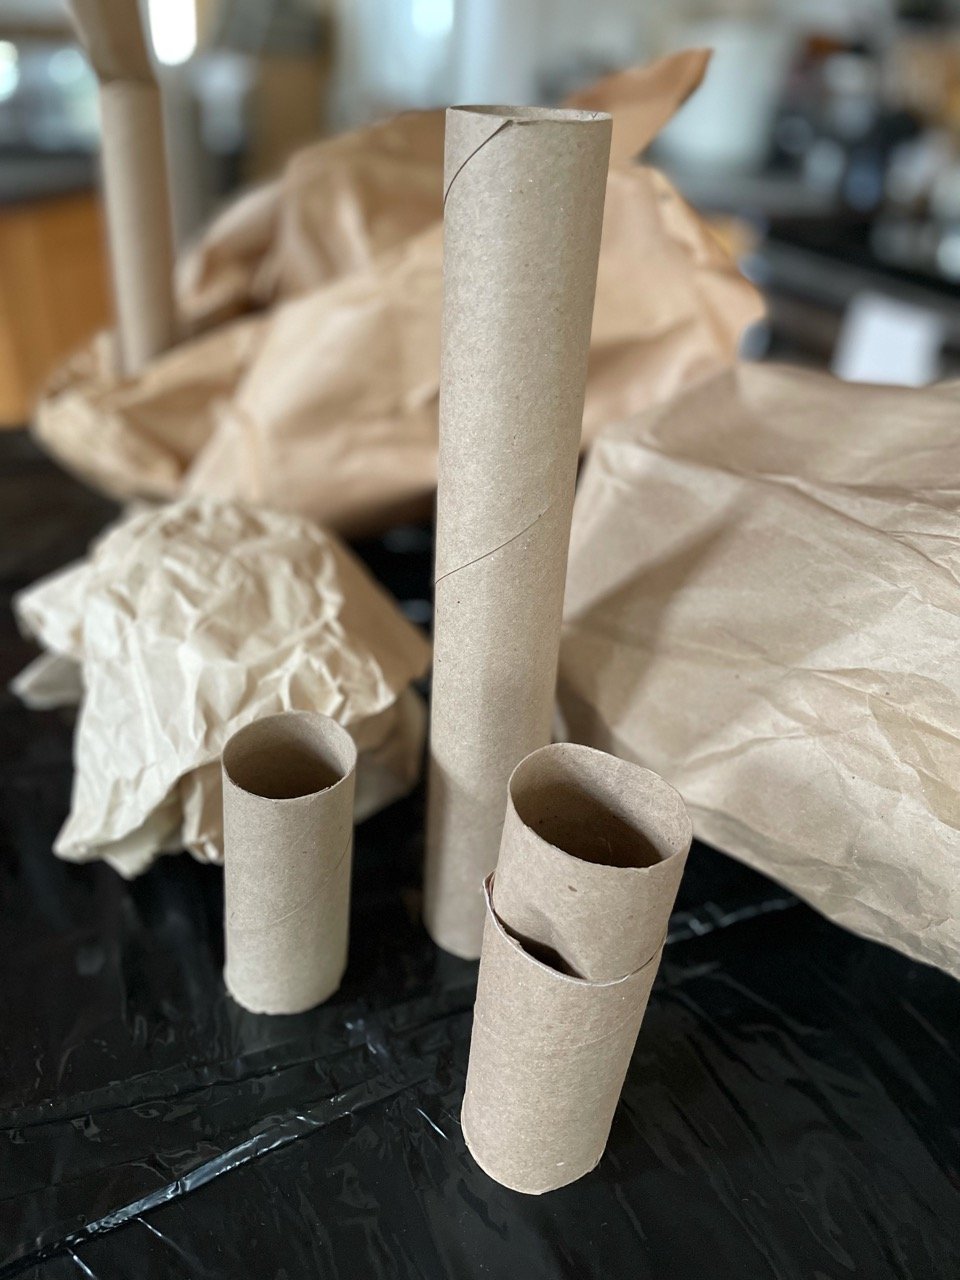
Using the paper towel rolls, scrunch the bottom of one to fit inside the body of another and another to form a support or armature for the turkey’s head and neck.

Checking length of the future tail against grocery bag body, cut to same length then accordion pleat or fold kraft paper or packing paper.

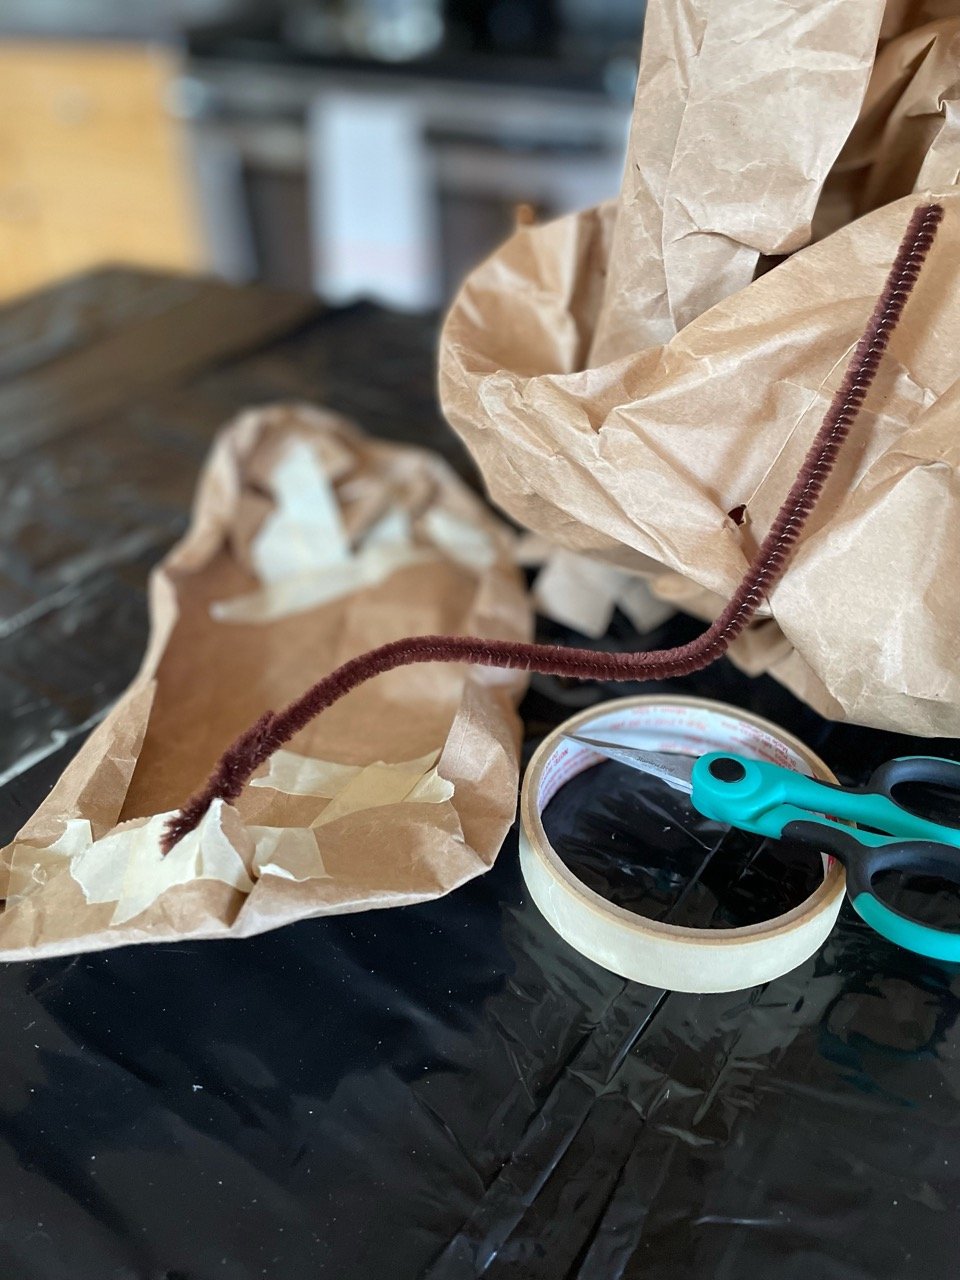
Gather pleated paper together tightly and secure with twine, string, or wire. We used a chenille stem.

Create a hole in the front of the grocery bag turkey body just large enough to pass the paper roll neck/head assembly through. We split the bottom into four flaps and folded them outwards to provide more stability.
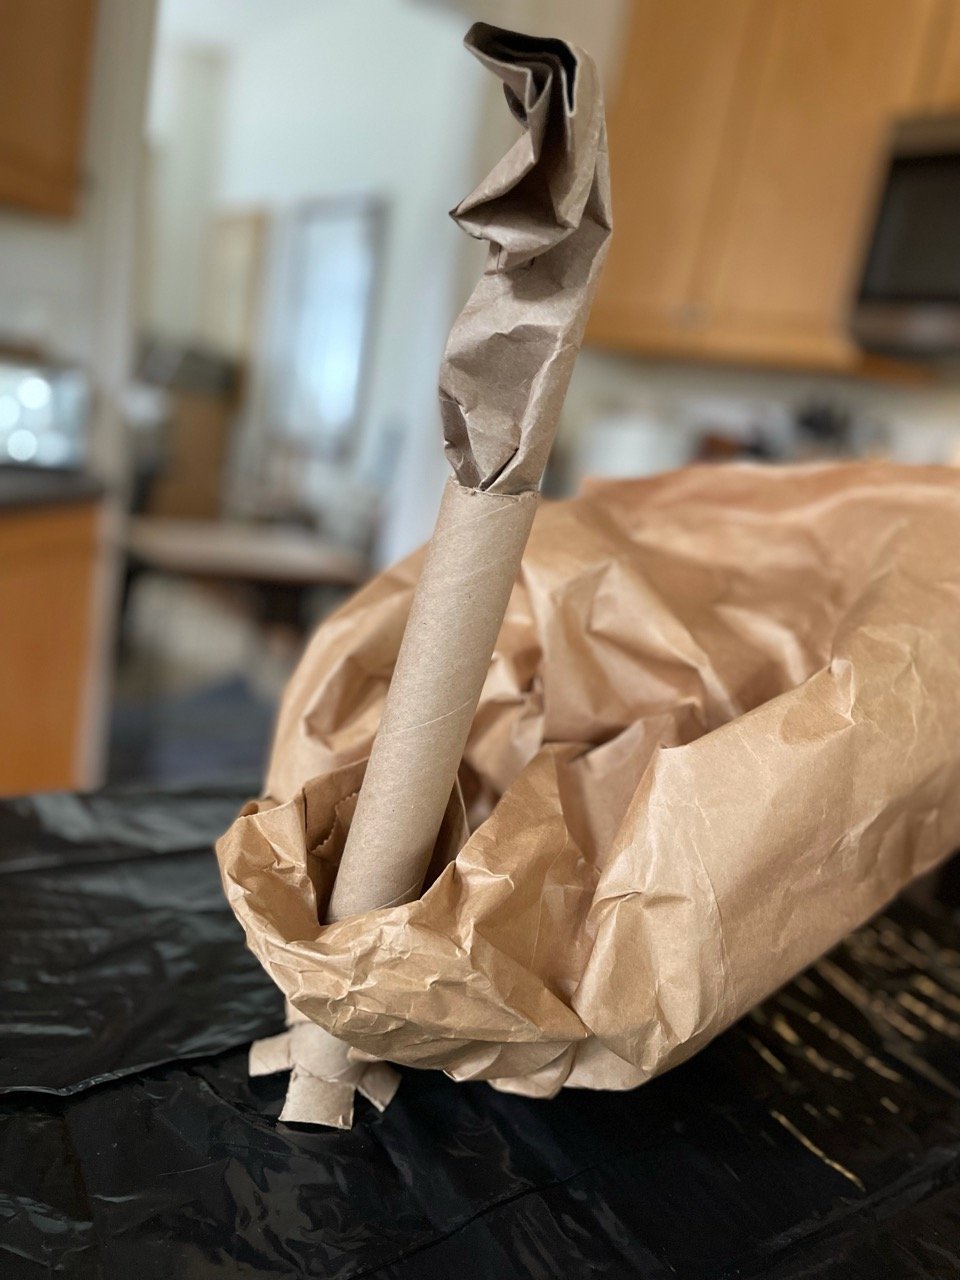
Cutting basic kraft grocery bags apart provides working material for wrapping the neck and head, crafting wings and stuffing the body.
We wrapped the neck assembly with kraft paper, leaving excess at the top to form the head. Crush shape the head into an almond shape with a pinched point to make a beak.
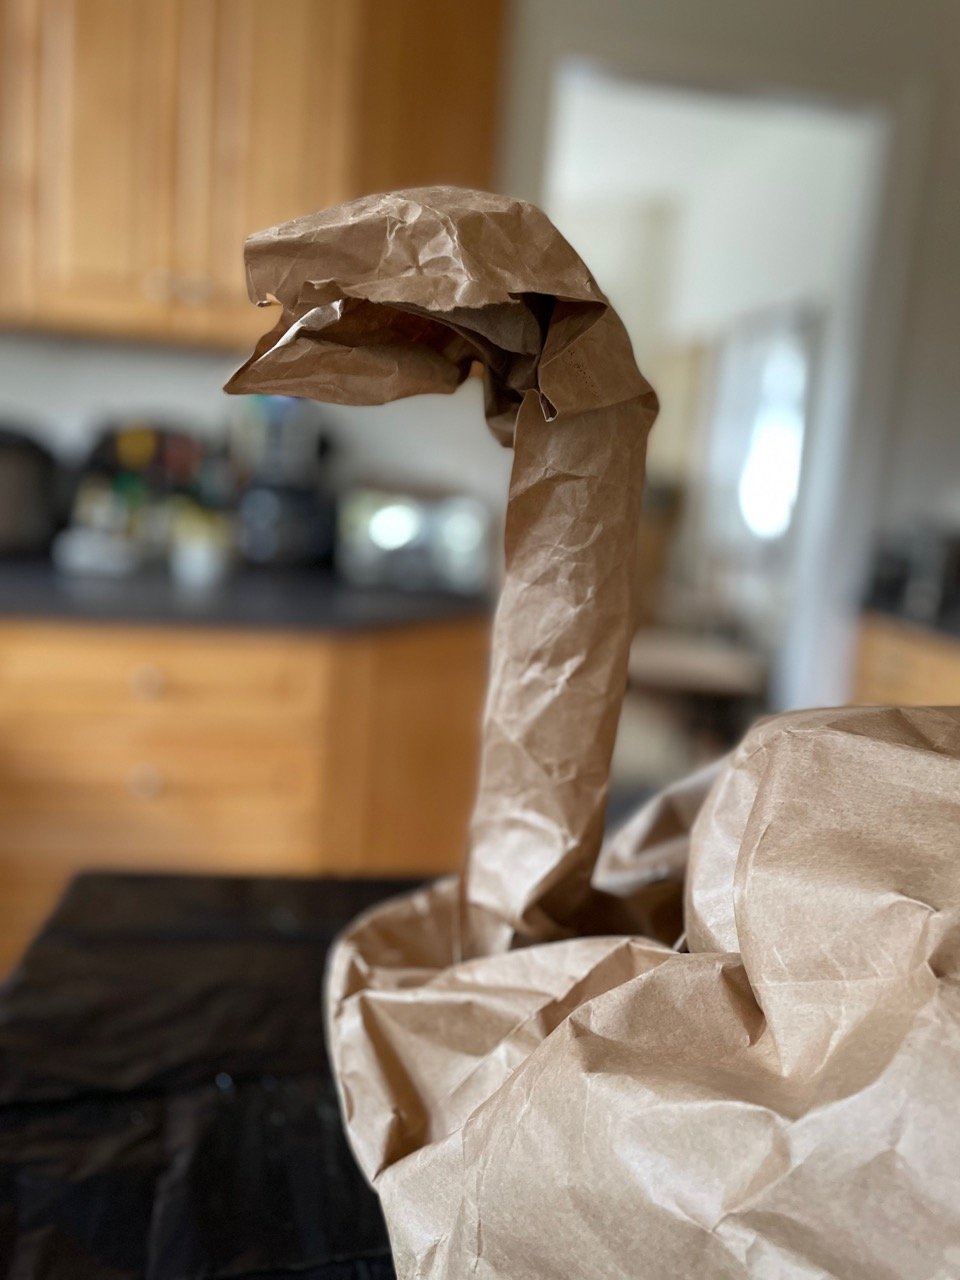
Once the head is in a basic bird shape, glue down folds in the paper to refine. We used chenille stems to stabilize the head until the glue dried.


Taking a cut out side of a kraft paper bag, crush curve the edges to form an oval to attach across the front of the turkey to build out the breast and help hide the mechanics of the paper tube at the bottom of the neck. Tape down the crush rolled edges of the oval. We reinforced spots on each edges of the oval, made an opening, and ran a chenille stem from side to side behind the paper roll neck so the wire can draw tight to be stable.
In the this photo, you can also see the twist of paper added, draped over the beak, to form the distinctive turkey wattle.

Turning to the rear of the turkey, we balled up heavy kraft paper give the body substance, and added pillars of toilet roll paper columns to increase stability in the interior.

Splay out the fans of the accordion pleated paper to form the tail. It helps the paper to stand to attach edges of individual fans together. We made two layers of paper fans so the tail is really full. We attached the tail with brass brads — but could have used tape or glue. As the tail stands by itself, it could be set behind the body sitting as a centerpiece without being attached.

Wings on turkeys are sort of useless, but as a design element on a centerpiece, they add a lot! We cut kraft grocery bags into wing shapes and add symmetrically matching sections imitating rows of feathers, gluing them one over the other. Before gluing, we folded the faux feathers down the center to add textural interest and a give a more featherlike appearance.


Once the layers of feathers were glued and the glue dry, we crushed rolled the outer edges of the wings— the non-feathered edges — to add dimension. We attached the wings with brass brads— but tape or glue works as well
(Hint: clothespins make great tools for softly holding paper edges while glue dries.)

Tom on the table showing the layers of paper added at the front to fill in any gaps, hide any mechanics or attachments and imitate a turkey’s feathered breast.

Quarantinesgiving was my 1st Thanksgiving

By November 2020, COVID-19 had made one spring, one summer, and one fall interesting. And we were about to find out what it had in store for us for The Holidays™. My parents, siblings and I had mutually agreed that the priority was keeping my parents safe. That would mean limited and cautious visits with the grandkids, especially. At the time, older people were the most at risk, and the youngest ones were most likely to be silent carriers. Cases were surging, no vaccines yet. No pressure! Just don’t mess up and kill grandma! [Nervous laughter]
Like Halloween before it, I was determined to have some sort of Thanksgiving. God knows why, it’s not like a top ten holiday for me. Quarantining with littles meant going without much of what we had been accustomed to — freedom, spontaneity, outings, time with friends and family, etc. For me, it also meant going without any help after delivering my second, and emergency-esque surgery. We’d been slogging our way through it, and dammit we were due for some celebration!
I was woefully under-qualified to host any version of a Thanksgiving, and I don’t remember all the thinking that landed with me hosting this pressure-filled gathering, but 2020 was nothing if not different, right? “Just think of it as a dinner party. You've thrown all of one of those in your adult life, surely you can pull off Thanksgiving-lite,” she said to herself, like a happy idiot.
Being outdoors was the first parameter. So much would depend on the weather. Some layers, extra blankets on-hand, a fire pit ready to go — with a little luck, we just might pull this off.
Then came the meal part of the planning. F#cking hell. I’m the child of a talented cook, but I did not inherit those genes. This was going to require some research… not a problem for a nerd from a family of nerds. And knowing when you’re out of your depth is a wisdom that age and experience blessed me with. Ah humility, you quiet, priceless asset!
I kinda like to take it easy these days. I don’t willingly sign up for high pressure situations. And to me, Thanksgiving is about as high pressure as holidays get. Between the traditions, the food, what people have come to expect… there’s a lot of pressure to get it “right.” But COVID created the kind of situation that would have been the *only* way to get someone like me to take on Thanksgiving. Since everyone’s expectations had been thrown out the window, I could get a pass on not delivering the holiday they'd come to expect.
In my career, I make a habit of regularly clarifying with clients and partners: What is the goal? (I’ve found this is also a handy way to center yourself when feeling overwhelmed by everyday stuff, too.) So when it came to tackling Turkey Day, I brought everything back to zero and started from scratch. Put aside everything you can about what you think is required of you in this moment. Focus. What's most important?
Stuffing? Nope.
Gravy? Sorry.
Pie?? Multiple! Again, focus on what matters, people.
Okay, there has to be a bird. And I'm going to have to cook it. I'll figure out that later.
What else? Places to eat. Things to eat with. We'll have to be outside. How to make it as comfy as possible out there? Set up the fire pit. Have blankets. Mom has a serving thingie that keeps things warm — I'll borrow that. Okay, back to the food. What else? Some vegetable. Green beans. We’re Americans, stuck on starches, so… potatoes? Bread? Both? Mom makes legendary sweet potato rolls. I'm not trying to touch that. I'll ask her to bring. (I love potluckiness — it’s homey/intimate. More authentic or something.)
The bird
I accidentally bought two. I won’t get into it. (Side eye: Whole Foods.) Having a backup is probably a happy accident, especially for a newbie. Better to have too many turkeys than too few, eh?
I'd never cooked an entire turkey, or any other bird, or entire anything, ever. Maybe an entire potato? A spaghetti squash? But I was officially out of my depth. I'm a once and future vegetarian, and current reluctant eater of fish and poultry. Pregnancy required me to open up my diet, but I never got comfortable with raw... things. [Shudder] I knew I couldn't reach up a turkey, let alone yank out anything. (I was later assured that my procured turkey would be civilized: all its inside bits would be bagged up and easy to remove. Wonderful. I’ll be wearing gloves up to my elbows until the thing is in the oven, and would still require someone else to remove the, er, bag.)
I got a lot of advice before even buying a bird. Thank goodness there's no shortage of advice on the internet! First things first, how big of a turkey do I need? Then, what all will I have to do to it? How will I cook it? How long will that take? What time will we want to eat, because apparently there’s this magical window of “resting” the hot bird wants, and then it’s on! Feed time! But I gotta time it all just right.
Anecdotally I understood that moisture is a big deal. A dry turkey is a sad turkey. So I read about how to (hopefully) avoid that. I settled on dry brining and stuffing the lil chonk with apple and lemon slices among the herbs etc. This should add moisture and make it smell lovely while taking up the oven all day, methought.
Fun fact: sliding lemon slices under the skin was a good move for moisture AND had the added bonus of making it look like the turkey had tits — everyone’s favorite! What holiday or family get-together is complete without them? So, be aware, or you’re welcome. Either way.
If you’re the Go Big or Go Home type, here’s some inspiration that’ll keep grandma and grandpa talking for many Thanksgivings to come <3

Source: https://www.sunnyskyz.com/blog/1820/Lighten-The-Mood-This-Thanksgiving-With-Lemons
The big day
Mother Nature gifted us a mostly sunny, 50s-something day. We were a go for dinner! Mismatched tables and chairs were set up in the backyard. A wintery tablecloth here, a springy floral one there. Inside, potatoes and green beans went about as well as one would imagine. They're simple, reliable things I'd made a million times, therefore unlikely to explode the day somehow. To my great surprise, the turkey turned out lovely.
There was a lot of rushing. A lot of running around, setting up this and that. I had a toddler and a nursing infant at the time — little, mobile agents of chaos. But somehow we made it work. And what made it work was our collective willingness to let sh!t go. To be content with the day we created within the limitations forced upon us.
Thanksgiving in and of itself isn't my favorite. Politically it’s … ugh. It makes me want to give speeches in the style of the teacher in Dazed and Confused: "Don't forget while you're shoving mashed potatoes and gravy down your gullet that the colonizers turned to cannibalism and would have starved had it not been for…" Anyhoo… The point. What makes Thanksgiving good is the gathering — seeing our loved ones, and spending focused time together. Everything is closed, right? So we’re stuck together! Yay, bonding!
My siblings Thanksgiving-ed with their individual families, and the family text thread was hopping with photos back and forth of each celebration. It amused me that it was kind of like looking at personality test results. Each sibling’s Quarantinesgiving reflected their individual style. From the choice in dishes, to preparation style, and how each gauged whether their dinner was successful.
For my part, I was too busy running around to take many photos. But there’s this one, from after the dust settled.
Turkey legs up, ladies!


gnome time like the present
With time change behind us, looooong evenings ahead and certain holidays zooming up quickly— uh hum... we are looking at you, Christmas train— we are taking some time to do small, manageable projects. In order to speed up the process, thereby MAKING these project manageable, we don’t start at zero, but utilize bases that are already started i.e. upcycle readily available decor, but add better materials, or personalized finishes. For example, these thrifted gnomes followed us home and we set to work reusing a much loved, but timeworn sweater to improve their looks.
It’s fun to get something done in an afternoon or two and points for sustainability as well!!

We started by removing as much of the polyester fluff from the thrifted gnomes as possible. Using the existing gnome, we drew a simple pattern on a scrap piece of fabric and set to work. When reusing old sweaters, we prefer real wool or animal fiber, though any type will do. However an animal fiber sweater can be tightened up or felted if it is washed and then tossed in the dryer. This process expands the scales on real wool, helping them catch together, closing openings — or choose one that has already been through that process inadvertently… not that YOU put sweaters in the wash by accident…
We lined the sweater we chose to use with lightweight cotton fabric so that we could speed up the process with a sewing machine. Lining knitwear, especially loose or loopy knits, prevents yarn from catching on the presser foot. All of the sewing for this product can be done by hand with a tapestry needle if you are not proficient with a sewing machine.

In order to cut the sweater arms into gnome legs, we ran seams along a central line — then carefully cut each sleeve into 2 tubes by following the red line in between the sewn seams. Presto! Instant wooly gnome leggings!

In the narrowest portions of the gnome outfit, we clipped the lining at the finished seams to make turning the legs and arms right-side-out and fitting them on the gnome body a little easier.

Lookin’ a leetle creepy there, upcycled sweater parts…. but it gets WAY better!

Choosing some fun leftover yarn— any type, color, or texture will do— we made the SIMPLEST yarn gnome beard ever!! You may have bits of faux fur or alpaca or wool roving or goat hair or cat hair — whichever. Have we mentioned we are not judge-y? We are NOT judge-y. But for these gnomes, we circled the base of the hat with red trim — but could have used rope or twine — and tied on lengths of yarn by checking the length of desired hair or beard, doubling the yarn before cutting, making a loop at the top of the double yarn, placing the loop over the trim circling the hat, and then pulling the two strands of yarn through its own loop and pulling up on the strands until the loop is tight. We have heard it called a "lark’s head knot” but we call it “two strands through a loop thingy.” Po TAY to. Po TA to. Vodka. Whatever works.

Repurposed sweater cut and sewn and gently tacked to repurposed thrifted gnome. Please note the fuzzy bottom of thrifted fellow— tacking on a patch cut from the sweater completes the matching pants. Reusing an existing form, but changing the finish cuts this project time in half!

Mister and Milady, Jingle and Jangle, Him, Her, Them… they are complete!
meant to bee

While we are not fans of time change, early in and out of the chilly darkness, DOES mean it's time for small projects that can be done cuddled up with a blanket on your lap! These "gathering wool" sessions are for a purpose... handmade ornaments are lifetime keepsakes. Knitted, crocheted or felted wool are some of our favorites— but they could be quilled or cut paper or wire and beads!
Here is a knit bee from a Claire Garland pattern available from her website or on Ravelry.

Claire Garland has tutorials available for her techniques, so knitters with basic skills can learn new ways to create for charming results!


Little projects are a nice relief from a long knit, use small amounts of yarn, and building new skills is so satisfying. We really love the lifelike results... bee happy, friends! 🐝

Needle felting wool is another way to make easy, manageable projects like personalized ornaments from sustainable materials.