


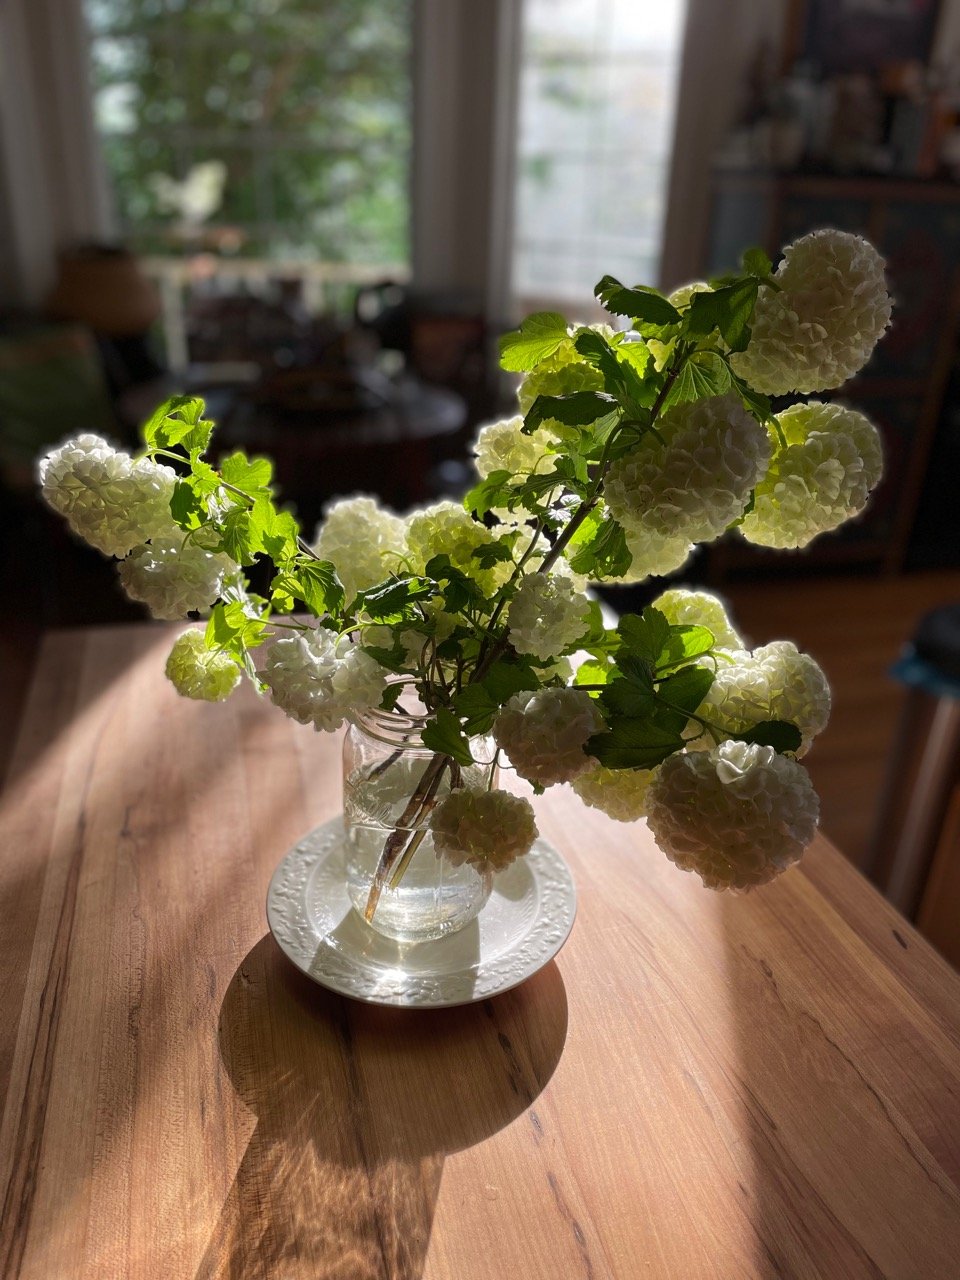
whacking in a garden
SO, you all have your winter-weathered compost pile turned and that garden spade with a strong smooth handle and a clean sharp blade at the ready, right? Us? Not so much. We always have ambitions for a black gold yielding compost from our zero waste kitchen goings-on, but have fallen short— defeated by inefficient countertop containers (hullo, bugs and smell) or underperforming barrel tumblers (who has the arm strength to dig that thing out? who?).
We have largely embraced porch containers for those things we most want to pluck: tomatoes, usually small, peppers, and herbs. Benign neglect being the order of the day, anything planted in the greater garden must do well pretty much on its own— and, since, there is serious debate about how much tilling is good for the planet, were are erring on the side of low disturbance of the soil.

We have come round to not only saving the soil, but eliminating the unnatural lawn as much as possible. We’ll be getting into the whys and wherefores from the effects of the devastating loss of insect life to the benefits of healthy biodiversity. We have eliminated much of the mown grass on our patch, planted for seasonal picking and use for birds, wildlife— and, oh, us as well!

Healthy planting areas are alive with motion— bees, beetles, worms, butterflies and birds, birds, birds…

Enough for all and plenty to share.
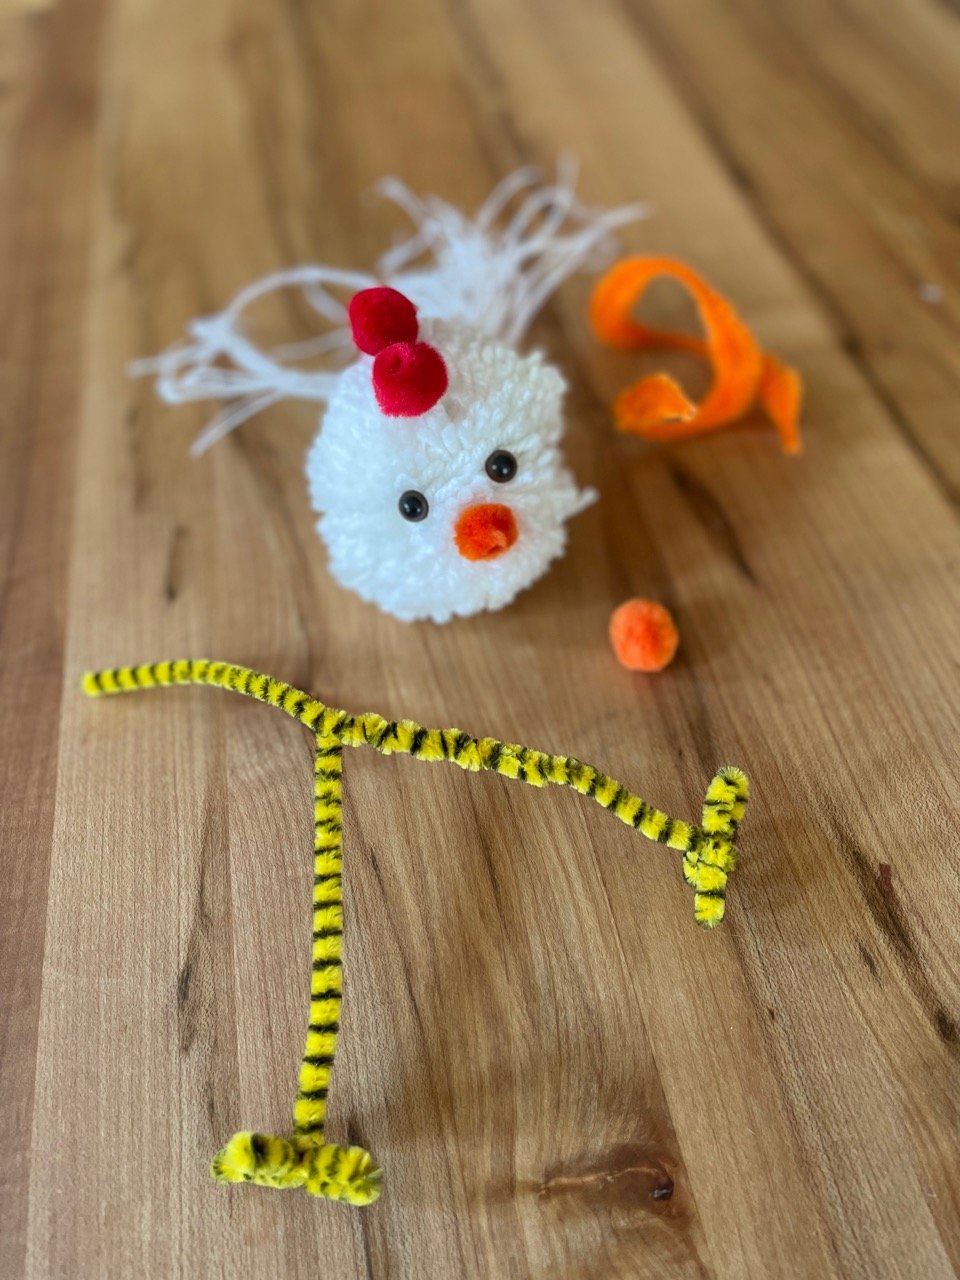
we are not just a one chick pony
We’ve been working around the cluck… ahem… to get some tutorials up for easy peasy spring decor. If you thought the pom poms could only be used one way? Yolks on you— Chick this out: same pom, different chicken.
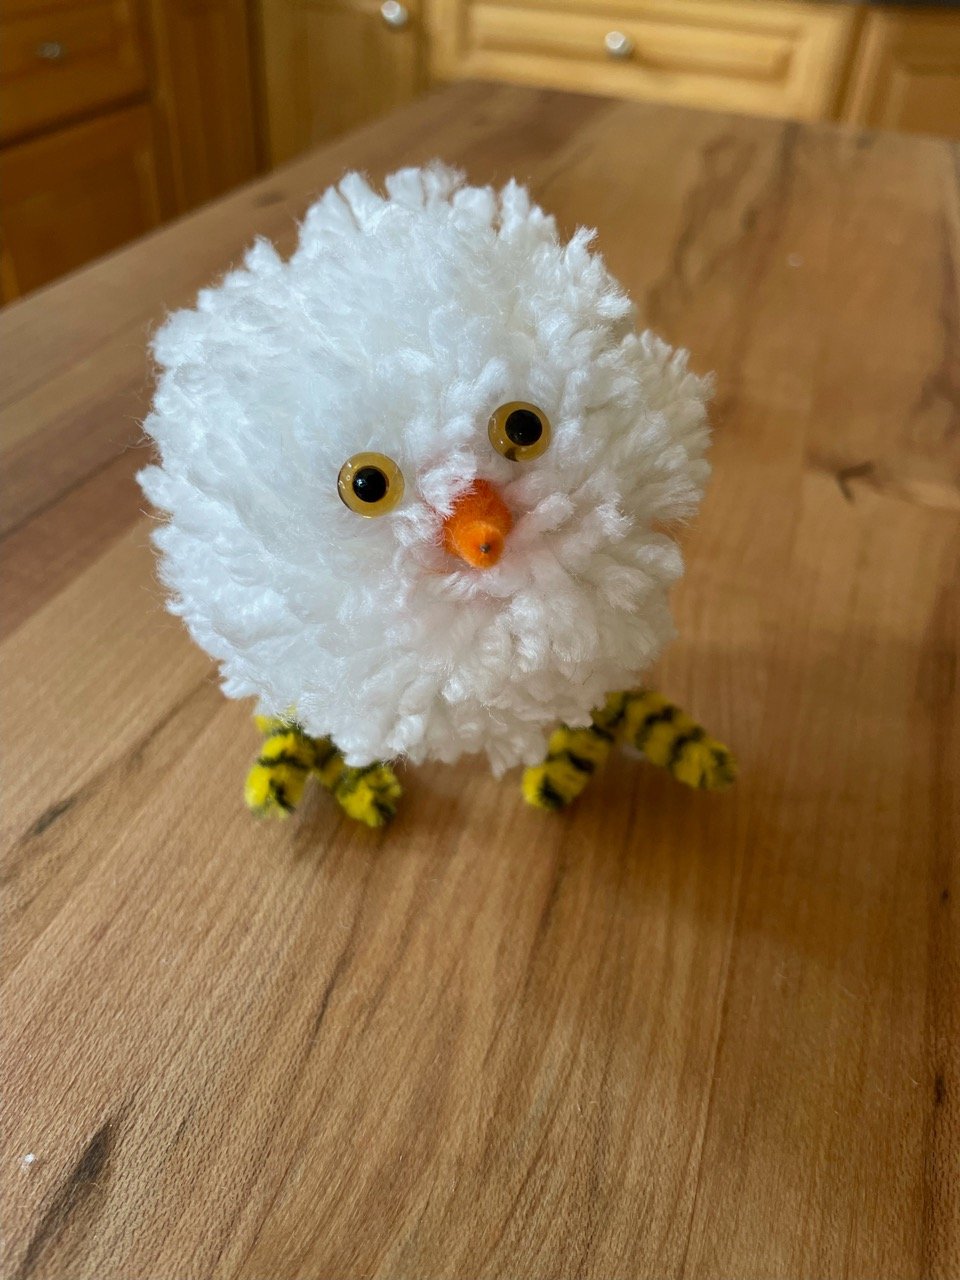
We used the same techniques as our spring chicken post. A store-bought or homemade yarn pom pom, eyes, a beak, then encircled with wire or chenille stems for legs and feet, embedded down in the fiber approximately halfway on the sphere, and made secure fairly tightly. A new twist on chicken legs!

Defying eggspectations, we changed it up and dyed the yarn chickie-yellow, using easy-to-hand food coloring. Hint: leave off gluing on eyes and beak until after the dyeing and drying process is complete.
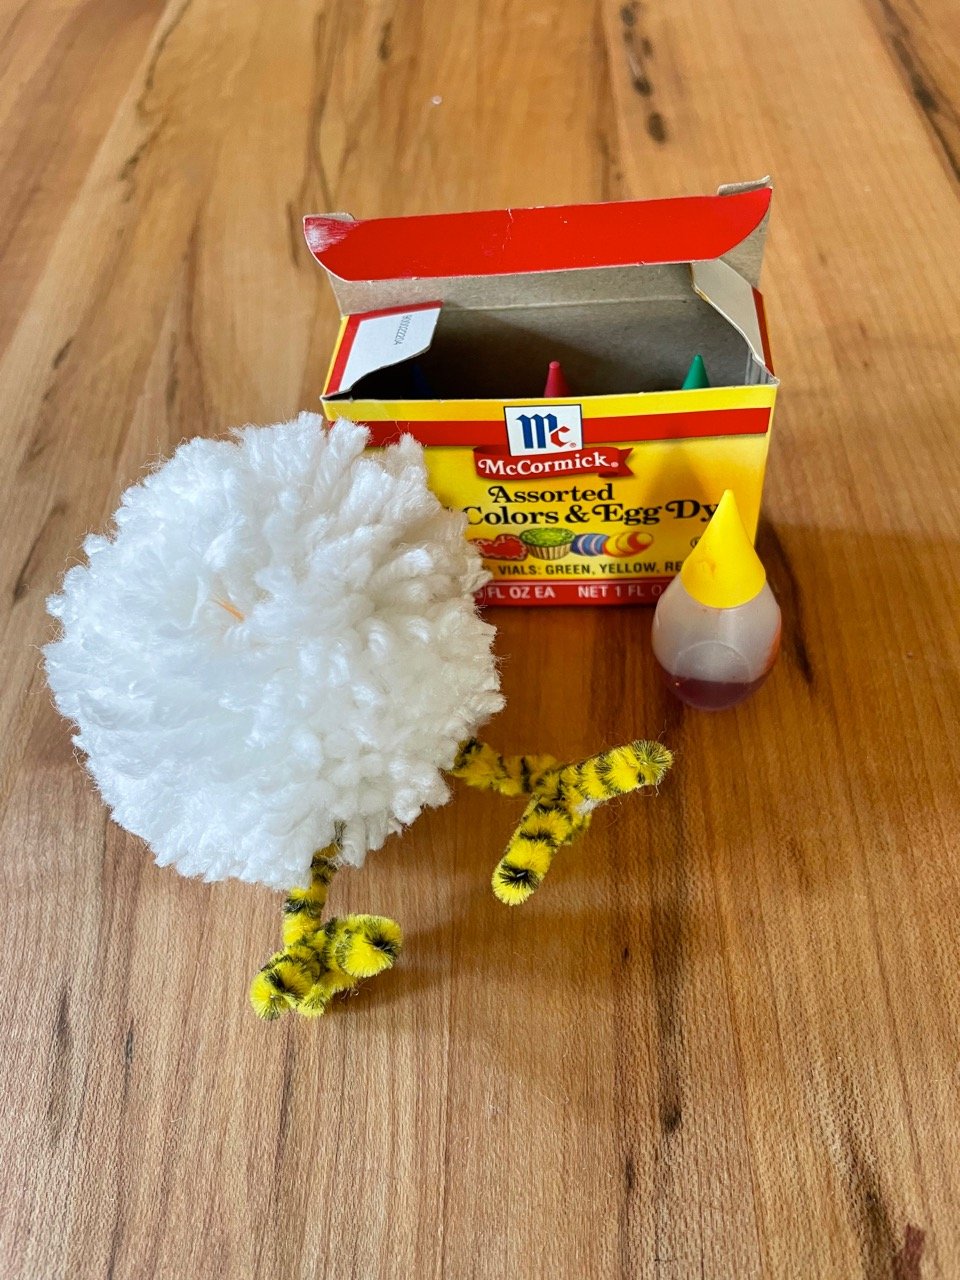
So we got up to our old chicks, covered our work surface, protected our clothes, and put on some plastic gloves in preparation for operation Tres Chic II…Hensome Lad: Son of a Biscuit.

We mixed yellow food coloring and water in a small bowl.
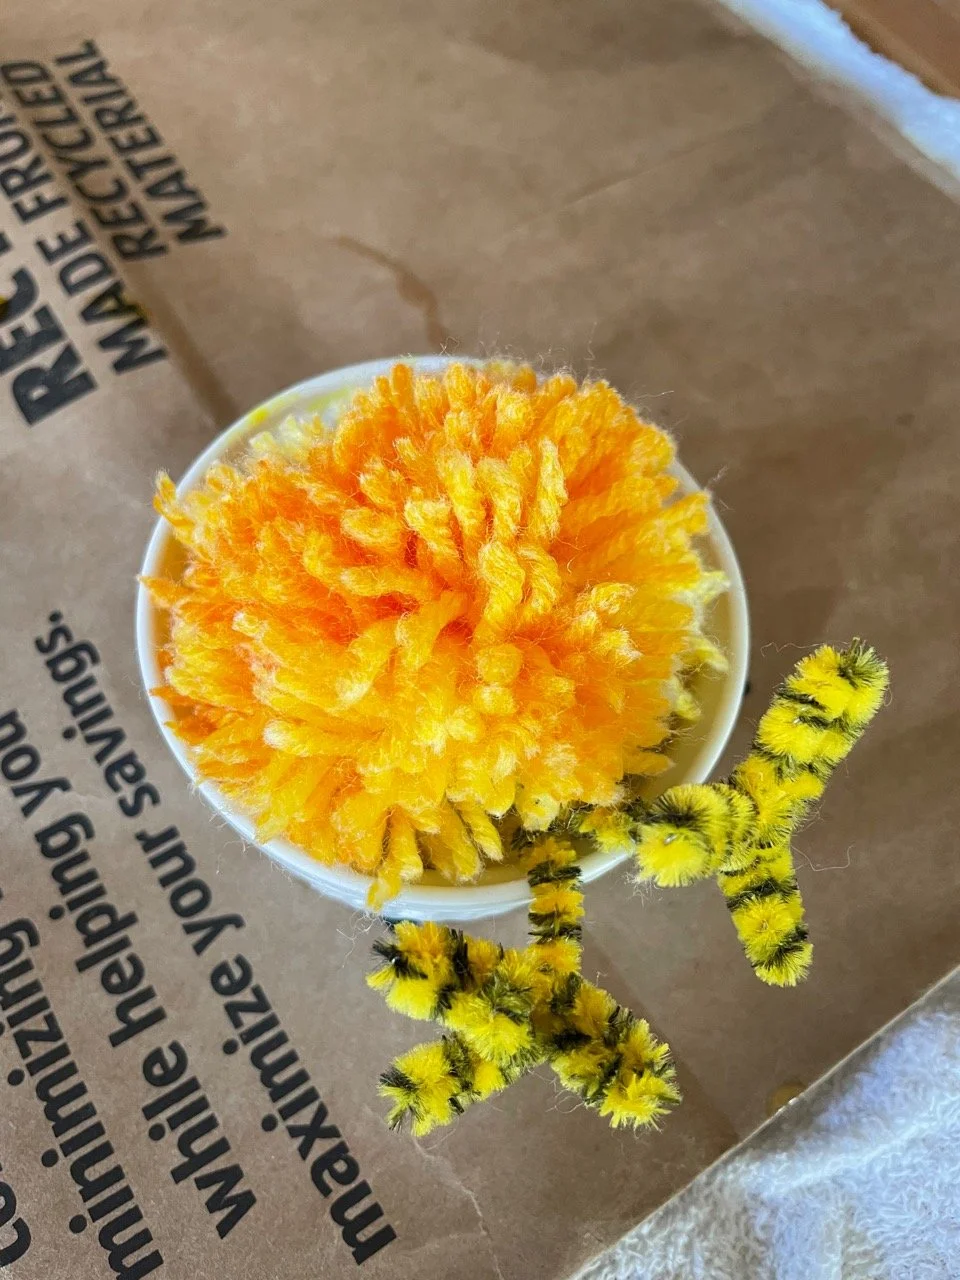
In a poultry amount of time, the yarn became saturated with dye by turning the pom a couple times. We rinsed the dyed pom in cool water, wrung it out carefully, then put it in the dryer with a couple old towels (the dye will come off until it is fully dry and set).

Trimming out some of the fiber to add some shaping, gives our chick some definition.

Talk is cheep… pictures say it best: this little one is im-peck-able!

Don’t mind us. Everyone around here is a comedi-hen. The best chicken puns don’t fall far from the poul-tree and we have all been dealing with not one, but several, eggs-istential crises, so we had to get them all in. Can’t wing for losing…
We’ll show ourselves to the eggs-it…
this IS a spring chicken
Adding handmade Spring decorations to your home or someone’s basket is easy and fun! Use homemade or purchased yarn pom poms as a start for this simple Spring Chicken.

Small pom poms, which can be made or store-bought, chenille stems or simple wire, any type of eyes— combine to make this adorable little Easter tree ornament or basket stuffer.
We twisted the stems to form simple feet, trimmed a purchased pom into a beak shape —but an end of orange chenille stem would work as well. We added simple animal eyes, trying everything in place before gluing with water-based glue (school glue or tacky glue will work and are not as messy as hot glue).
The stem or wire legs and feet are wrapped around and into the pom pom tightly so that the fiber covers it all around. We added a bit of ostrich feather for a floofy tail.
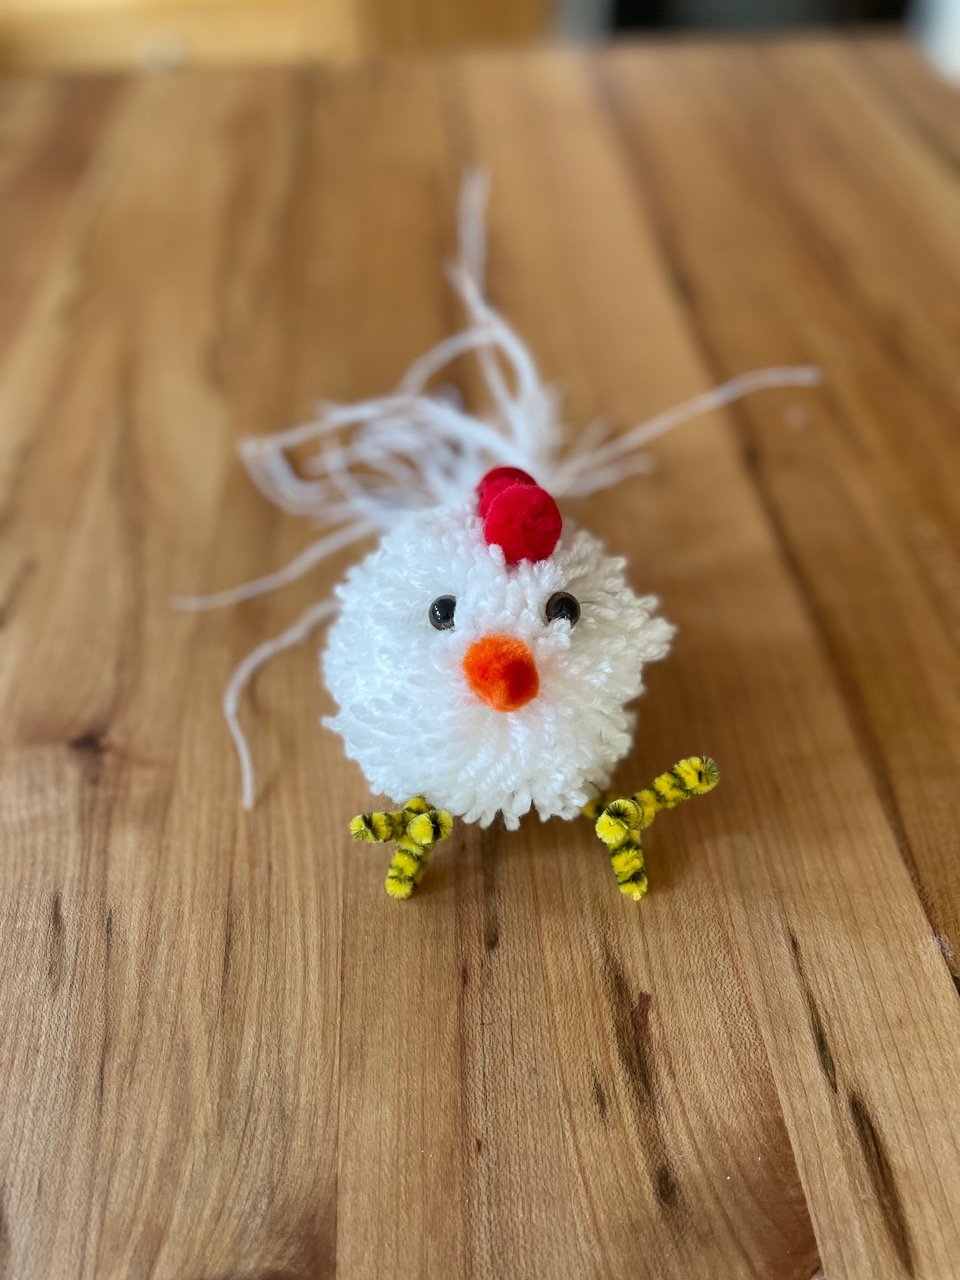
Tres chic!
upcycled easter
We are still loving the idea of using what you have on hand, re-using what can be given a second purpose, and cutting back as far as possible on cheap, imported, high carbon-cost decor. Bein’ that it is Spring and we turn to all things renewing, we are going entirely renewable. Take an old wool coat and rehabilitate it as your bunny!
This fellow is stuffed with chopped up, mismatched socks. The carrots are spindles, twine, and last year’s Easter grass combined.


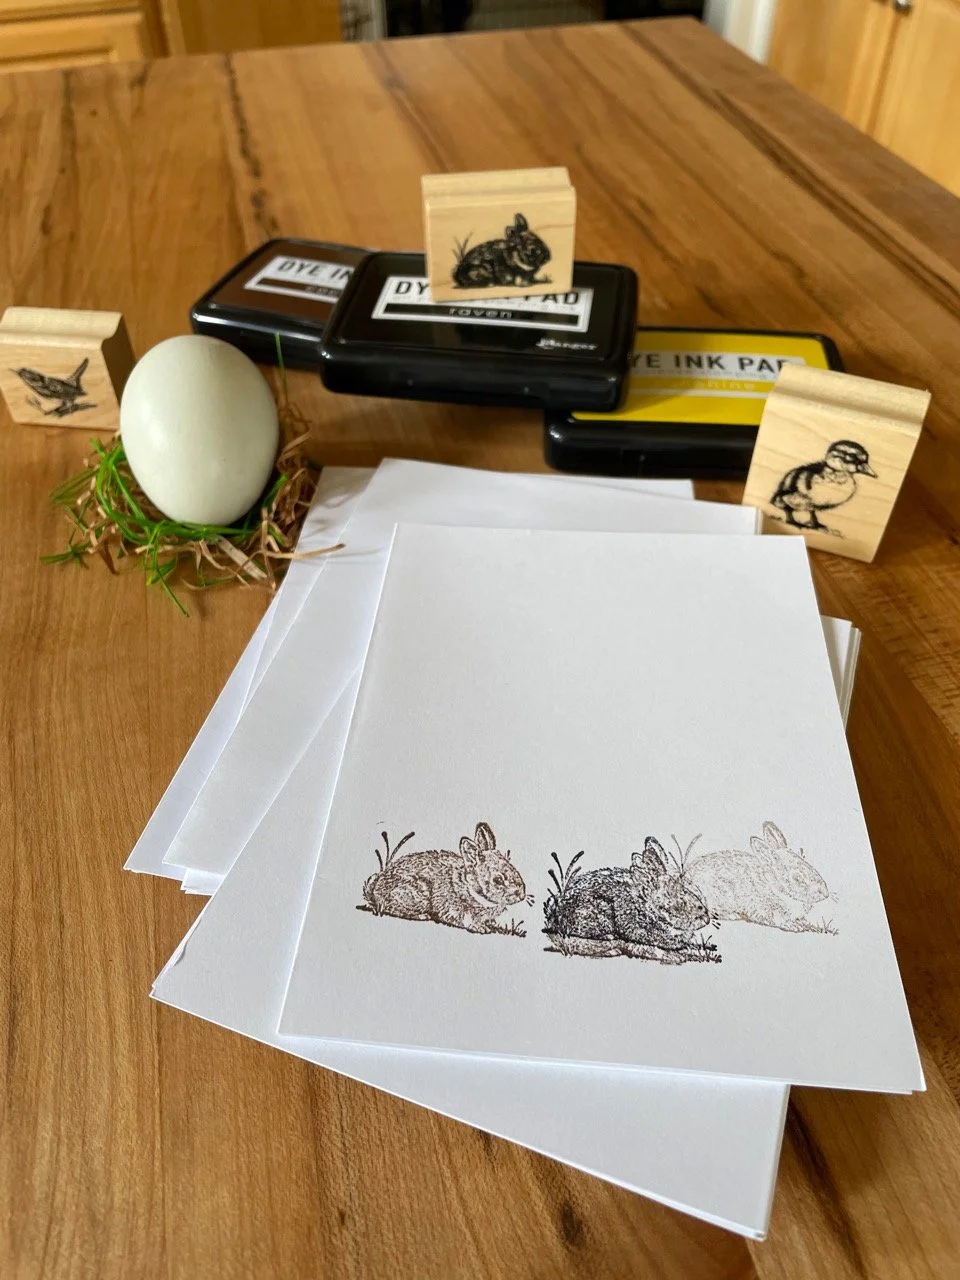
Simple stamped cards to send your happiest thoughts. Stamp and embellish with markers, stickers, or paint.
Wool coat bunny showing the simple, sturdy construction.

We thought he looked a bit downcast, so we brightened him up with needle felted wool accents.

A leftover yarn “ribbon,” and Rabbit is ready!

Valentine's, Pal O'Mine

Heart it or hate it, the day of Lurve is on the way. You might be celebrating Valentine’s or Galentine’s or Palentine’s, so we have a little “SHOW ME” sesh for making homemade cards that are really cute and truly easy.
Reuse papers from old envelopes or those stacks of patterns you got that time when you were going to organize all the photos and scrapbook the hell out of mementos… no? yes? no? We’ve given up that idea, too, friends. It’s a GOOD thing.
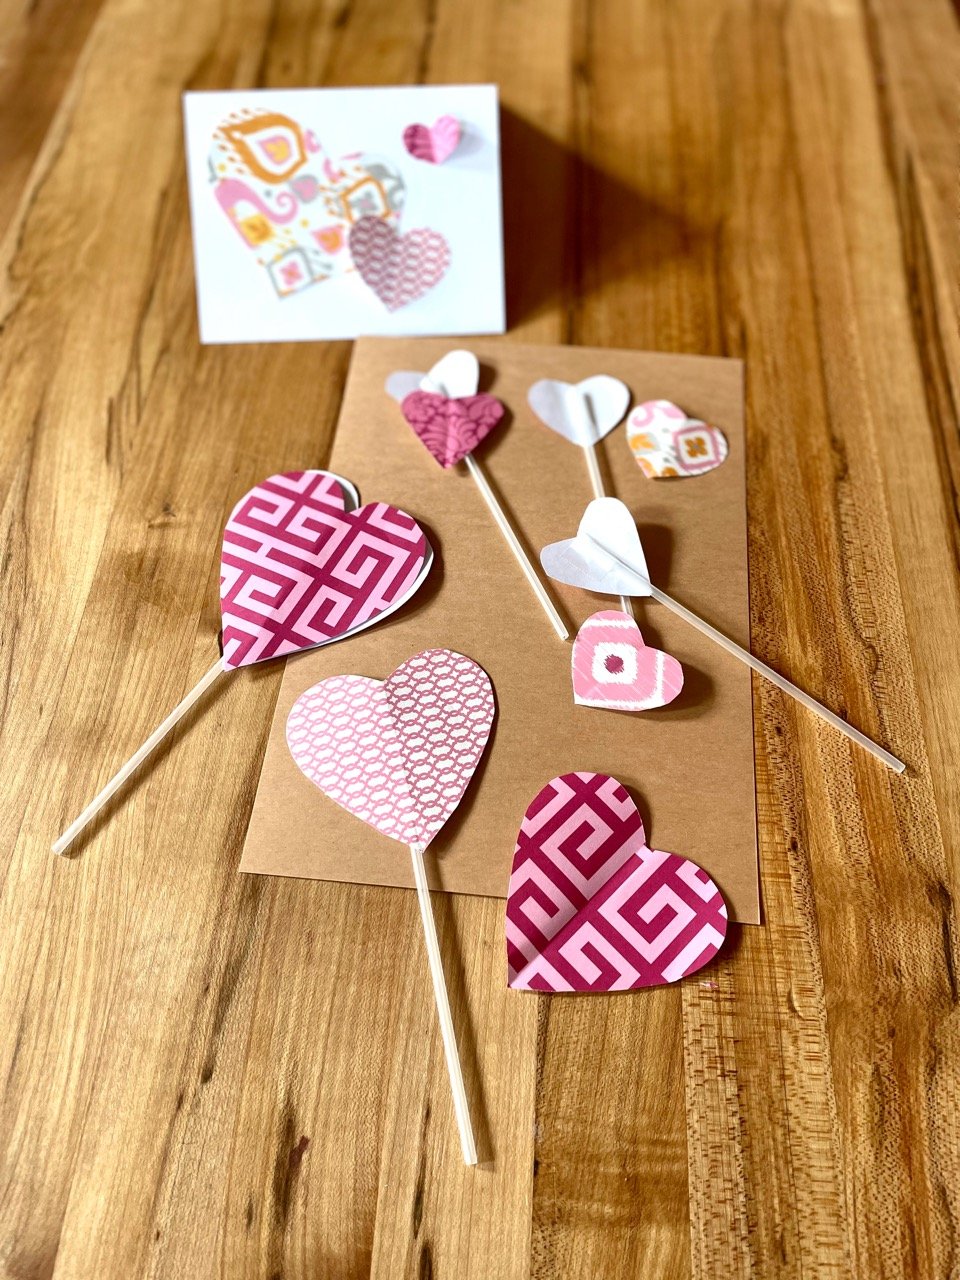
Take papers of different, related patterns and fold in half. Cut half-heartedly, ah… we mean cut half hearts… along the folded edge such that you end up with a little pile of heart shapes in different sizes and patterns.

If you have blank card stock, glue hearts on the fronts of cards. OR create your own cards and envelopes from trusty kraft paper.
We used bits and bobs from the whole process— parts of leftover paper and the negative space hearts left over from our first cuts, which, as we all know, are always the deepest.
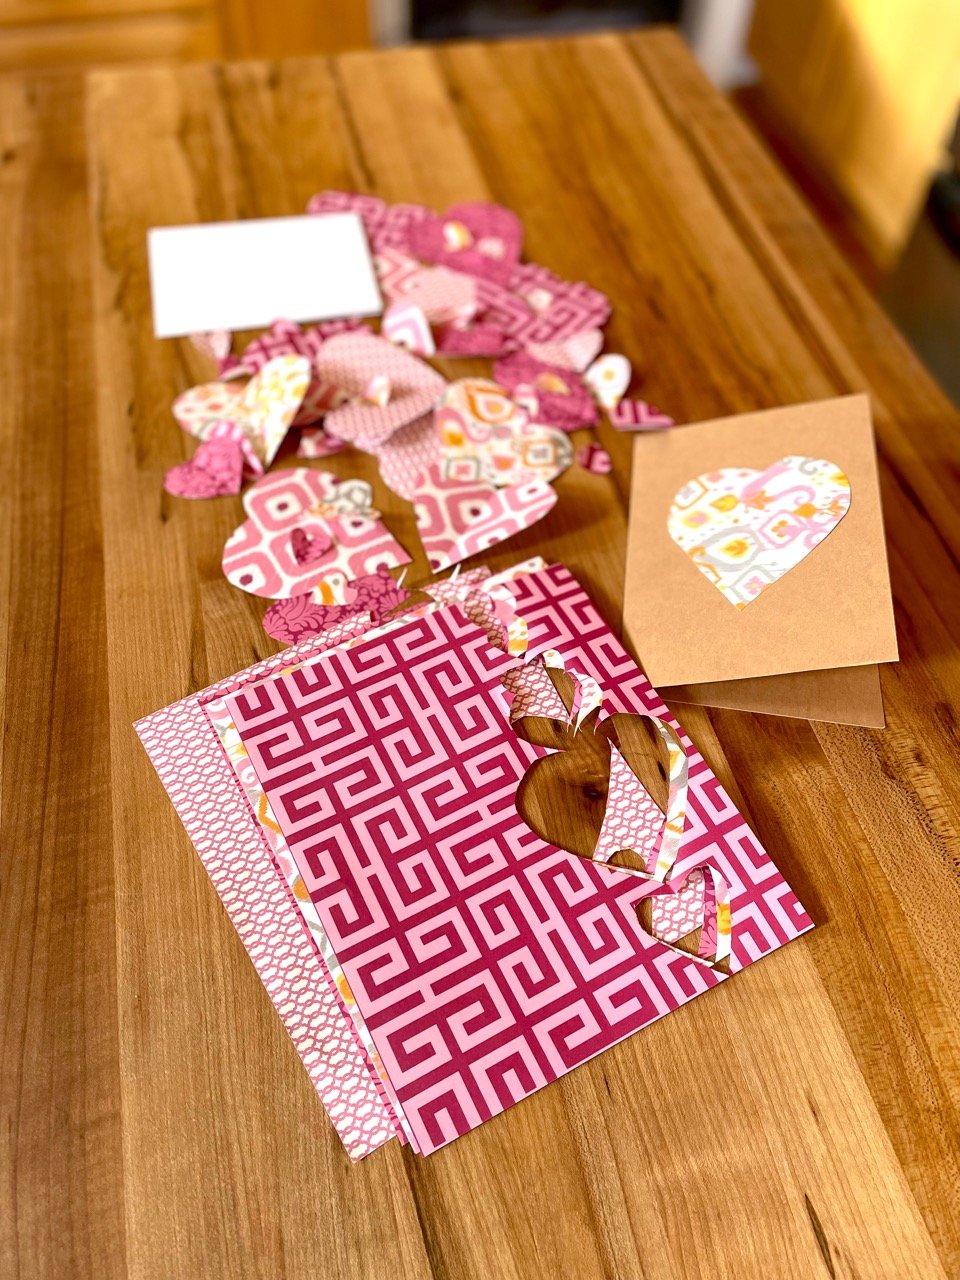
Have fun! Lay out hearts and pieces in different configurations, balancing patterns, values. It is A-Okay to just glue one heart on each card too! It’s the love you are sending, not the art.
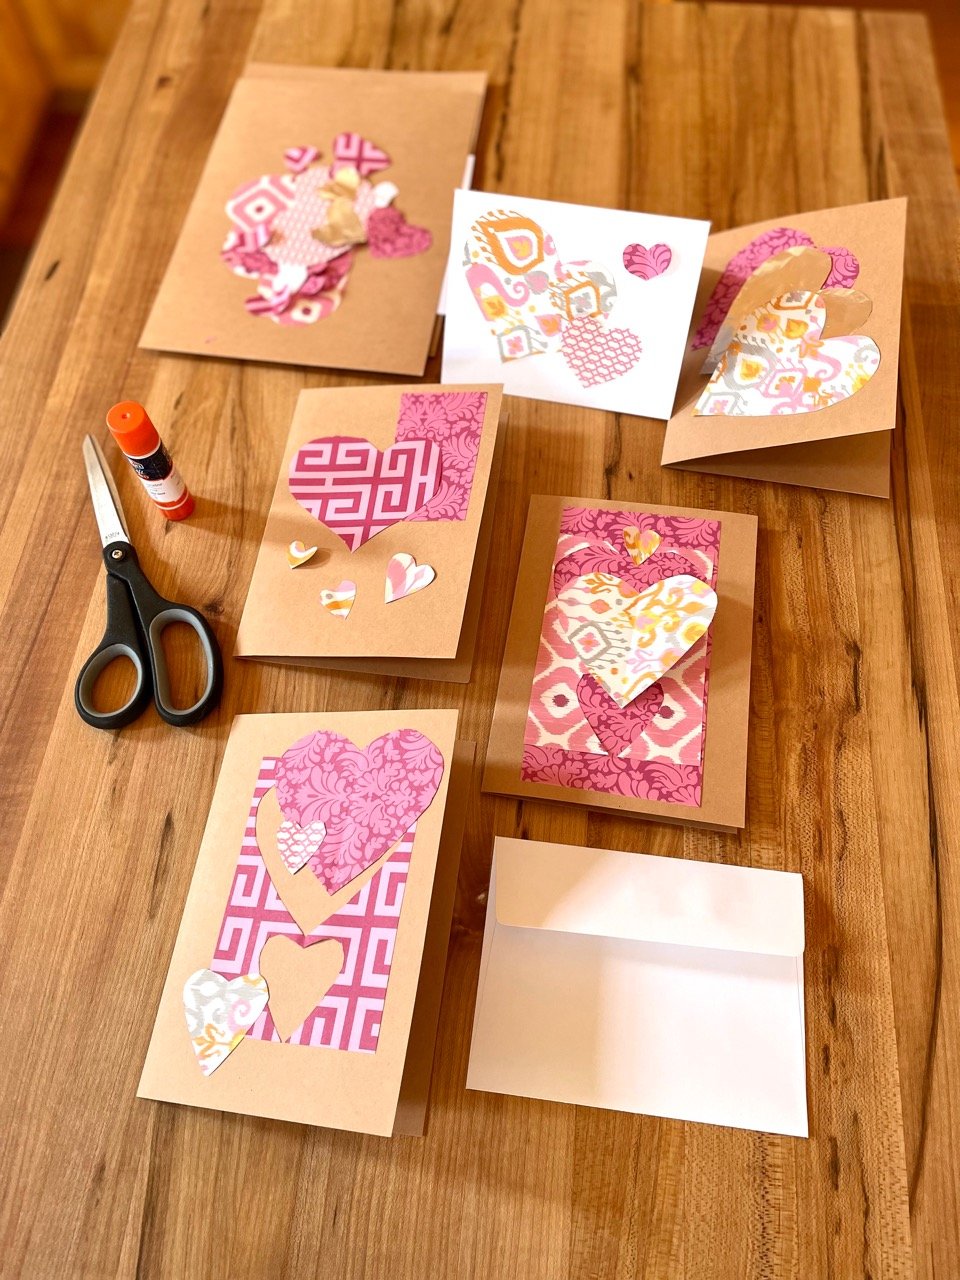
We are playing with 3-D pop-up effects as well. Pop-Up cards are a top trend…. but more on that in a bit.
Whatever you do, make sure you put on enough postage, especially if your envelope is a non-standard form. Last thing: S.W.A.K. (seal it with a lick, because a kiss won’t stick!) Lil bit gross, but goes right to the 9-year-old in you, doesn’t it?
hat ornament upgrade: gnome big deal

We are always learning, ya’ll. Sometimes the same lesson over and over! It took a bit of time to create the hat ornament from leftover and recycled materials. We have illustrations below on how to add on elements to create a jolly little gnome.

Perusing the wider webs, we saw so many examples. Gnomes are in! We saw some that were really adorable — and crazily “affordable.” Hard to resist absolutely adorable ornaments for $3. But the real costs are actually higher. Made us think we could not or would not work for such a low return on our time and materials, but somewhere someone has to do so.
Please, all, take a moment and contemplate how little workers everywhere are paid! Work towards changing the corporate approach to labor and supply.

Gather wool roving, cotton fluff, or any fuzzy bit for a gnome beard. Felt up wool roving into a ball for a nose, or use a standard commercially available pom pom.

Use tacky glue, white glue, or hot glue to secure the beard to the inside of the base of the yarn hat ornament, and the felted ball or pom pom to the front just above the beard. We secured the ball and beard with cord for extra stability. Then we added a nice Brooklyn groomed mustachio for extra panache! Go big or go Gnome, right?

fresh evergreen wreath part 1: prepping material
As with any fresh plant material construction, beginning an evergreen holiday wreath should begin with good preparation. Set up work area, preferably with a work surface tall enough to prevent bending down to table level. Unless you are working in a dedicated workshop, securely cover surfaces with waterproof material such as plastic drop cloths or large garbage bags. A turntable or lazy susan is a great way to rotate any arrangement project, but is especially helpful in working each part of a wreath equally.
It is very possible to use fresh cut evergreen branches and wire to create your own wreath, but with so many things vying for attention at this time of year, we happily recommend using a purchased wreath base — they are widely available at garden centers and grocery stores.

We look for springy, fresh branches on these wreaths and a minimum of falling needles. Once home, we dunk the whole thing down into a tub of water and let the branches absorb moisture. After removing the base and allowing a day to dry, we treat the base with a anti-dessicating spray such as the commercially available brand, Wilt Pruf, or similar, generously spraying BOTH sides of the wreath base and allowing it dry. This one step, though not essential, makes a world of difference for evergreens lasting longer, staying prettier, in winters that are becoming ever warmer.
We like to tidy up the purchased wreath bases with judicious trimming and balancing of branches before any decoration begins.
When your work area is set up, the wreath base is ready, gather together your tools of the trade: pruners, snips, wire cutters, scissors.

Don’t forget additional items which help avoid attachment issues: wooden floral picks, green florist wire, twine, and glue gun with plenty of glue sticks.
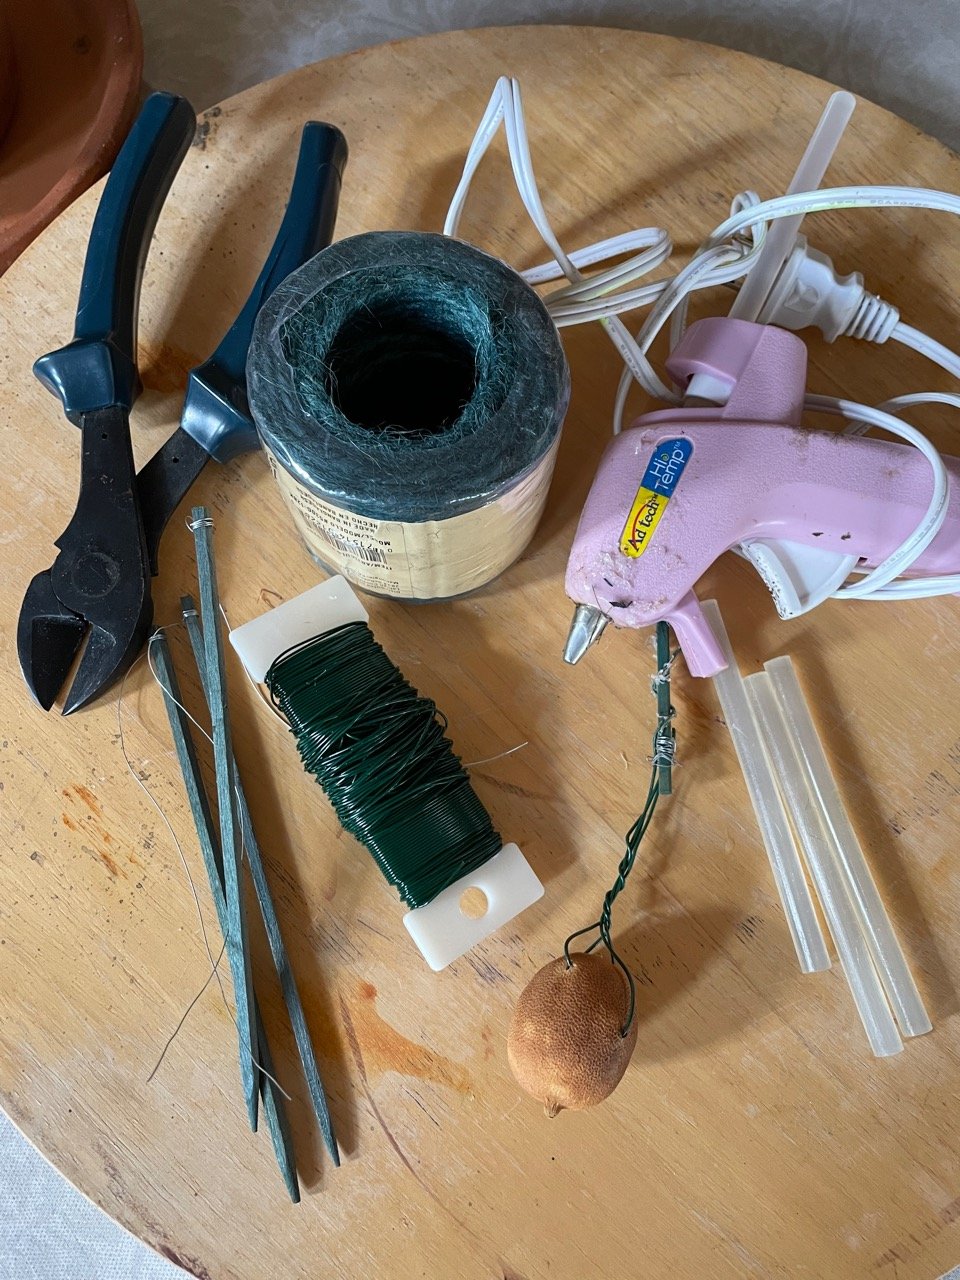
Adding a pick onto almost any element in a wreath provides extra structure for securely attaching to the evergreen branches. Running wire securely through or around cones, fresh fruit, or the tops of ornaments, all help the embarrassment of a wreath yeeting its dec onto unsuspecting guests at the front door.
We pick fresh evergreen elements to add to a commercial wreath. Varying the colors, leaf types, and texture adds to visual interest. We use cut-from-the-yard or bought at the garden center elements that have had a day to sit in containers of cool water so they are conditioned (hardened off from a freshly cut) and ready to insert.
Once the base is tidied and ready to decorate, assemble materials to attach. Start with bundles of found or purchased greens wired on picks and then glued at the base. Leave your newly gorgeous green base as is— OR go for something fun and unusual! Eschew the expected! Leave off the ribbon entirely— be bold!
Feathers, twigs, leaves, nuts, grasses...

Varying the sizes or types of similar items is great way to add pleasing harmony.
Wreath dec needn’t be traditional cones, fruits etc. Add a variety of elements tailor-made to your style! Avoid the cookie cutter look by adding in actual cookie cutters, ornaments, beads, baubles, spools of thread, faux fruit or berries, tiny tools — whatever fills out the former store bought wreath with your own personal flair. Whatever you add, just make sure it is firmly attached to last the season!!

Interregnum: Time for the Regular Reminder to Breathe

December. Here you are, you massive bully, you. Fall? We hardly knew you. Blown out by the cold, reaching fingers of wind from the north… shaking out the last of the leaves and replacing the autumn glow with sharp blue ice-pack light lancing across brittle lawns in long shadows. It just feels late all day. Dark in the afternoon early.
And yet… if you close your eyes and listen? Jingling of bells! Or is it the jingling of coins tumbling in tills across the land as the holiday gift buying frenzy revs up and sweeps through.
But first, we hang now for a bit in the time between. The interstitial. The time of year when pumpkins AND holiday lights and dec occupy lawns and porches in strict violation of The Code. Ya’ll, just stop. Find a good compost pile or farm with animals and give those cuties their next, best home before you throw open the Christmas closet and unleash the inflatables. Literally, give it —and yourself— a rest. It is totally understandable to want to dive in to the best parts of December celebrating, but it is not advisable nor really even possible to do ALL OF THE THINGS. Pick a few. Do those well. Spend more time and less money. Be more present and less into presents. Bring light and fewer light displays. Bring change, but give all the dollars you can to the worthiest places and not just change at the red bucket. It feels really, really good.
Having (hopefully) survived the first of the grand high Holler-days and put family pressure and Thanksgiving behind us like the well picked turkey carcass, we are about to hit the slalom ski run accelerating to the next. A time to breathe in the crisp air— before being overwhelmed with Cinnamon and Spruce scented breezes. A time to plot out shipping schedules which determines buying schedules which determines, oh god, wrapping schedules. Wrapping… woof. Breathe…. breathe…
Thankfully, there seems to have been a turning point in corporate thought and fewer large retailers are open on Thanksgiving Day proper. Maybe forced by executives newly aware of workers who deserve fair wages and benefits, or maybe newly aware of workers at all — find that their workers need and want celebrations with their own families and friends, so have curtailed crazy open hours and Black Friday etc and many people have opted to shop from home or limit time out, so the frenetic pace of “normal" holiday shopping is subdued… one good thing from the pandemic. This quieter holiday season should allow a pause for reflection on just how crazy the pressures to consume have been heretofore.
This year,too, many, many more folks felt free to travel to see long missed relatives for Thanksgiving. Laudably, a majority were vaccinated. Many were left with the impossible choice of seeing people or risking their own, like children under five, who could not yet be vaccinated or those who put others at risk by willfully choosing to go without. Christmas will likely be the same. Or worse. Dependent of variants etc. Sigh… So, while it is possible "we all can be together… if the fates allow...” the virus may intervene— For us, that means putting the best parts of the season to top of our list, and Santa’s list, and anyone’s list.
To begin, we suggest —powerfully suggest— nigh unto insisting— that people take a moment and enjoy the post T Day November and slightly into December interregnum. Before Fa la la laing and so forth, take the time to recollect, to plan, map out what is most important in the holiday to do that silly-word-thing: self care. Make this liminal time all about you for a couple of days —then make it all about everyone else. You cannot pour from an empty cup… truth.
The interregnum between family pressure filled Holler-days is a good time to spend moments to yourself, assessing what can be done, what needs to be done and what can you can let go!
Hereforth a short list of things you know. These are good and good for you! We are moms and we are legion— so we scold. Get over it.
Put away ideas about must-dos and tradition this year. We are handing out dispensation and special licenses. Sift out what is important for safety and sanity. Make do. Decorate in small doses with what you have and what you find with natural materials. It really does something for our souls to be out in nature and to bring nature inside.
Take time now to assess your project list and pet the cat… or else.

Hey— send cards. Send Happy New Year if you aren’t about the holiday or worry the intentionally hobbled, but limping along USPS won’t deliver on time. It’s a holiday SEASON— there is plenty of time and it is never wrong to show someone you care.
While you are at it, thank your posties, friends. They really do their best… in all kinds of weather… and are a lifeline for a lot of folks who don’t or can’t email etc. Put a card for them in your mailbox— doesn’t have to be holiday themed if you worry about giving offense (and we love that you do).
Normalize shopping local, patronizing artists and artisans, give from the Second Market, make things to share… above all listen to the message of the season still lovely, if a little lost in profit driven orgy of consumption. Why do we gift at all?
Drop a card of thanks to those who support your everyday life— the docs office, the vet, the tire repair folks… whomever. It is lovely to do so in person and provide a smiling face with the sentiment— but we don’t advocate being out in the current atmosphere too much. Besides, they won’t see your smile behind your mask…. you ARE wearing a mask, right?
Take some dreamy moments to yourself before things get hectic. Enjoy the transition and the recommit to helping or valuing others. This Thanksgiving arrangement will become part of a wreath gifted on.

Read a book a day to your children for 24 days until Christmas. Don’t have 24? Libraries hand ‘em out for free!
Read a book to a shelter pet.
Read a book.
Find a giving tree or equivalent and make someone else’s holiday as jolly—or jollier— than your own. Involve your children in picking out things for kids their own age so they have the joy of imagining some one like themselves feeling special and loved on a holiday.
Pay it forward when you can. We love paying the shipping for someone rushing to get something special to a family member and unprepared for the cost. We are on call at the local shippers especially on behalf of Santa for children’s gifts that need to be in time.
Find out EXACTLY what is needed at your local food bank. The volunteers and staffs of these amazing life-giving centers know what works and what will clutter the shelves. They often have insight into Benevolent and/or Community resource that are set up to equitably and reliably distribute aid to those who need it most.
recycle material turkey centerpiece

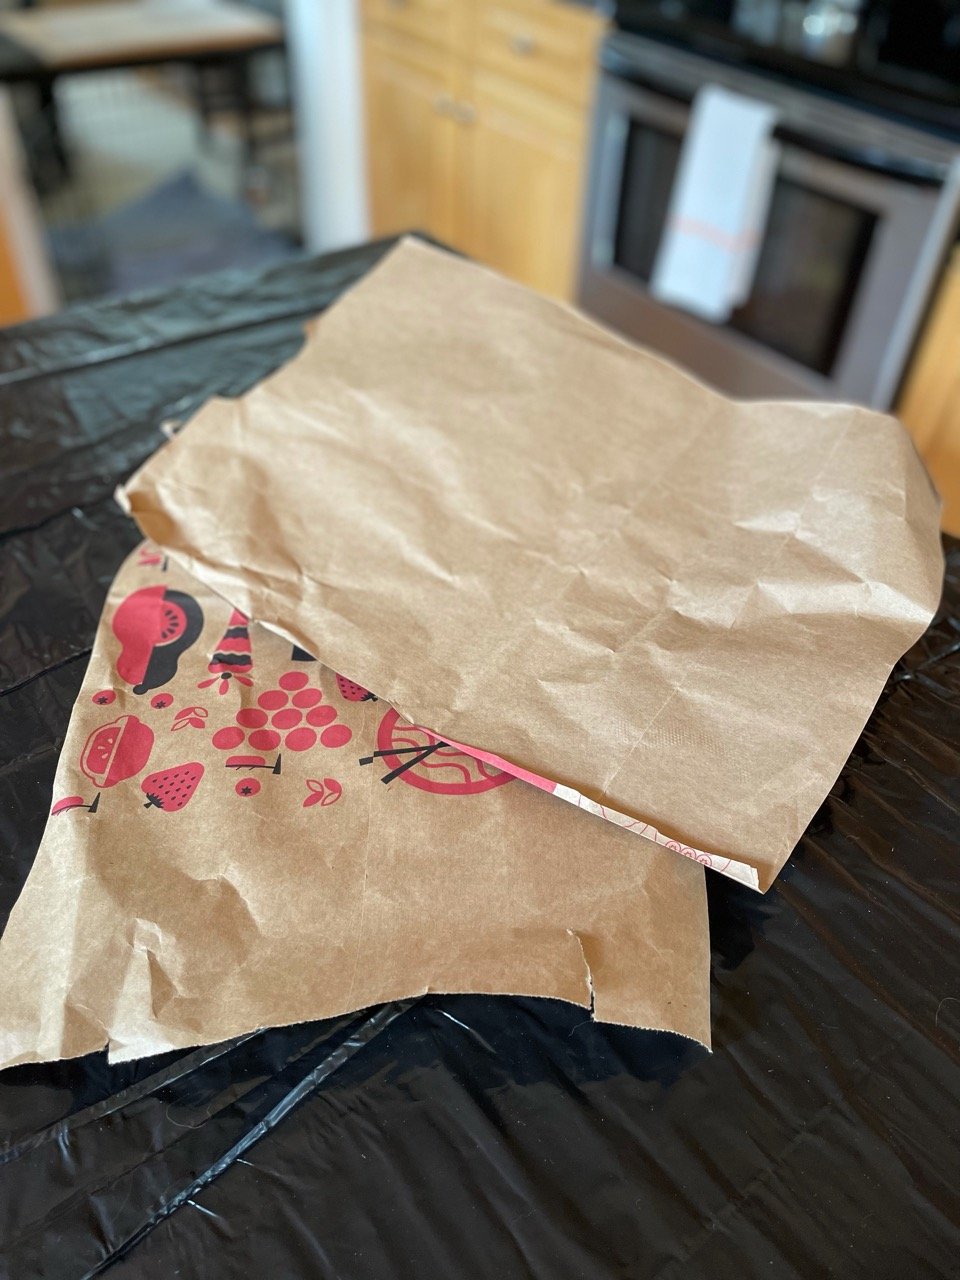
Friendsgiving, Black Friday Eve, Thanksalotapalooza…. however you are celebrating, it is fun to pay tribute to the bird most associated with the fourth Thursday in November, though turkey may or may not have been on the menu for the storied meal shared by the Plymouth Colonists and Pilgrims and the Wampanoag people indigenous to the area. Novelist Sara Josepha Hale popularized the idea of turkey as the main dish for Thanksgiving in the 1820’s with a campaign to make Thanksgiving a national holiday. We are presenting a budget friendly turkey for the center of the table that even your vegan friends and family will approve. Raiding the recycling, we have put together a step by step for a life-size gobbler— no brining, no basting, and no baking required!
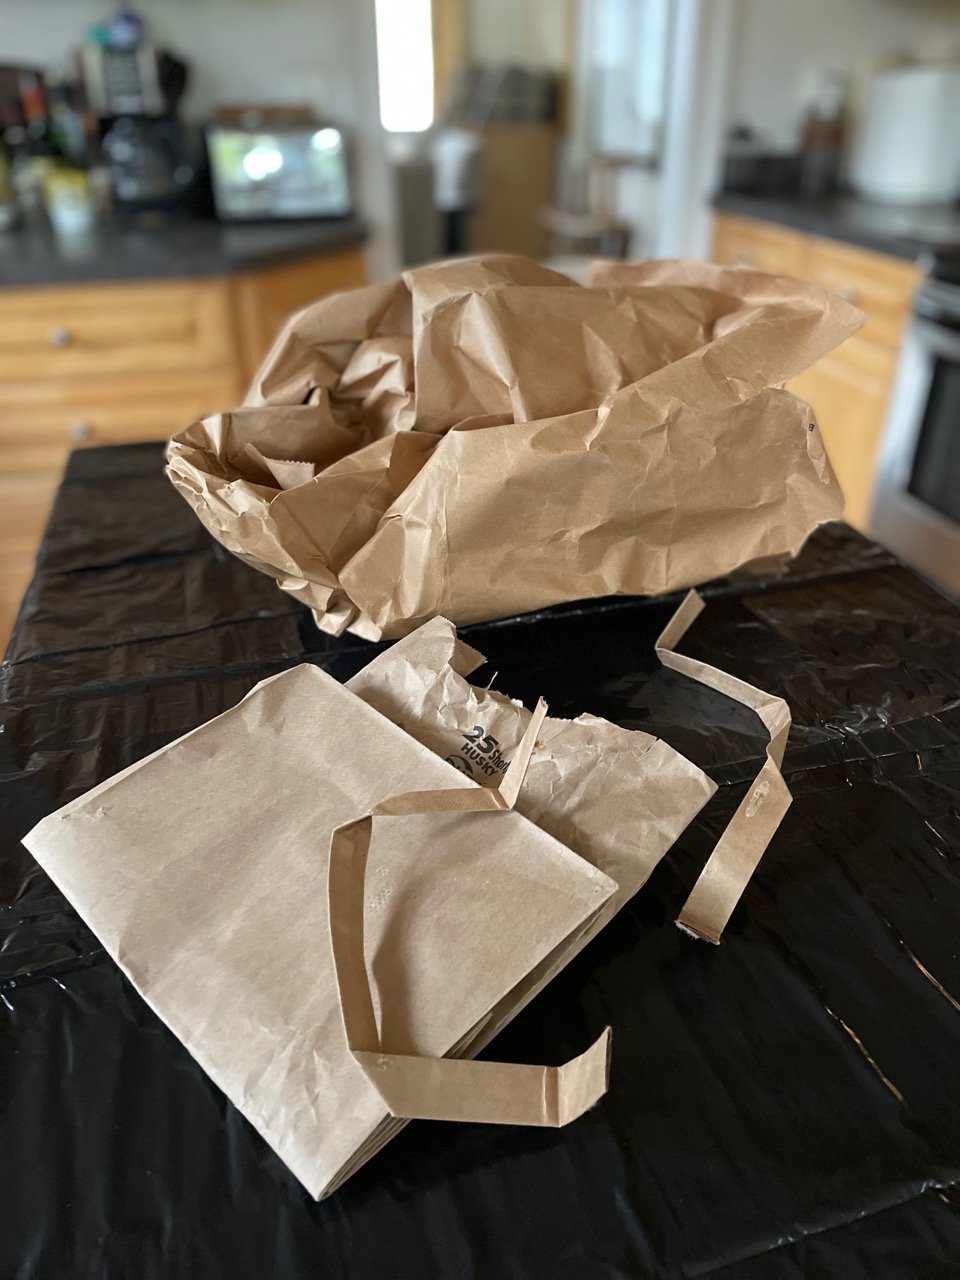
You will need 3-4 regular paper grocery bags, kraft paper or kraft paper used for packing, toilet paper rolls and/or paper towel rolls, tape, and glue. A stapler helps expedite the construction — can be used as temporary holds while glue dries and removed later or hidden inside paper folds.
Starting with a kraft paper grocery bag, turn it inside out if it has any printing and puff it out to form the basis of the turkey body.
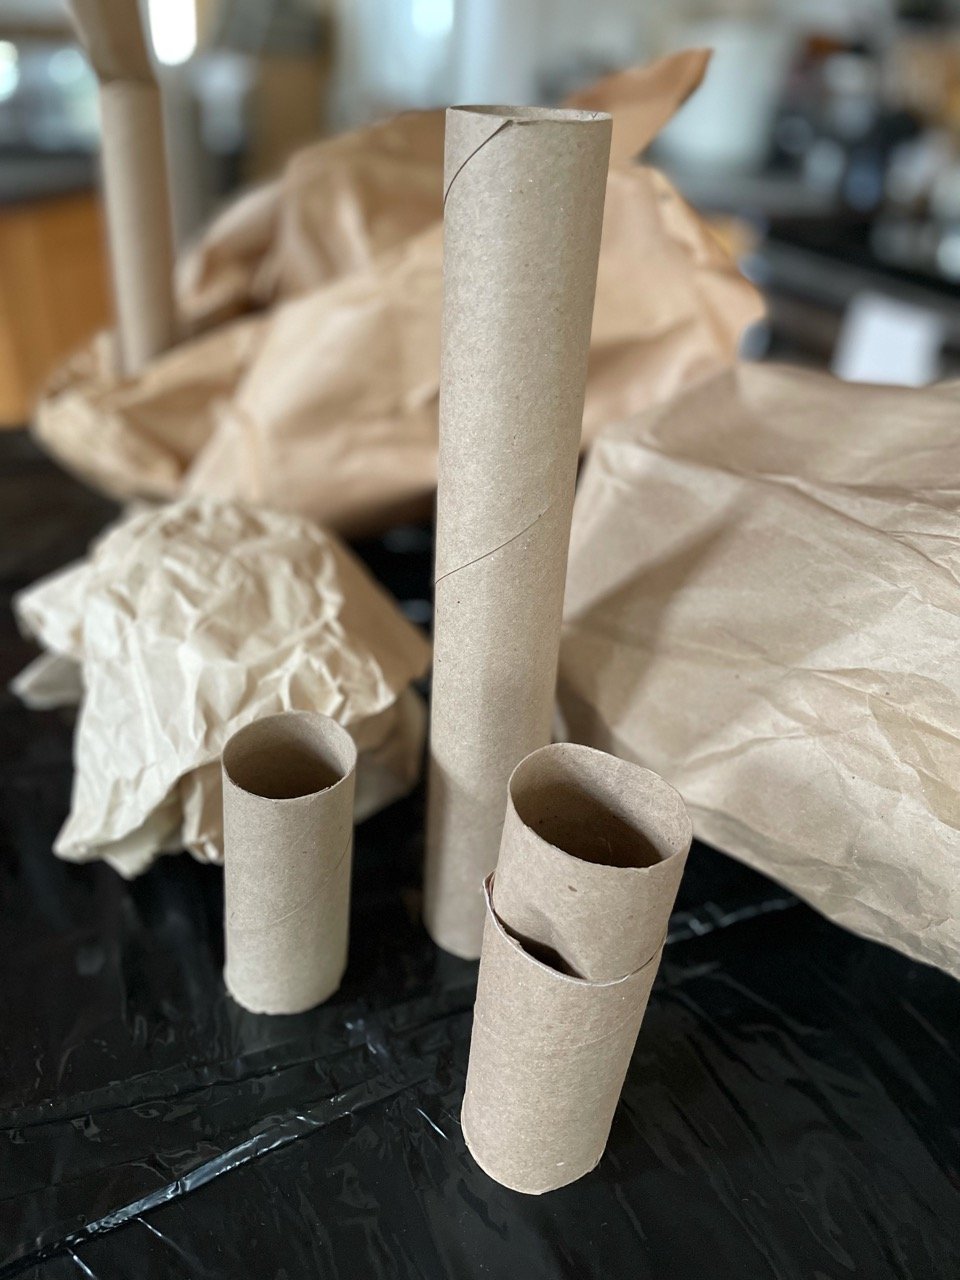
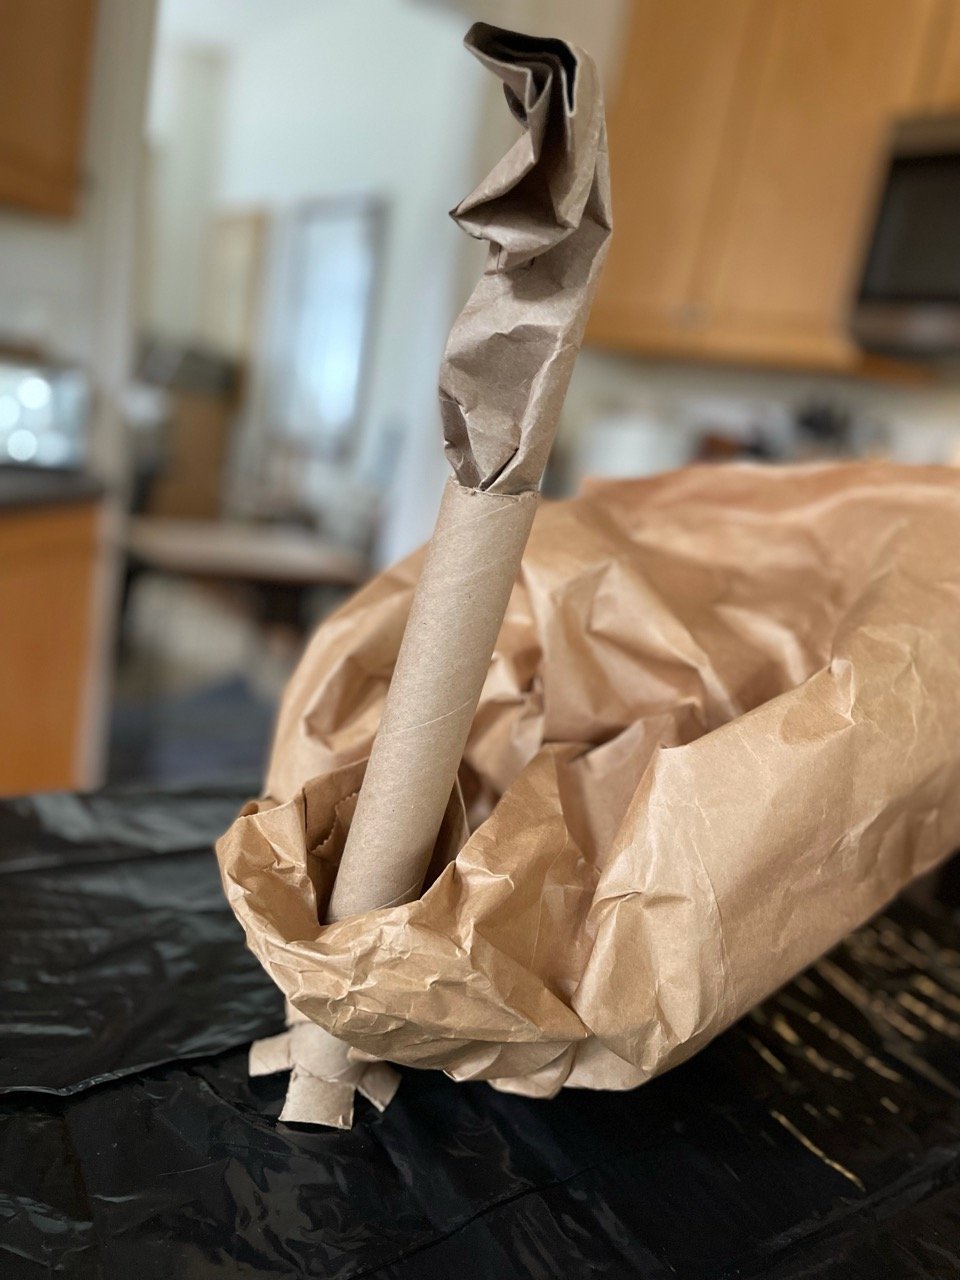
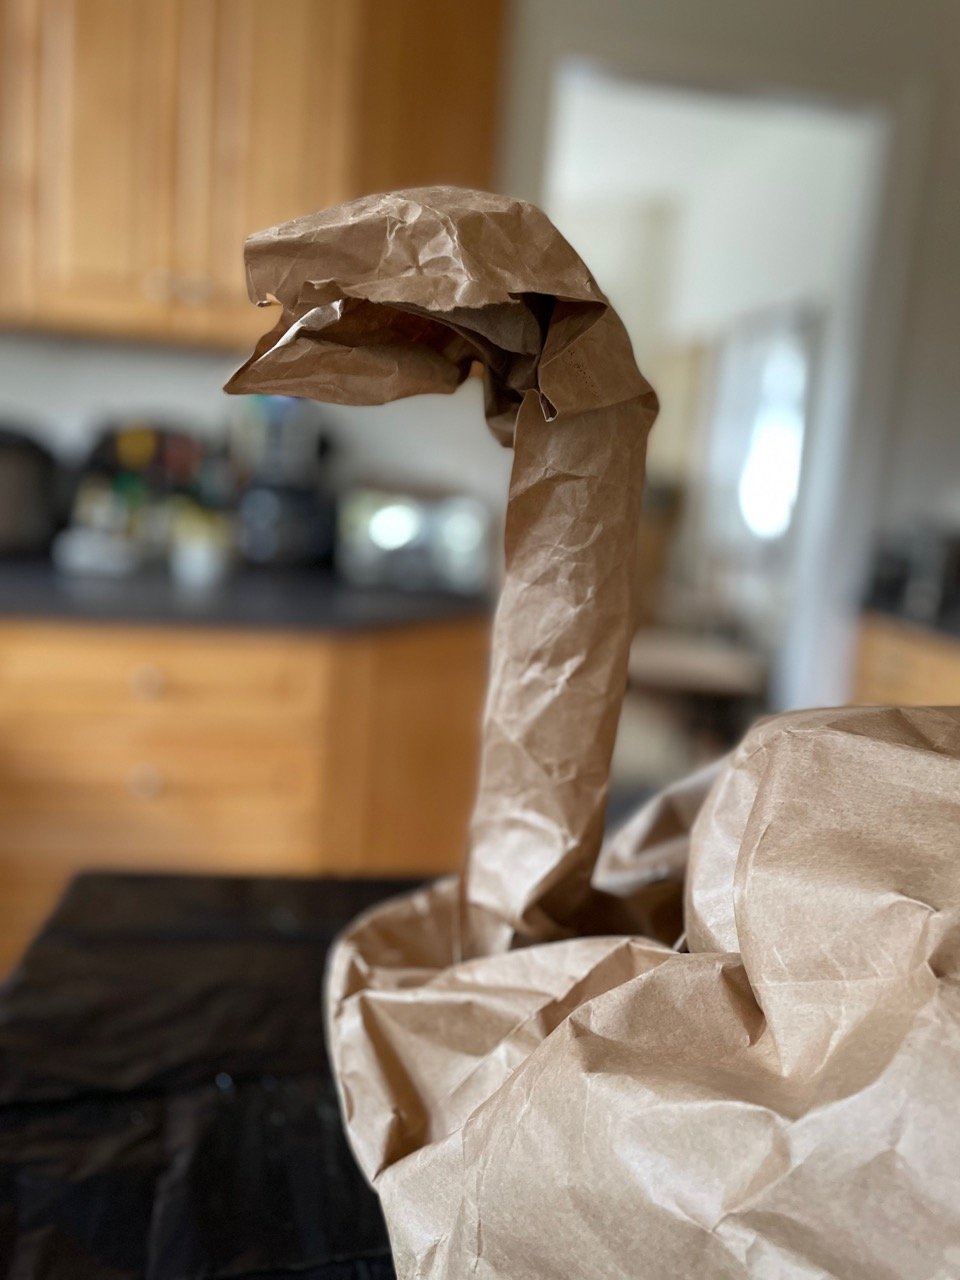
Using the paper towel rolls, scrunch the bottom of one to fit inside the body of another and another to form a support or armature for the turkey’s head and neck.

Checking length of the future tail against grocery bag body, cut to same length then accordion pleat or fold kraft paper or packing paper.

Gather pleated paper together tightly and secure with twine, string, or wire. We used a chenille stem.

Create a hole in the front of the grocery bag turkey body just large enough to pass the paper roll neck/head assembly through. We split the bottom into four flaps and folded them outwards to provide more stability.
Cutting basic kraft grocery bags apart provides working material for wrapping the neck and head, crafting wings and stuffing the body.
We wrapped the neck assembly with kraft paper, leaving excess at the top to form the head. Crush shape the head into an almond shape with a pinched point to make a beak.
Once the head is in a basic bird shape, glue down folds in the paper to refine. We used chenille stems to stabilize the head until the glue dried.


Taking a cut out side of a kraft paper bag, crush curve the edges to form an oval to attach across the front of the turkey to build out the breast and help hide the mechanics of the paper tube at the bottom of the neck. Tape down the crush rolled edges of the oval. We reinforced spots on each edges of the oval, made an opening, and ran a chenille stem from side to side behind the paper roll neck so the wire can draw tight to be stable.
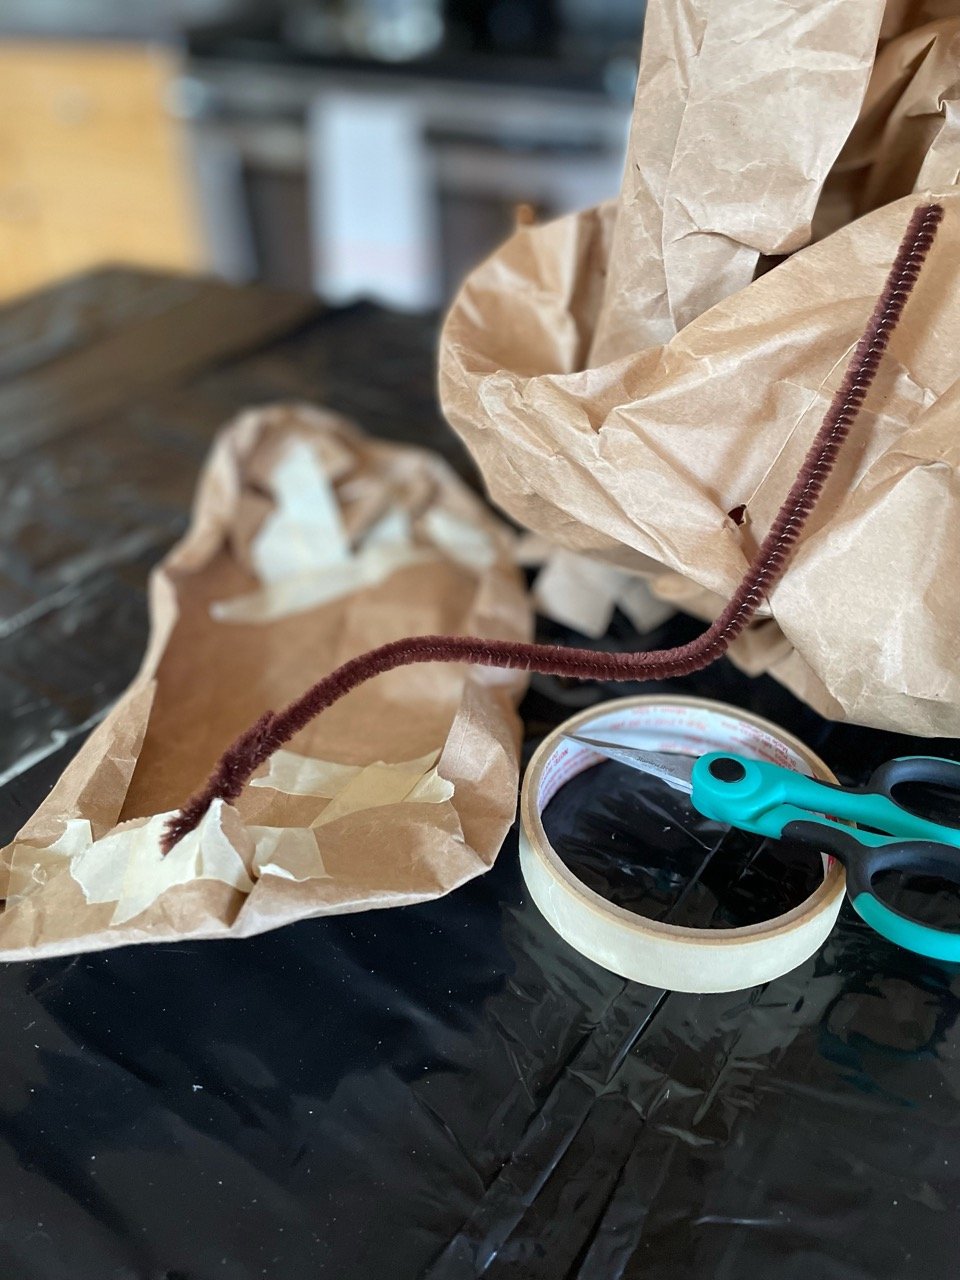
In the this photo, you can also see the twist of paper added, draped over the beak, to form the distinctive turkey wattle.

Turning to the rear of the turkey, we balled up heavy kraft paper give the body substance, and added pillars of toilet roll paper columns to increase stability in the interior.

Splay out the fans of the accordion pleated paper to form the tail. It helps the paper to stand to attach edges of individual fans together. We made two layers of paper fans so the tail is really full. We attached the tail with brass brads — but could have used tape or glue. As the tail stands by itself, it could be set behind the body sitting as a centerpiece without being attached.

Wings on turkeys are sort of useless, but as a design element on a centerpiece, they add a lot! We cut kraft grocery bags into wing shapes and add symmetrically matching sections imitating rows of feathers, gluing them one over the other. Before gluing, we folded the faux feathers down the center to add textural interest and a give a more featherlike appearance.


Once the layers of feathers were glued and the glue dry, we crushed rolled the outer edges of the wings— the non-feathered edges — to add dimension. We attached the wings with brass brads— but tape or glue works as well
(Hint: clothespins make great tools for softly holding paper edges while glue dries.)

Tom on the table showing the layers of paper added at the front to fill in any gaps, hide any mechanics or attachments and imitate a turkey’s feathered breast.

gnome time like the present
With time change behind us, looooong evenings ahead and certain holidays zooming up quickly— uh hum... we are looking at you, Christmas train— we are taking some time to do small, manageable projects. In order to speed up the process, thereby MAKING these project manageable, we don’t start at zero, but utilize bases that are already started i.e. upcycle readily available decor, but add better materials, or personalized finishes. For example, these thrifted gnomes followed us home and we set to work reusing a much loved, but timeworn sweater to improve their looks.
It’s fun to get something done in an afternoon or two and points for sustainability as well!!

We started by removing as much of the polyester fluff from the thrifted gnomes as possible. Using the existing gnome, we drew a simple pattern on a scrap piece of fabric and set to work. When reusing old sweaters, we prefer real wool or animal fiber, though any type will do. However an animal fiber sweater can be tightened up or felted if it is washed and then tossed in the dryer. This process expands the scales on real wool, helping them catch together, closing openings — or choose one that has already been through that process inadvertently… not that YOU put sweaters in the wash by accident…
We lined the sweater we chose to use with lightweight cotton fabric so that we could speed up the process with a sewing machine. Lining knitwear, especially loose or loopy knits, prevents yarn from catching on the presser foot. All of the sewing for this product can be done by hand with a tapestry needle if you are not proficient with a sewing machine.

In order to cut the sweater arms into gnome legs, we ran seams along a central line — then carefully cut each sleeve into 2 tubes by following the red line in between the sewn seams. Presto! Instant wooly gnome leggings!

In the narrowest portions of the gnome outfit, we clipped the lining at the finished seams to make turning the legs and arms right-side-out and fitting them on the gnome body a little easier.

Lookin’ a leetle creepy there, upcycled sweater parts…. but it gets WAY better!

Choosing some fun leftover yarn— any type, color, or texture will do— we made the SIMPLEST yarn gnome beard ever!! You may have bits of faux fur or alpaca or wool roving or goat hair or cat hair — whichever. Have we mentioned we are not judge-y? We are NOT judge-y. But for these gnomes, we circled the base of the hat with red trim — but could have used rope or twine — and tied on lengths of yarn by checking the length of desired hair or beard, doubling the yarn before cutting, making a loop at the top of the double yarn, placing the loop over the trim circling the hat, and then pulling the two strands of yarn through its own loop and pulling up on the strands until the loop is tight. We have heard it called a "lark’s head knot” but we call it “two strands through a loop thingy.” Po TAY to. Po TA to. Vodka. Whatever works.

Repurposed sweater cut and sewn and gently tacked to repurposed thrifted gnome. Please note the fuzzy bottom of thrifted fellow— tacking on a patch cut from the sweater completes the matching pants. Reusing an existing form, but changing the finish cuts this project time in half!

Mister and Milady, Jingle and Jangle, Him, Her, Them… they are complete!
meant to bee

While we are not fans of time change, early in and out of the chilly darkness, DOES mean it's time for small projects that can be done cuddled up with a blanket on your lap! These "gathering wool" sessions are for a purpose... handmade ornaments are lifetime keepsakes. Knitted, crocheted or felted wool are some of our favorites— but they could be quilled or cut paper or wire and beads!
Here is a knit bee from a Claire Garland pattern available from her website or on Ravelry.

Claire Garland has tutorials available for her techniques, so knitters with basic skills can learn new ways to create for charming results!


Little projects are a nice relief from a long knit, use small amounts of yarn, and building new skills is so satisfying. We really love the lifelike results... bee happy, friends! 🐝

Needle felting wool is another way to make easy, manageable projects like personalized ornaments from sustainable materials.
adjusting Robbie the Recycle Robot for older kids or grown ups
For older children and adults, create a mask to go with the Robbie the Recycle Robot costume. We used both pieces of a commercially available heavy duty disposable pie tin. We used a rounded wooden peg to push out a nose and eyebrow form in the malleable pie plate material, then CAREFULLY incised some shapes, opening eye holes and mouth with a screwdriver and hammer over a soft towel. (Hint: check the eye openings to make sure that the wearer can actually see!! Also, if the mouth opening is large enough, it isn’t necessary to add nostril openings.)
Using small pliers, we gently bent the edges of each opening towards the back of the mask and crimped the edge flat. With a round peg (a wooden spoon handle would work), we further rolled down the edges— then, though the edges were softer, we TAPED over each edge with sturdy duct tape until there were no sharp points. DO NOT put sharp points next to your face. EVER.
This mask form is NOT for small children.

Once all the inside edges of the face openings in the mask were safely covered, we cut 4 small squares of duct tape and placed one on the front and one directly opposite on the back on each side of the mask about halfway on each side. We made a small opening through the front and back duct tape squares. Using the large chenille stems, we poked from the back through to the front on each side of the mask and made a slight twist in the end of the chenille stem at the front to keep it in place. This makes for comfortable, adjustable mask holders!
Just because we like the decoration with a soupçon of additional unreality, we added small reflectors on the cheeks and secured the plastic top of the pie tin over the mask.

Robbie the Recycle Robot reporting for Halloween duty with his LED light aglow and ready to go!
(The mask is shown resting on top of the completed costume “tunic.” They are two separate pieces.)


fast & easy halloween costumes are close as the recycle bin
All Hallow’s Eve is just around the corner and everyone is thinking about costume possibilities— even these guys!
Revived melty candle. See the full how-to here.

Dressed up for the day (and the day after!) Inspired by #CreativeSprint post by @icklewitch.

Claire Garland knit pattern black cat and white mouse. See more patterns in her Etsy shop.

Going as twins this year! Knit cat mask.

Coming up with a costume, any costume can be taxing enough, but it isn’t always easy to get out and shop these days… Ordering online is a good option, but sometimes time or money is tight. Sometimes a good solution is as close as the recycle bin!
Last Minute Costume Kit (helpful items)
• brain (non zombified preferred, but, eh, it’ll do)
• the internets (if you must, in small doses only— waaaay too many ideas out there)
• kraft paper, grocery bags
• color construction paper or felt
• tacky glue — saves SO much time attaching
• glue gun (so-so on these g-darned painful implements of frustration and strings of glue)
• small sewing kit
• string/twine
• strong tape, any tape

Okay—
Now... think outside the box of preconceived notions and DO NOT under ANY circumstances appropriate sensitive cultural identities!! If you are unsure, just don’t do it.
However, have at it with gnomes, sprites, elves, natural elementals, etc... or sort-of-grown-up Groot thingys...
Be a little weird… We don’t always get a day. This is ours.

lifecycle of a centerpiece: ready to upcycle
Deconstructed centerpiece— one small bit of trash… the rest drying for use in an upcycled fall wreath.

Thrift store wreath to use as a base for upcycled fall decor incorporating materials dried from a September centerpiece.

Set to work! Surface protected, turntable set up and proper tools at the ready— delete tired, dusty or fusty materials from the thrift store wreath base. Attach dried materials saved from fall centerpiece with wire or hot glue.

When using materials for a wreath, it helps to divide them by type before beginning. Start by laying out elements around the wreath before attaching. Attach wire to the heaviest items by wrapping wire and stem with florist tape— brown tape, in this case. Wire the stems onto the wreath base. Regular stems can be glued in place with hot glue. Start with the heaviest and bulkiest elements and finish with the most delicate.
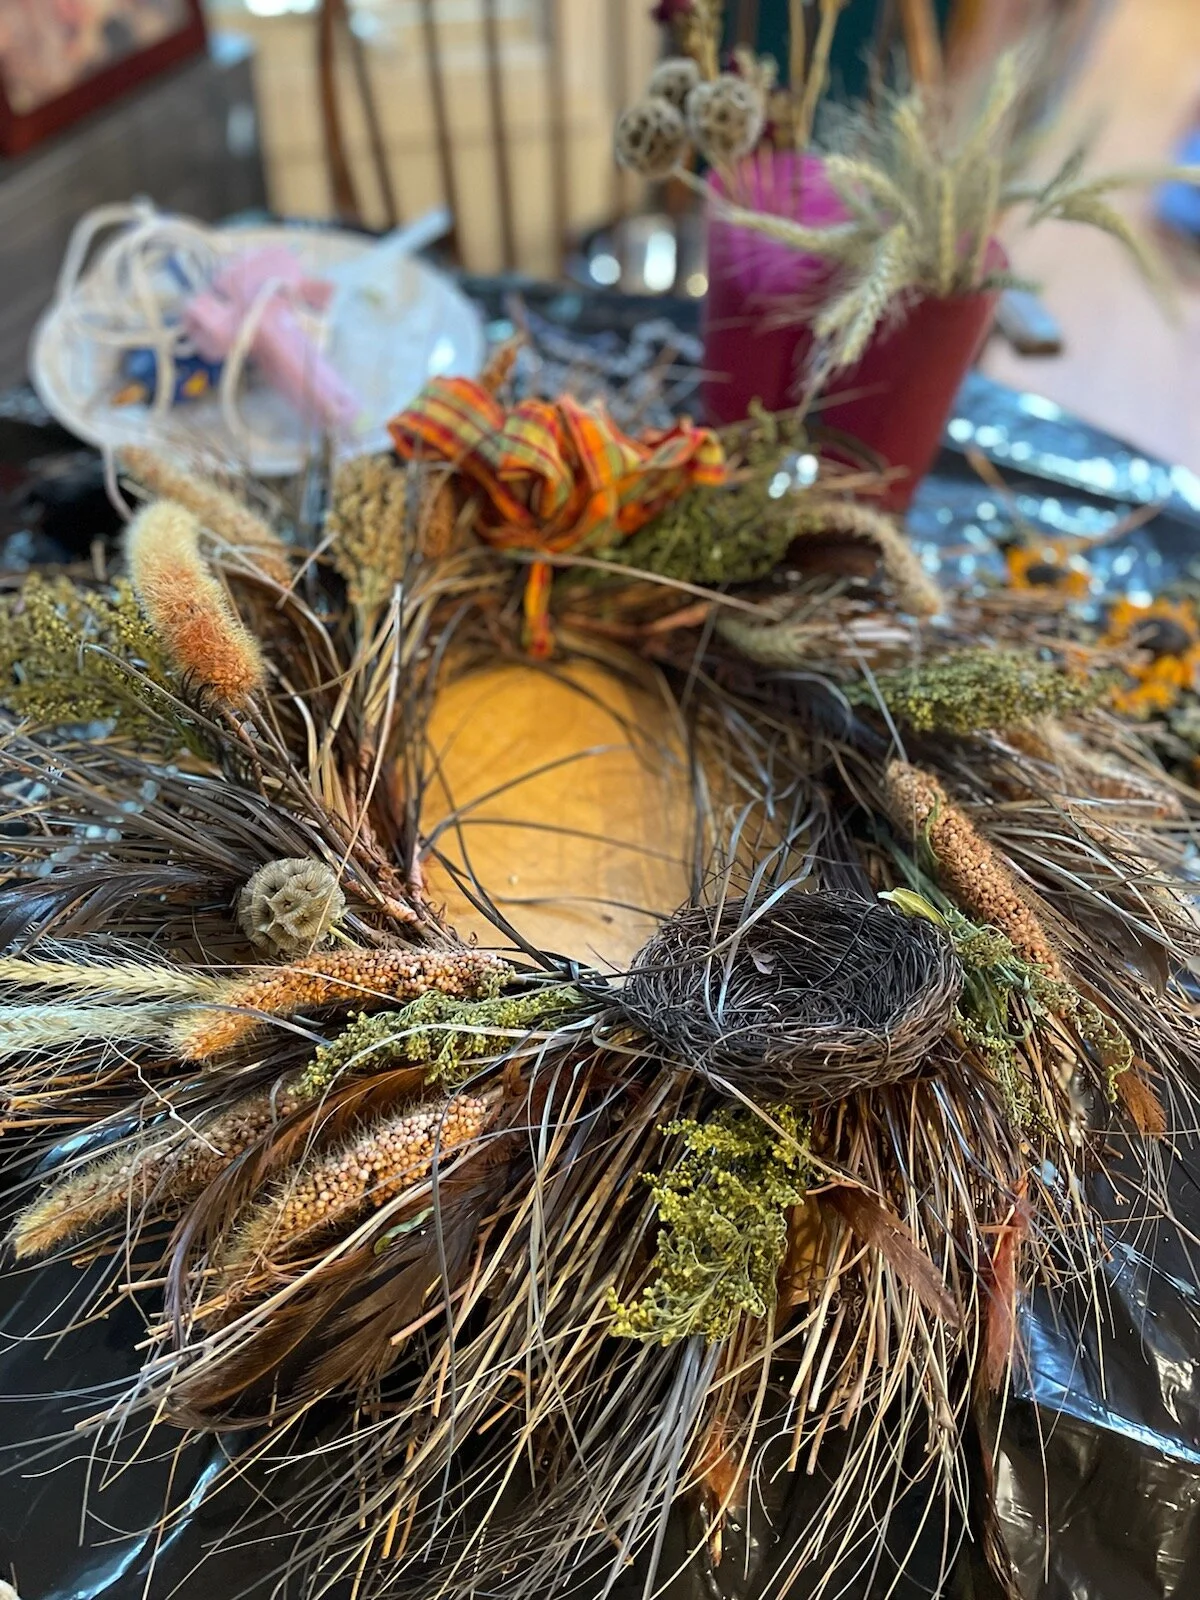
Hang up and have a look! Almost ready for the front door.

Et voilà !


life cycle of a centerpiece
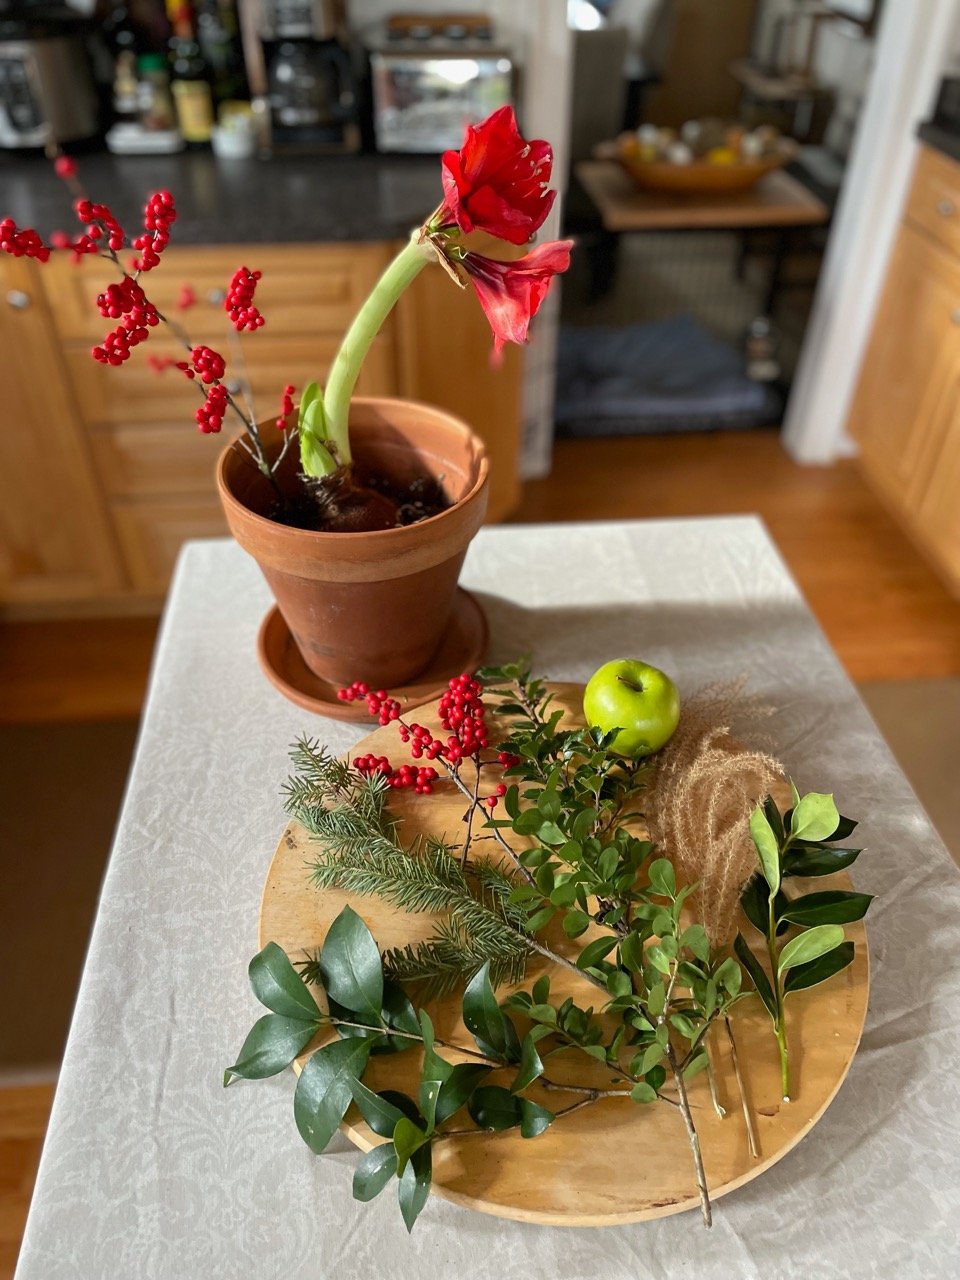
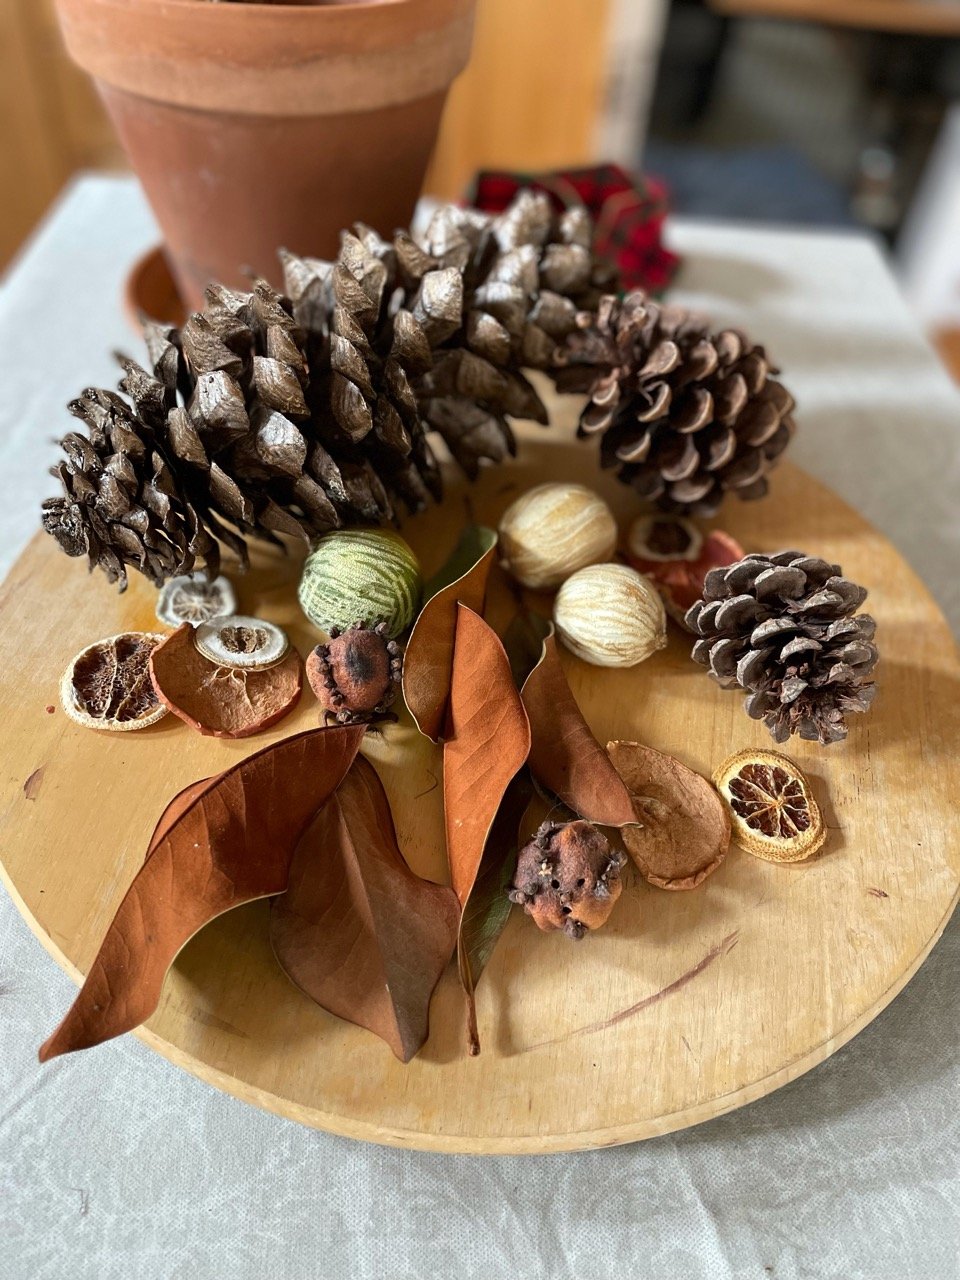
Sadly we have all learned this week that we are not saving the planet by switching to aluminum straws and filling the recycle bin… it will take a whole concerted effort on all our parts to move in the right direction. Not giving up hope — nor abandoning filling that bin — but definitely looking for ways to mobilize political action to combat climate change. In the meantime, we are using and reusing what we find at home, in the front yard, and within a short mile radius in order to limit purchasing goods that are created and transported at a huge human cost and worse carbon footprint. Herewith a centerpiece that went to a party, came home to chill with the fam, and will go on to serve yet one more purpose!

Boasting more lovely toasty tones and harvest grains than a bowl of granola, this sunny centerpiece looks great in copper. We upped the interest by clustering some intriguing fall flavored shapes at the base.

Natural wood tone toad stools and a printed paper Monarch— we think the whole package is the Autumnic bomb.
The next stage in the life of these material will play out as the natural elements dry to a preserved state to be used in the near future!
To be continued…right after we are done phone banking the entirety of Congress about Climate Change.
