


falloween with kids...and COVID

How to accurately describe parenting through a pandemic? I’d ask other parents in my circles, but we’re all tapped TF out. My kids are little, which presents its own challenges, but one silver lining is that they’re not entirely aware of everything that’s changed or been lost over the past year and a half. My youngest was born a few weeks before our area locked down in early spring 2020, so she doesn’t know all that she’s missed out on. My now four-year-old? Not so much. She’s acutely aware of missing swimming lessons, playing with cousins, and climbing around playgrounds with friends yet to be made. It’s been rough. We have vulnerable people in our family, so we’ve been on the extreme end of cautious. We almost lost a very dear friend in the first weeks of the pandemic. It snapped us into shape real quick, and how close it was shook me and hasn't left me.
But being so careful has meant sacrificing a lot, and it’s taken a toll. We’re going a little bonkers, feeling cooped up, and we miss interacting with others. (I’m not even sure I still know how to interact with other adults.) I see lots of families venturing out, doing things that worry me too much to do with my kids. I was a worrier before becoming a mom, and the arrival of my first kiddo amped up the anxiety big time. Now as a single parent, it’s all on me, and the fear of making a mistake can be overwhelming. But I feel guilty that my kids are missing out on different experiences. I worry that their development will be stunted or something. A “lost year” is quickly turning into two, and it represents my youngest’s entire life. I’m not sure she even realizes that there are many other babies out there. We just had no idea what this was going to turn into when it started.
Much of that first year is blurry, but when I started to reclaim some sense of control, or the ability to revive certain traditions and “the things we used to do,” it was that first Fall. Falloween is my favorite season and lasts from September 1st until Thanksgiving, roughly. It could be 90 degrees here and humid as hell, but I'm baking some damn pumpkin bread or stirring a giant pot of butternut squash soup. This season goes so quickly, sometimes you have to will it into your day or house.
Last year there was so much we didn't know, so there was so much we didn't do. Like trick or treating in the usual way. We did a Easter egg type hunt in the backyard with little pumpkins filled with toys and treats. My parents and I posted up behind different doors, and my kids trick or treated up and down the hallway of my house. COVID greatly influenced which events we participate in, and how we participate. We had to get creative if we were going to enjoy some version of our traditions.
Now that we’ve got an entire year and some change under our belts, and the grownups are vaccinated (Hallelujah!), we can weave in more activities that we’re comfortable with. With kids too young yet to be eligible for COVID vaccination, we’re still prioritizing safety.
Safe(r) fall activities
Keeping in mind the CDC’s emphasis on vaccination, masks, distancing, outdoor activities over indoor ones, and small groups instead of crowds, and advice on high, medium and low risk activities from sources like The Mayo Clinic, we’ll keep it small, outdoors, and local.
There is no shortage of great lists out there with every Fall activity you can imagine. This one from Real Simple lists 62 of the best Fall activities. 62! From hayrides and apple picking, to bonfires and drive-in movies, there are plenty of safe(r) options to consider.
You’ve got picnics and parks, farmers markets, pumpkin patches, hiking, camping, outdoor theater and concerts to enjoy outside. And there’s a ton of fally goodness that happens inside: small gatherings, or cooking with the kids, carving pumpkins, or creating something special with fallen leaves and other treasures from the yard. Nothing beats getting outside while the weather is cooperating. Some fresh air and running around, taking a moment to appreciate this transitional season— a pause between the bright, hectic summer, and the muted, stiller winter.
To kick off our celebrating this season, my parents, my littles, and I ventured out to an apple orchard. It was perfect: mild and sunny weather at a beautiful outdoor location. A bit busier than I expected, we were still able to keep plenty of space between us and others, even when the kids were running around. It was an adventure for them— a new experience and a new place to explore, and, hopefully, a new tradition for us. Oh, added bonus: like many orchards, this place also offers summertime berry picking, and, you guessed it: pumpkin patches later on. So we already know one place can return in a few weeks for the ultimate Falloween souvenir.

creativity gymnastics x dix (which is french for 10, but is our new word for thursday)

Creativity Building Activities
(ACTIVE is part of “Activities”)
Lie down — flat on your back— close your eyes— open your eyes— look up…
turn over — look down or around.
REALLY look but don’t describe anything until the next day when, after you close your eyes again, write down what you heard or smelled on day one, NOT what you saw.
Take out one word you use frequently from your vocabulary. Substitute another word. Look it up in another language….For a day, several days. Home=abode, Pickup= Draggin’ Wagon, table=mi mesa, etc…. doesn’t have to be complicated or clever, just different. Hell yes, get out the Thesaurus.
Call someone you know by another name— not a harmful name, for goodness sake, but a different name. We used to call our children “george” regardless of gender or actual name. Without the capital “G.”A george was an inhabitant who needed to get something done. As in, “Okay, george, time to clean up.” Substitute an uplifting name. We are happily known as “Pumpkins” from time to time. We suggest “Beauty”
Pick a color— make it a taste.
Turn a framed picture or photo in your home upside down for at least a day. Do you still like it? Why or why not?
Write 10 words using only the hand you don’t normally use.
Draw a plan of your home or room from the viewpoint of a bird looking down.
Record your voice saying three things you love.
Measure objects in a room using yourself as the measure: The door is 1 1/3 Beauties tall… the cabinets are half a Beauty wide…
Could be parts of yourself! Horses are still measured in hands!
Spread some flour or sugar on a flat surface like a countertop or table and spend 10 minutes or using both hands to doodle in the surface.

intro to building creativity
Anyone who knows us, knows we thrive in autumn. Is it the crispness of the cooler, drier air? The riot of color as an absolute exultation of color vision? Some atavistic understanding that you’d best have fun while the sun shines because there are darker days ahead? Yes. All of those. But also the concentrated celebration of creativity that unleashes in our part of the world at this time of year. In this short span, each month culminates in a fantastic holiday for artistic types: Halloween, Thanksgiving, and Christmas plus the December Holiday Season— whether or not attached to a religion connotation, there is no doubt, Revels in this portion of the calendar are part of our cultural identity.

What? How does Fall run into the December Holiday Season?? Astronomically, of course. While meteorologically, Winter begins December first, the end of Autumn, the winter solstice, happens December 21… on an otherwise unassuming Tuesday at 10:59 in the AM in our neck o’the woods, to be precise. So the Longest Night, the Shortest Day, heralded with Lucy’s light, opening of the Henges and cries of “Roll Tide” (Yule, in this instance) is close enough to fall to lump right in for creative types. This is OUR time, friends. With closets and attics and bins all flung wide, we are allowed, nay culturally openly encouraged, to ADORN ALL THE SURFACES! For a lot of us, a veritable decoration extravaganza ensues. We parade out theme-y things: Fall-y then Halloweenish, then, once those are wrangled back into boxes, we traipse out with glory and glitter, tinsel and greens, bells, bows and liiiiigggghts!!
Fun, right? Unless it feels like a competition. Decorating for holidays should be solid fun not trial by proxy on Internet sites (unless you are in a neighborhood with a competition, then it is a competition— and it is ON).

Every year the sphere turns on its axis unrelentingly cheerful towards this time of year… and then Boom. The Pandemic hit. Then it stuck around. All of us had to revise and rethink celebrations. With the admirable can-do of a nation known for creative responses, we did just that. Remember? Remember we, and you, and all of us, rose to that occasion and those Occasions became different, but still full of family and love. We all need to revisit our own resourcefulness despite the push to return to Before, we are not all out of this thing yet. We can, however, CHOOSE how we respond.
We are celebrating all y’all who dug in and made do. (If you hunkered down and did nothing? We love you too. Judgement-free zone here). Maybe you and your inventive energies are on low battery mode. The current situation IS kind of a lot. Herewith some beginning stretches for imagination mode.
We are in the middle of generation-defining moment. World changing events reach right into our own lives and homes on the daily redefining what is normal— or even available. We are starting small. Repainting the door we wrecked with Clorox in the first part of lock down… Taking Grandpa for that booster shot… venturing to the farmers’ market for apples and decorative veg, for gourdness sake.

Want some help retooling? Follow along...
Starter Box of Tools for Creative Thinking
Take your left arm and wrapping it firmly around yourself. Now take your right arm and, overlapping your left, wrap it around. Now give yourself a big ol’ hug for doing anything, any single thing creative. Even just thinking about it, however fleetingly. You are doing great, Beauty, you are.
Walk outside away from others, if safe— the very air is good for brain function.
Spend some time thinking now about what is important to you and yours. Sounds basic, but make a list!
Check it twice…. ha ha! No, really. Put the first list away. In a week, make the list again. What resonates?
Define areas to decorate.
If you are a whole house type— good on ya! But for some of us, the holidays are overwhelming. Keeping decor to certain areas ratchets down the angst level from eleven.
Decide not to purchase but to create.
If it is fun and not an Instagrammable Moment where getting things “right” takes over. Perfectionism is surmountable, but it is tough! Acknowledging you have a problem is the first step.
If you have to purchase anything, try local (farm markets, craft fairs, second market from resale or thrift stores)
Process not Product.
For curated creative ideas, have a look at our Pinterest boards:
Fresh Holiday
DIY on a Dollar
Pumpkin to Talk About
Or, read about a few creativity exercises to flex your artistic muscles and grow your interest.
bored of boards? enter the mood bowl
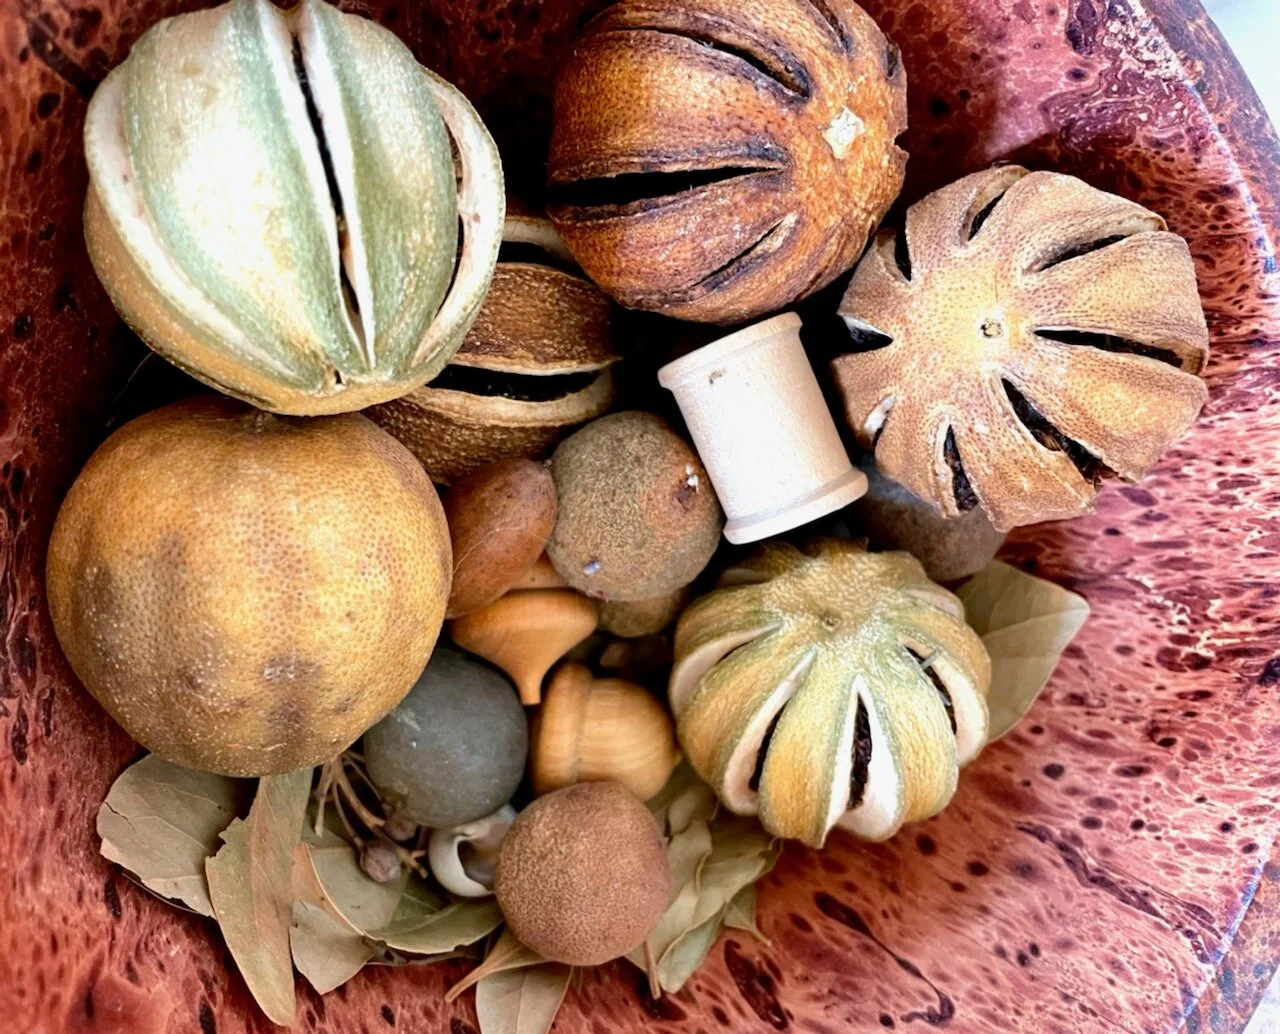
A mood bowl picked for an Autumn mood.
We’re all familiar with mood boards. And if you’re familiar with working with clients, then you know how helpful, and often necessary, having a tangible set of inspiration bits can be to aid moving from idea to visualization. A lot of people struggle to envision how a design will come together, and shy of some impressive psychic ability, we can’t expect others to know where a project is headed if it’s only, well, in our head.

Mood board example, created for a client’s guest bedroom.
The above mood board, circa 2010 comprising natural linen hopsack with indigo dye pattern over silk check curtain fabric, and maize-inspired colors like Beeswax and chestnut-y colors like Old Gold (pictured here as paint “chips”). You probably recognize many of the hues as they’ve cycled back in style.
When planning a new scene, we’re big fans of the mood bowl. Spying and sorting through little bits to add to the collection, placing them all together in a creative cauldron is a tactile and satisfying ritual. It’s like handpicking only the best ingredients for some creation yet to be concocted. Highly recommend. And, bonus points, these beauty bowls can double as decor.


diy on a dollar: fall leaves
Another sustainable seasonal idea: Upcycle paper grocery bags into colorful Autumn decorations.

Cut open a grocery bag and fold accordion style. Use stencils, trace real leaves, or, heck, just take a guess! Then cut out multiples to scrunch and crunch around centerpieces, use in wreaths, or scatter on the table.

Use the bottom of the bag as a palette and sponge color onto a few or all.

You are doing DIY on a Dollar! You've got FALL in the bag 🍁 🍃 🍂
diy on a dollar: fall ideas

Dryer vent tube secured with hot glue, painted with acrylic paint. Add leftover faux leaves and/or dried material. Twist of paper and cut grocery bag leaves.

More pumpkin fun with simple, economical materials. Pots migrating inwards after summer? Repurpose them for Fall with paint inspired from vintage cards or felt cut outs — bring on the Kawaii smiles!

Any craft is welcome therapy, especially if the kiddos are involved! Perfection is soooo not the goal... but PROCESS! Much loved pumpkin from preschool days has pride of place.
life cycle of a centerpiece
Sadly we have all learned this week that we are not saving the planet by switching to aluminum straws and filling the recycle bin… it will take a whole concerted effort on all our parts to move in the right direction. Not giving up hope — nor abandoning filling that bin — but definitely looking for ways to mobilize political action to combat climate change. In the meantime, we are using and reusing what we find at home, in the front yard, and within a short mile radius in order to limit purchasing goods that are created and transported at a huge human cost and worse carbon footprint. Herewith a centerpiece that went to a party, came home to chill with the fam, and will go on to serve yet one more purpose!

Boasting more lovely toasty tones and harvest grains than a bowl of granola, this sunny centerpiece looks great in copper. We upped the interest by clustering some intriguing fall flavored shapes at the base.

Natural wood tone toad stools and a printed paper Monarch— we think the whole package is the Autumnic bomb.
The next stage in the life of these material will play out as the natural elements dry to a preserved state to be used in the near future!
To be continued…right after we are done phone banking the entirety of Congress about Climate Change.

The Three L’s of My Fall Mantel
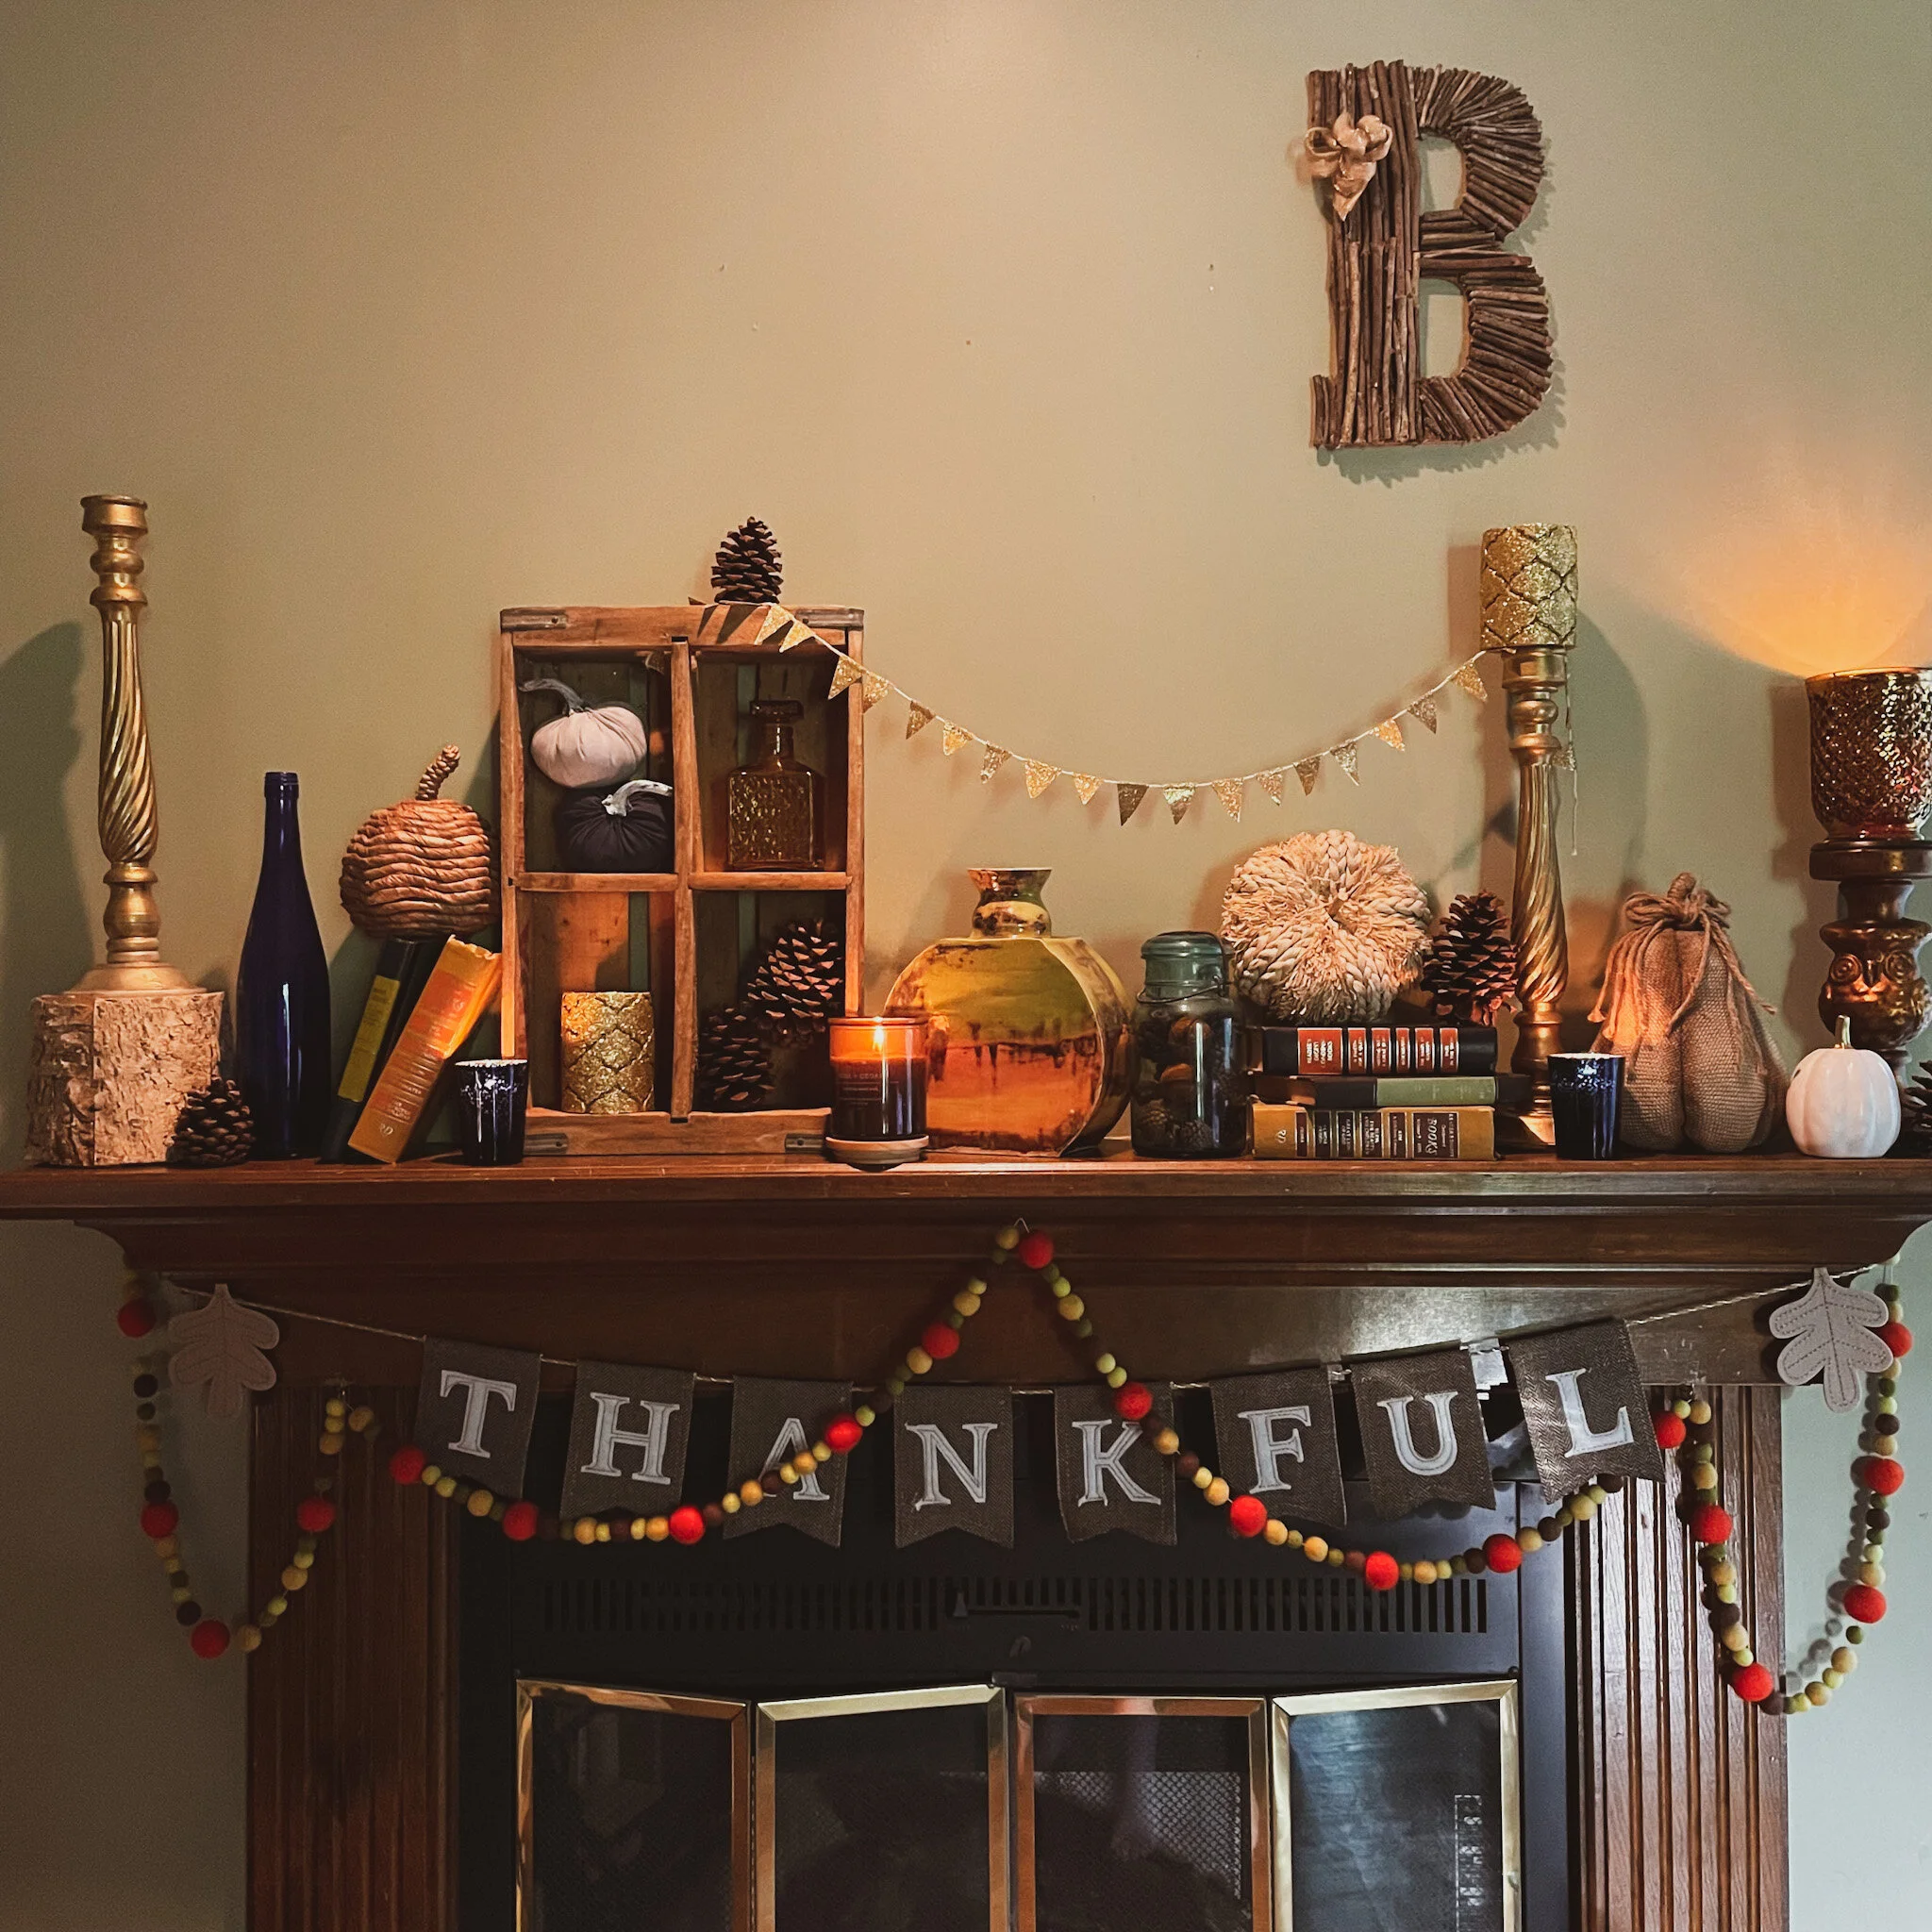
Mantels can be as simple or as complicated as you want. They can follow a color story, theme or like mine, be a hodgepodge of collected items from over the years. I really only have one rule for my mantel: Everything MUST fit in one storage container.* It’s a mantel. Not a Christmas tree, but more on that some other time.
*Fall-specific decor, but feel free to pull other items from around the house.
Yes, we all love elaborate mantels on Pinterest, but then you have to store all that sh*t, and let’s be honest; unless this is your first year, you have enough sh*t in your [insert storage space of choice]. Even if I buy something new, as I did this year, it means something must go if it all doesn’t fit. But I will say, I have a black belt in how to organize a store container.
Otherwise, it’s game on. The rest is up to you, go for what feels good or have a plan. As a Virgo, I like lists and planning, so for me, I look for three simple things when putting together any decorated space: levels, layers, and light.
Levels
This is a pretty basic one, but as a graphic designer in my professional life, I like to think about what you’re looking at from left to right and I don’t want it to be the same across the line. So I build things up to varying heights to give some visual interest. And no, that does not mean it has to be symmetrical. Unless that’s your preference and then, hey, good for you. For me, I spent a sh*t ton of time on this and I want you to look at it for a minute or two. It’s about the details.


Layers
While mantels are usually fairly shallow, you can fit way more on them than you think! Using things like wood crates, books or candle holders can be used for stacking and creating depth. Also don’t be afraid to let things hang off the edge or droop over if you need to. Maybe you put a pine cone at the bottom of a candlestick or a small pumpkin on top of a vase. Anyway you like it, use this tip for fitting more on your mantel.


Light
Yes, candles. But also think about where your natural light or light from your fixtures hits your mantel. Mixing metallics, glass, and other shiny things can also help give your mantel depth but reflect light into the smaller, darker spaces of your mantel.

Color is another way to help direct light. When you think about colors, think about coordination and contrast. Lights next to darks, shiny next to flat.

Just for fun, here is my list of random objects that I keep around and have sourced from all over. Thrift stores have a ton of great items, as do garage sales and yes, even Target and Big Lots. But I don’t think I’d go outfitting my mantel from a big box store. The trick for me is mixing it all together like you planned it.
Ingredient list:
Candlesticks
Old books
Garlands of any sort, paper, fake foliage or felt.
Dried items
Ceramics
Wood
Crates or containers
Candles
Candle holders
Photos
Pine cones
And of course, Pumpkins, but not just real ones. Raffia ones, ceramic, glass, etc. After all, It’s decorative gourd season.
Five smells for the love of Fall, that are not Pumpkin
When styling a scene for your home, especially a seasonal one, don’t overlook scent. Scent can be powerful and evocative, transporting us to specific memories or traditions. If you don’t happen to have ingredients or oils on hand to whip up your favorite Fall scents, our friend and guest voice Marie is here to help with recommendations.

Deep inside my tattooed, red lipstick and all black wearing soul, is the most basic of stereotypes: “Girl who loves Fall.” She indulges in more than a few pumpkin spice lattes, takes photos standing atop a carefully selected pile of orange, red and brown foliage, and sips Apple Jacks (recipe below) in front of her chiminea. It is, even more than Christmas, my favorite time of year.
Beyond the traditional Midwest family outings of various produce patches and picking activities, working on your knife skills with gourds, is one underrated tradition that I love— selecting a fall fragrance for my home. And while I love the smell of pumpkin spice in the morning, I prefer that smell in my coffee. So put the Glade pumpkin spice candle down and feast your nose on five smells for your home that will make your guests stop and ask, where you got that candle.
No. 5: Midnight Forest - For the ladies who like to cuddle up to a good smelling man, this candle is for you. Do you ever walk by a man who gets you to double take just because he smells good? This is that in a candle. This is a great candle for a bathroom.
No. 4: Blue Mint - If there is one candle that takes me from fall right into winter, it’s this candle. Not as icy and the name suggests, I love this candle in my bedroom because it makes me want to cozy up with my weighted blanket and read until Spring.
No. 3: Smoked Wood & Amber - Don’t let the name fool you. This doesn’t smell like burnt wood, but the best damn fireplace of all time. The amber is the sweetness that counters the smoke, which is just a hint. It’s warm and inviting and was gifted to me by a very fancy woman who was the premier buyer for the home department at a high-end department store. So if you’ve ever wondered what fancy women’s homes smell like, this is your Huckleberry.
No. 2: Rose + Cedar - This candle smells like a fancy cabin. And the wood wick gives it that cozy fireplace vibe. If this candle came as a gift, it would have hot cocoa and a red and black checkered blanket in a wire basket with it. This is my second favorite fall candle and one that is burning on my mantel as I write this.
Told ya.
No. 1: Cedar + Magnolia - Truthfully, I have all the size variations on this candle. It is my Sunday morning cleaning candle and my Friday night cozy up on the couch and watch movies candle. A sweet floral with a just enough cedar to get you in the mood for scarves and sweaters. This is my go-to for fall parties, hostess gifts, and a signature smell in my home.
Displaying your fall candles at home:
Have more than a few fall scents you like? Of course you do. Take a vintage tray, charger, because let’s be honest, if you have chargers, you probably don’t use them enough, and display all your fall candles together on a mantel, coffee table, or your dining room table. Even a small wooden cutting board would work. Note: If you decide to use pillars, make sure they are sitting on something to catch wax, the last thing you want is a perfectly usable cutting board regulated to decor only because candle wax dripped on your cutting board.
Apple Jacks Recipe:
Your Favorite Whiskey, like this one or this one
Ice
In a tall glass, add ice and 2oz of whiskey.
Top with apple cider.
Make it Instagrammable: Add a slice of apple and a cinnamon stick for garnish.
Warm version:
Heat cider in a small saucepan on medium low until just steaming, about 7 or so minutes.
In a mug, pour ½ oz of whiskey and top with warmed cider.
winning entry: introduction
How do you create a welcoming approach to your own abode or staged property? Start with the story you want to tell. The message you want conveyed will begin unrolling with the first view by guests or potential buyers. Conventionally known as “curb appeal,” this view sets up expectations for how the property is perceived. Tidy, but messy-ish in the right, naturalistic way, balanced, properly lit and easy to approach, the front porch, deck, stoop, or landing SHOULD, introductions being made and cartes-de-visite properly exchanged, usher the visitor through a congenial portal into a gracious space within.
Shut The Front Door!
It’s THAT easy?

Well, generally speaking, yes. Again, how is this accomplished? We recommend taking it step by step…
Ah ha ha… hum.. whoo boy. Sometimes we crack ourselves up…
Also, we are not seeking sterile perfection, but progression...
In truth, setting up a winning entry does consist of a series of stages as well as staging. Contrast large elements with small, combine and cluster pots of fresh plants with small additions of seasonal decor. This may mean raising up certain elements and adding in a small amount of contrasting color.

Symmetry has its place in the design world and matching pairs of containers for live plants exude a sense of formality demarcating the FRONT DOOR. We like to goose…ahem.. the staid regularity slightly in favor of whimsy by adding a touch to one side or other: another, smaller, planter or garden sculpture.

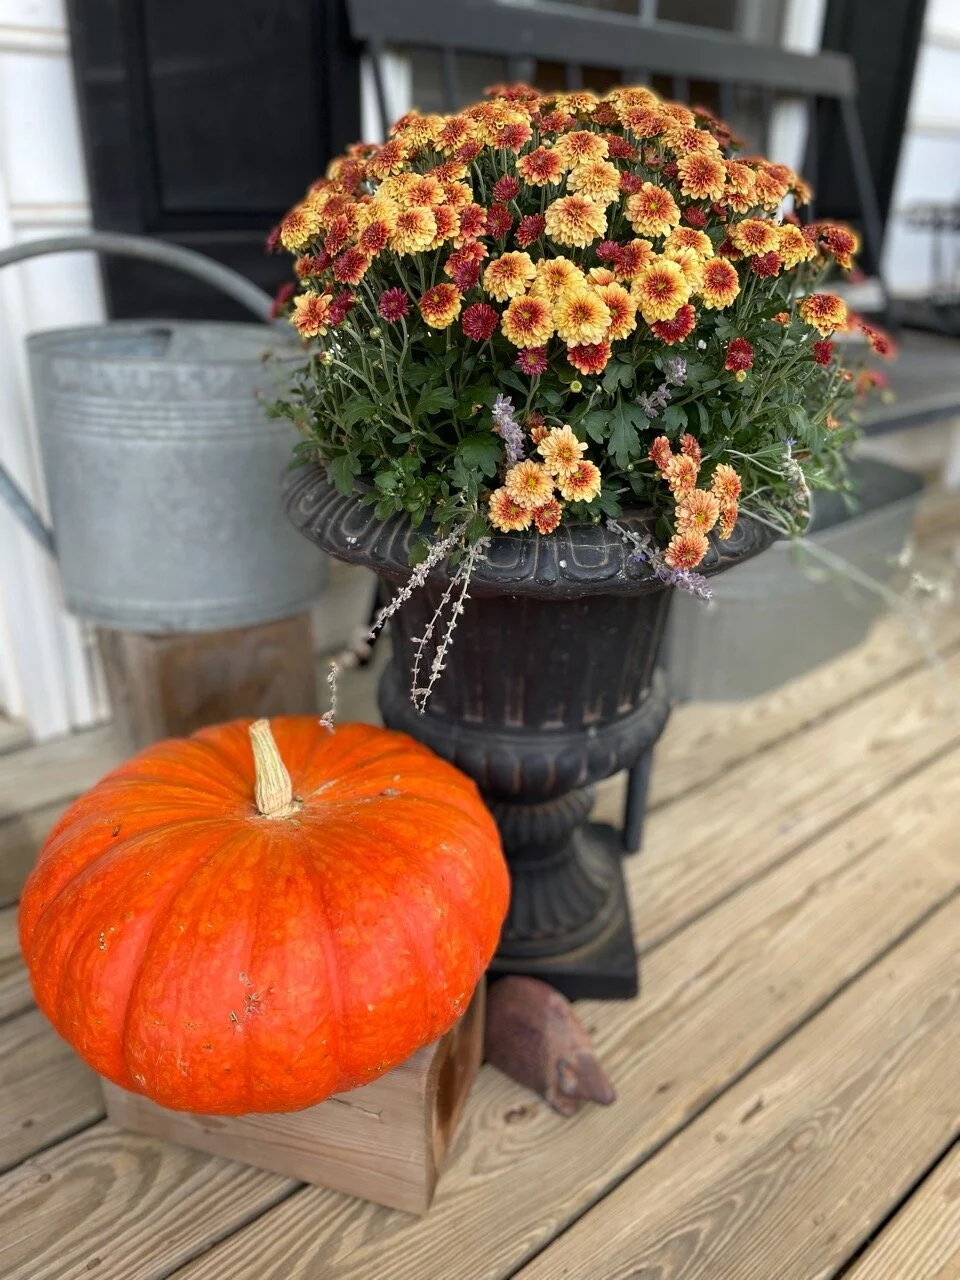
Plantings well suited to containers with a punch of color… the Fall Y’all police might see a violation but we are happy with a violet nation… ok. pink. pink nation. And these are impatiens, but so are we with conforming to strict ideas of “seasonal.”

Set a scene for an event with faux material combined with the natural.

Check out our Pinterest board “Winning Entry” for more ideas and suggestions!
…and the award for Winning Entry for 2020 here at Cordelia and Co Design goes to (we are a leeetle more open now… but not much)

faux or no: fool the eye for long lasting effect in staging
While we bang on continuously about using natural materials wherever and however possible, at times, faking it IS making it. Staging is a specific form of decoration meant to set a scene and elicit specific, hopefully pleasant, responses.
In staging a property for sale, the pleasing “scene” often has to last for longer than fresh material will hold up. Few things are as unwelcoming as rotting fruit or dead plants! Calling in the faux is not only acceptable, but advisable for staged properties expected to be open longer than a week. Seek out really good reproduction fruit, vegetables, florals and plants, and keep them ready as reliable backup performers for your A-list celebrity arrangements and decor. Though most faux leaves etc. can be stored flat, we take the time to work the bendy parts so that the fake leaves and flowers fall in naturalistic attitudes, rather than looking like a squished and tired commuter just off the Paris Metro…quelle horreur!

Arrayed in containers and pots that would normally be used for real plants, the artificial can fool the eye and hold up much longer without care (though have never had to find out— the homes we stage sell super quickly! Howifsomeever, we HAVE had to leaf notes for the fab real estate crews and homeowners to please NOT water the staged plant “life”!)

Good faux flowers add sunny touches to staged rooms.

Naturalistic arrangements help staged rooms feel occupied, pleasant and living— rather than sterile and hotel-like.

Faux fruits and veggies make fun additions to kitchen staging implementations— plant that suggestion! This is a place where good food and good times will happen. Trust.

Thrifting your way to stable assortment of fauxlicious stand-ins is easy and cost effective.

Ready for our close-ups, Mr. DeMille!

Natch, no faux for real party time— there is nothing like fresh for that Open House or reception! Bring in the Stars of the show for the main events, then substitute the stand-ins for longer lasting beauty.
an autumnal meditation
This is the second Fall season of a pandemic that radically changed our lives in varying ways. Last year was rough. Not going to lie. We dug deep and found ways to move forward, to hold what was important more closely— but in new ways. We scrambled a bit trying to figure out how to newly create our treasured traditions and celebrations amongst strange, new constraints. We are not just talking sourdough bread baking, or plastic film hugging walls, but zoom rooms and screen meals and outside picnic parties with china. This year we have more time and wisdom on our sides. We can plan ahead, take the best that last year taught us — let’s go with more intentional, conscious decisions about what matters, who matters most, and how to put that, and them, altogether first, amen.

This is the second Fall season of a pandemic that radically changed our lives in varying ways. Last year was rough. Not going to lie. We dug deep and found ways to move forward, to hold what was important more closely— but in new ways. We scrambled a bit trying to figure out how to newly create our treasured traditions and celebrations amongst strange, new constraints. We are not just talking sourdough bread baking, or plastic film hugging walls, but zoom rooms and screen meals and outside picnic parties with china. This year we have more time and wisdom on our sides. We can plan ahead, take the best that last year taught us — let’s go with more intentional, conscious decisions about what matters, who matters most, and how to put that, and them, altogether first, amen.
Meditation: What kind of Fall do YOU want? Drop down the Beauty lenses, activate the “everything is up for change” vision. Look around with those fresh eyes. "Have to”s for celebrations are out the window and a new way of doing sprawls before you. Time honored traditions are wearing new shoes, dancing to new tunes… Avoid the stores and maskless hordes and make your own fall decor! How about a Thanksgiving picnic? Who doesn’t love a turkey sandwich with cranberry relish? Oh, and hand pies… Leaf it to us, we’ll lead the way!
Over the next few weeks, we’ll drop some posts with how-tos for make-dos and make withs what you’ve got that last from the first of Fall through Thanksgiving…In the meantime, wrap yourself in everything Autumn, gather up some pods, and corn, and other naturey bits and bobs to bring inside to honor all you’ve weathered this year. Be gourd to yourself, punkin’, and each other.

It’s Fall, y’all!
September. Have we missed you! Babe, when you roll up on the calendar, you usher in the best months of the year. You bust in trailing leaves, crowned in fruits and grains, trays of goodies balanced against your bouncy bosom, handing out muffins, shouting "Fall, ya’ll!” You are here. Meteorologically speaking, and soon, astrologically as well. We’ve been holding in all of our gourd-related puns for so long we are about to burst. We want to dust the world in cinnamon and nutmeg — to orange up the decor and live our best pumpkin-spiced life! And, 90 degrees or no, we whip out our warmest, coziest throws and wish for it to last and last. But before we dive headfirst into a dog-poo-free leaf pile wearing our favorite sweater while sipping a spill-proof hot apple cider— a word, please.

September. Have we missed you! Babe, when you roll up on the calendar, you usher in the best months of the year. You bust in trailing leaves, crowned in fruits and grains, trays of goodies balanced against your bouncy bosom, handing out muffins, shouting "Fall, ya’ll!” You are here. Meteorologically speaking, and soon, astrologically as well. We’ve been holding in all of our gourd-related puns for so long we are about to burst. We want to dust the world in cinnamon and nutmeg — to orange up the decor and live our best pumpkin-spiced life! And, 90 degrees or no, we whip out our warmest, coziest throws and wish for it to last and last. But before we dive headfirst into a dog-poo-free leaf pile wearing our favorite sweater while sipping a spill-proof hot apple cider— a word, please.
The Big Boxes That Be are already pushing the great red and green consumer festivus on us, packing the shelves with jingle and jangle. We are here to throw that switch and turn the Christmas train right around. Let’s put the Ho ho holiday back in its box, right back up on the shelf in the closet of assorted celebratory gear, figuratively and mentally. Pause. Take THIS moment in. This glorious, pivotal, equinotic season. This stretch when time turns on its axis. The changes happening are a season all on their own. In this pause, make room— create some sacred space to celebrate the mercurial moments therein. Celebrate you. Celebrate yours. The Christmas train will be along to sweep us all up soon enough. For today, and for at least a few weeks hereafter, stop and take this all in. Celebrate the richness, the layers of senseplay abundantly available…the colors, the flavors, those sounds… the atavistic ingathering eyeing incoming winter, felt in the bones. Exit Persephone. Welcome pumpkinpalooza, yes, but also the transitions, the contemplative variations, of precious, fleeting Autumn.

We plan to share some fall-lovin ideas here to help you fill your days and homes. To note the moment. Stay tuned for simple, budget-friendly crafts, makes and alternative activities— with not a Box in sight. So, go ahead— start saving treasure leaves and gathering some sheaves from around your world. If you’re #blessed to live in an area where colors change, take advantage and enjoy those living canvasses.
file this under “old school”

Finished, upcycled table.
We are all looking for ways to move furnishing in a sustainable direction. One of the best ways is to reuse pieces that have already been made. Upcycle furniture from home, internet lists, or hit the thrift shops or yard sales (with your mask ON, please) and make something old new again.
A quick update in a fresh color gives a basic piece new life. Here we have taken a cue from old files and used what was heading for the trash bin as part of the decor— doubling our recycling cred in the process. (Sping!)
Using parts of letters and envelopes, pretty paper hand towels, and other paper ephemera, we collaged the top of a rather nondescript, simple school desk using a classic glue adhesive like Mod Podge. A little thoughtful layout created a gift lovely enough to go to anyone, but, in this case, a personalized keepsake for the recipient.

Saved article from Better Homes and Garden that inspired this project. Does that say 1997?!
peek inside: wreath construction

Formerly fresh garden rose wreath showing construction. Lightweight green floral wire wrapped around cut stems.

Structure behind the construction: not always a pretty face. Woven bark wire for stability on back of once fresh picked garden roses woven with lightweight wire to form a wreath.

wreath making: fresh cut from the garden
If fresh decoration is needed for a short term event, a wreath makes a great stand-in for a cut flower arrangement. With a few pieces of equipment, twining together simple greens, with or without flowers that hold up out of water, can be the answer for low-cost, high-impact decor. Of course they look wonderful and welcoming on doors, but can be hung in windows or laid on tables for a bright reminder of the outdoors.
Garden or yard greens and floral elements are fleeting, but allowing them to condition, preferably overnight, in cool water in a clean bucket, should keep them looking good for hours. Some greens from the garden, especially evergreen varieties, can last for several days. We construct our fresh wreaths with a base of evergreen branches. Surprise, you all— “evergreen” does not have to mean spruce, fir, cedar, or pine! Look out for varieties of juniper, cypress, soft hollies, arborvitae, cryptomeria, euonymous, laurels, ivies, and curly privet as some examples of lovely background foliage. If you are in a position to plant these varieties at home, they come in handy for money saving elements for all floral arrangements. Check with your local nursery for what grows best in your area— and try to plant native varieties whenever possible!

After grooming greens, snip larger branches, if necessary, into 8-12” sections. Lay the sections along each other to form a fulsome line. Twist the end of green floral paddle wire at the beginning of a line of branch sections and gently, but securely, wind the paddle of wire around the stems and in between the leaves such that the stems are held, but leaves are not all mashed together.

When ready to assemble a fresh wreath, trim off any discolored or tatty leaves, bare branches or dry areas, roots from ivy, and any really new growth as it will be too delicate to hold up out of water.

Add in sections of branches or stems, continuing to gently wind the wire, until the desired wreath circumference is achieved.

We often include flowering branches such a shrub roses, limelight or other hydrangeas or less tender cut flowers such as rudbeckia, black eyed susans, cone flowers, blue sea holly, lavender, and zinnias.
Once you have the length of wreath you want, lay flowering stems or branches along the leaves as you wind the paddle wire around as you go, securing everything in place. Overlay the two ends of branches and flower line to form a circle. Wrap tightly with wire to hold ends. Cut the wire with wire cutters and twist tightly, bending the wire ends down into the structure of the wreath so no sharp points are left. Check overall appearance. Wire in leaves or flowers wherever needed to fill out less fulsome areas. Don’t forget to add a twist of wire as a hanger!


Mirror, mirror on the wall, who is the prettiest of them all? A wreath that has made a visit to the “ladies” or “gents” or “the bath chamber of the all-thing,” we are all inclusive here… the point is to check out your creation in a mirror. Amazing how our eyes “tire” of looking at any work and a mirror image forces a new perspective and often reveals any deficits that might need amending. Alternatively, take a picture, walk away from your project and take a look!
floral basics: flower time!

tools needed:
greened up containers
prepped, clean, preferably cool, work area
prepped, clean containers
prepped, clean floral material
buckets as far as the eye can see — or at least several, hopefully in different sizes
water
sturdy, waterproofed work top
trash container(s)
floral snips or pruners
floral scissors
tools appreciated:
turntable or lazy susan
sturdy riser to get work up for ease of arranging
rubber mat for standing over long periods of time
apron to somewhat protect whatever you are wearing, and to hold snips, bits of wire and your iPod (woof. did we say that?? we are OLD)
fan
cool location for finished arrangements
Flower Time (Yes. Finally.)
Stick in some flowers. Make it pretty. The end.
Really? Really? Yes. Well, sort of. If you have prepped everything, kept everything in good shape, divided your material into the correct numbers of arrangements and greened up containers, it pretty much comes down to sticking in the pretties in a pleasing way. We like to put in each element one at time to balance the color and shape in the round, starting with an element that takes up space in a fluffier way like a multi-branched way, then the largest elements such as large roses, dahlias, or hydrangea, and then poke in the single stem fiddly bits to fill the thing out. It is nice to have colors spread evenly around the arrangement, so some adjusting may be necessary. Try not to blob big things together or cut material too short initially so you can readjust the proportions if necessary. Have fun! Of course, strip off leaves and lower growth on stems AND give a fresh cut before inserting. It CAN be more complicated than this, but doesn’t HAVE to be. Flowers make us happy. We have chosen them to ride shotgun at our most joyous and solemn occasions. You get flowers if you win the Kentucky Derby or Miss America or Olympic medals… they are lovely in groups and putting them together should bring joy.
Breathe in. Revel.
Because now you have to clean up, pack up and get these babies to the church on time…
Yikes.
For more hints, check out our other posts on floral basics.


Single flower bunches massed in prepared vases are about the easiest and most cost effective way to put flowers anywhere. You have perfect control of your budget and the time saved in preparation is huge. Masses of single colors can be really effective— or try varying between tables: light pink and dark pink or white and all green.
For more tips and tricks, take a look at our Floral Design and Floral Arranging DIY boards on Pinterest.
floral basics: arrangement prep
tools needed:
prepped, clean, preferably cool, work area
prepped, clean containers
prepped, clean floral material
buckets as far as the eye can see or at least several, hopefully in different sizes
water
sturdy, waterproofed work top
trash container(s)
floral snips or pruners
floral scissors
tools appreciated:
turntable or lazy susan
sturdy riser to get work up for ease of arranging
rubber mat for standing over long periods of time
apron to somewhat protect whatever you are wearing, and to hold snips, bits of wire and your iPod (Woof. Did we say that?? We are OLD.)
fan
cool location for finished arrangements


Who doesn’t love fresh flowers? They serve as our stand-ins for emotional moments, often speaking when we cannot. Weddings. Funerals. Anniversaries. I’m-So-Sorry-I-Forgot-Our-Anniversaries. Fresh flowers are symbolic of of heartfelt sentiment— and privilege, if we are being honest. They are expensive and we culturally value them more for their fleeting characteristics. They represent a connection to nature: some deep dive in our DNA that wants to wander in flowering fields that have the potential to grow and feed us? Why’s it always about food with us? Anyway, flowers. Part of the appeal of fresh flowers is their very evanescence. Their beauty is temporary. Their time with us short. They float through our days with scent and color and are prettier because they are temporary. Let’s explore some tips and techniques to extend the stay of these lovely, but temperamental guests, shall we?
A word about floral buckets.
While it is really helpful to have the actual tall vase shaped buckets that professionals use, it isn’t strictly necessary. The shape of floral buckets —narrow at the bottom, wider at the top— does allow flowers to fan out and have more room while the tall height of the bucket fully supports long stems, any large bucket, preferably taller than a mop bucket, will do. Cleaning out buckets before use is really important to keep flowers fresh. Always let them dry THOROUGHLY before stacking unless you place something in between to keep buckets from locking together as they dry. We know from sad experience that no force on earth is strong enough, no curse words vile enough, to separate buckets that are vapor locked together…
If you are working on a single arrangement: joy, joy, joy! No need to read the following about portions. You can use ALL OF THE THINGS!
Portion Control
So, you have everything clean, prepped and have set up a good work area. Now you can start arranging, right? Not so fast, friend. The next step is to apportion your materials so that you have enough floral bits for each element! It is simply the worst, if not disastrous, to have 12 table arrangements to complete and, in your happy enthusiasm, you have used up everything by the tenth. So start off by placing the same number of elements in separate bunches (in separate buckets, if you have them). Seven stems alstroemeria, five stems spray roses, five stems veronica, three stems large roses, nine stems of greens etc in each bucket or loosely tied bunches in water times the number of elements needed PLUS —and this is important— some stems of each flower and green into a spare bucket that serves as a rescue resource if something fails, wilts, or falls off along the way!

Buckets of spares, to the rescue!
Wholesale flowers are sold in bunches. If you are ordering from a wholesaler or large retail outlet like Costco, ask how many stems in a bunch. The online resources certainly tell you. A preeetty firm rule of design is to use odd numbers for a better balance in each bouquet or arrangement. The Rule of Threes… it’s a THING. Look it up!) It may work out differently as things go along, because that one spot in a bouquet just needed a bit more blue. The Design Police are NOT going to come get you if you have six veronica flowers in a bouquet rather than seven or nine. Probably.
Multiple arrangements are best done starting with an example and following from that. Keep the example where you can see it as you proceed to make it easier to copy. Hopefully not FULLY copy, but keep similar. We always say they needn’t match, but should look like they are going to the same party.
Some designers prefer to green up all the containers first and then go through and add floral elements. Some prefer to do each arrangement or bouquet from start to finish. We get bored between putting in one earring and the next, so we switch back and forth betwixt and between. Find what suits and go forward!
Now can you do flowers? No.
Greening Up
Greens— from ferns to eucalyptus to leafy wedding table runners (Smilax when you say that, people) — greens are the unsung hero of floral design. Especially if you are on a budget. They are easier to care for, less costly and more likely to “hold up” or stay looking fresh, out of water. They fill in, they cover up and, if properly conditioned, last well in vases or floral foam. If your work area is cool enough, you can actually green up containers the day before finishing with flowers. (A great thing to do before the family and friends come to “do the flowers” for your event… they get a work station with a set up, greened up container and follow the example set for them: 9,7,5,3… hey-ho...countdown to wine and cheese for you and me!)
Work station ready to go!
As you remove branches or stems of greens from their holding bucket, clip side branches for use, strip off any lower leaves from the desired stem length and remove any yellowed or brown foliage. To ensure everything stays as fresh as possible for as long as possible, make sure it has a fresh cut, even if it comes from the bucket the right length to insert.
A variety of greens in arrangements isn’t really necessary, but different shapes of leaves and colors of greens can add to the beauty of the finished piece. Whatever you choose, the first job of any green is hide, or mostly hide, mechanics of the containers. Place your starter arrangement up a bit and insert stems of greens such that leaves drape down to hide any waterproof tape and the edges of foam if you are using it. Once the edge of your vase or container is ringed with leaves, use taller stems to define the shape of the arrangement, whether it is round, tall triangle or the newly popular Hogarth curve where floral material swoops up and down in an “S” shape above the container. Loosely fill in the foam or vase so that the arrangement appears leafy but not so much that there is no room for the flowers!

Budget savers: Greens are so much more affordable than fresh cut flowers, consider using mostly or all greens for your event. Consider looking into local gardens for the privilege of picking. Learn how to pick so it doesn’t look like you have been through— a here and there approach, rather cutting a swath from one side. Choose plants from a garden center from which to cut —judiciously— and plant them for yourself or others. (gifts for the wedding party?) SPING! If you are in the business: If you have the space, grow your own over time. Reliable plants out in the yard are a lifesaver and money maker!
For more tips and tricks, take a look at our Floral Design and Floral Arranging DIY boards on Pinterest.
floral basics: container prep

tools needed
sturdy, clean, waterproof container or vase
waterproof tape or wire for securing floral foam to container
wire cutters
sturdy, protected, waterproof surface on which to work
tub or bucket for soaking floral foam blocks
water
tools appreciated
turntable or lazy susan
riser to raise work up for ease of work
actual long spout small watering can
What is a riser?
A riser is anything that raises your work up to a comfortable level. Why’s it not called a raiser? We don’t know, but we are ALL about saving the backs, so raise your work up instead of stooping over it on the kitchen table, mkay? A riser should be able to hold weight and be steady on a surface with a broad top. Vase and containers with soaked floral foam are really heavy. Adding greens and flowers in soaring designs often make those same vases or containers likely to tip over, so make sure whatever you use to raise up your arrangement in the workshop or at the event is up to the job. Having the project at hand up a bit helps with a common problem. None of the equipment or material used to prop up the floral stuff should ever EVER be visible. We are willing to concede that what used to be verboten is current and modern folks put dried flowers with fresh nowadays, but seeing the floral foam or tape or wires are strict no-nos. So look up the skirt of what you are doing and check that all underpinnings are disguised.

What is a turntable?
Not the HiFi old timey record player type, but a good old solid, non-tippy lazy Susan. Often found at thrift stores for reasonable sums, these table top relics for the 70’s breakfast table are often solid wood and make life easier when arranging flowers. It is a lifesaver or strength saver to be able to twirl your work around to work all sides and make sure all the gaps are filled, all the looks are balanced. Try doing a Christmas wreath on a turntable— magical! Twirls like Ginger Rogers, we are just saying.

riser with turntable
Flowers in water vs in floral foam
Floral foam such as the commercially available brand Oasis is honestly great for flowers at events especially if the arrangements are large. The stuff holds water like a two hump camel and stands up to a lot of material. If making large arrangements, there are all kinds of ways to support the soaked foam so that it won’t crumble or can be pieced together. We absolutely love it. Our life in events changed when we discovered the ultra large designer blocks… our fingers no longer shredded from encounters with chicken wire cages…
But there are times when containers with water are called for and can look stunning— so they have their place for sure.
Choosing containers: WATERPROOF
The good news? Almost anything with an opening can be a floral container. Take the ideas you have stolen, erm, researched, and put them into practice! You love the look of vintage tins with flowers? Cool. Line those puppies with well-fitting plastic containers. Spend a little time matching liners to outer containers so that your lovely flowers don’t die on the table after peeing themselves. Place clean plastic liners inside prettier baskets, wooden boxes, vases, pots, etc. You may have to tape a dark trash bag around a liner if the outer container if the liner would be visible— or you may have a quantity of excelsior or moss or other material to disguise the liner… just remember, no visible underpinnings!!
Lined pot on riser.
Secure the liner in the container. We want these vessels holding expensive material requiring lots of our valuable time to be practically bombproof. Cuttings of old foam slips down in gaps between container and liner really well if there is a large space.
One of the surprising benefits of using foam versus vases is the advantage for using short stemmed material in foam. If the liner is well placed, a block of foam can be seated 1/3 in the container and 2/3 above it. Yep. That is a lot of foam. This allows shorter material to be used all around the foam surface while keeping the height of the overall arrangement quite generous. This is handy if you don’t have access to tall wholesale flower bunches or are saving money.
(Hopefully you have checked heights and placement for where your arrangements are bound and have picked suitable container sizes. You HAVE checked, right? Truly no one loves overwhelmingly tall flowers, no matter how stunning, on a table intended for conversation.) You have GOT to see our Pinterest board: Nope.
You have acquired gorgeous copper pots but they are large? Excellent. Attach dry foam to the bottoms with clay floral adhesive and raise up a plastic liner or metal liner near the top of your container and use waterproof tape to secure soaked floral foam in that. (Because if you try to fill large containers with JUST wet floral foam? You will have to hire a crew to move these super heavy bits everywhere.)
In fact, if you are doing this more than once, assess every use of foam for how much is really need to keep your arrangement fresh. If it can be narrowed or raised, do it! Always look to cut the weight of arrangements and save on material. Arrange in transportable bits that can be easily packed and assembled on site. Use this trick, people, use it! Your back will thank you.
Prepping containers for floral foam
If arranging in foam, it must be soaked, submerged, for the time needed. If you hurry this process, the foam could be dry in the middle, which is not only bad for flower life, but makes the foam more likely to crumble.
Once the container is lined, trim and place well-soaked floral foam in or on a liner and attach to the container with waterproof floral tape or wrapped wire, if a basket. A couple criss crosses across the foam should secure your working surface pretty well. We always tape the ends on the outside surface, often by ringing the top of the container with the same type of tape so they don’t detach. If you are doing multiple arrangements, get all the containers prepped before bringing in the flowers. Floral foam once soaked, can be watered to keep it full.
Example of liners too tall, too small, and just right:


Prepping vases for arranging
Ack. Sigh. Okay, you don’t have floral foam or want to bother with it.. we get it. It’s just glass. We hatez it. So very breakable… and sharp… and heavy.
Enough whining. Vases are amazing for floral arranging. They are readily available, economical, hugely reusable (SPING!) and the perfect choice if you are on a low budget. Some things to make using them better for your event: think about what can be seen, especially if the vase is clear… think about how to transport sloshing water in fragile containers… and think about not overthinking them.

If you are using vases, stems become more relevant to arranging than working in floral foam. The stems of each element have to reach the water in order for everything to stay fresh, so shorter material is usually out. There is also limited display area for design as compared to foam, so it is often best to think of a vase arrangement as a bouquet set in water. This helps with narrowing the focus of design.
Starting with super clean containers— yes, even cleaner than foam containers where fingerprints don’t usually show-- run a checkerboard of clear waterproof tape across the mouth of the vase so the material will be supported as it is inserted. Fill partway with water and et voila, you are in business.
Dried flowers
Containers for dried material can be prepped in much the same way as for live material with the exception, of course, of not adding water or soaking foam. Floral tape, especially clear, can be criss crossed on the top of a container or vase to help support stems of the arrangement. Dry floral foam commercially available specifically for dried arrangements can be attached to a container. It saves material to pre-cover the dried foam before arranging in moss or preserved leaves or other dry material. It may be necessary to weight the bottom of a container for dried material as it may be top heavy and, therefore, tippy, without the weight of water to hold it steady.

Dry foam, prepped to start.

Dry foam vs. foam to soak for fresh flowers.
For more tips and tricks, take a look at our Floral Design and Floral Arranging DIY boards on Pinterest.
floral basics: setting up
Here you are. You have ignored our sage advice about letting the professionals handle the flowers for your event, or you are just starting out and are reading everything about tips and tricks for better arrangements… So, let’s dive in to “How-to-Floral”, shall we?

Here you are. You have ignored our sage advice about letting the professionals handle the flowers for your event, or you are just starting out and are reading everything about tips and tricks for better arrangements… So, let’s dive in to “How-to-Floral,” shall we?
Set Up
tools needed:
water
cleaning material for cleaning buckets etc
trash bags and/or drop cloths
buckets of different heights and sizes, if possible
water
flower snips or pruners
flower scissors (tie with ribbon so they don’t get confused with ribbon scissors)
stripper for leaves or thorns
water, for you this time. Stay hydrated, friends, this is not a sprint!
patience
Tools appreciated:
gloves
wire cutters so you don’t use your good snips to undo bunches of flowers
first aid kit
commercial packets of flower food
Prep your work space and your material
Best to work in a cool, water resistant, if not waterproofed, environment. Floral work is messy and wet. Buckets of water (and finished arrangements, to be honest, are heavier than you think). Sturdy surfaces are a must. Risers are helpful to bring the arrangement up to eye level and save your back. Turntables (lazy susan to you haters) are great for turning the work from front to back etc to finish it well on all sides.
We cover our surfaces in reusable plastic. Depending on the surface area, sometimes with plastic drop cloths, but often with good old large trash bags that get pulled up and used for clean up at the end of the arranging. (We feel we should have some sound badge or notification that dings when we hit a SUSTAINABILITY hint. SPING! That is the sound of the planet thanking you).
We also use line sturdy cardboard boxes with the trash bags for cutting and leaves as we are working. Once the bags are pulled, we use the boxes to transport arrangements for events. SPING!

As you set up your work area, think in terms of setting up an operating theater. Yes, really. You will be working with perishable, living things and you are about to open up wounds. (Technically, cut flowers and greens are dying things, and you are only staving off the inevitable, but let’s go with the metaphor here). Flowers are fragile and thirsty. Greenery less so, but still needs care. Everything you are using should be clean: buckets, snips, scissors, pruners etc should all be cleaned before you start. (Honest to Pete, if you are doing this more than once, they should be PUT AWAY clean! grumble, grumble).
Ahem. Operating room. As you are creating wounds by cutting into your material, everything possible that causes or exacerbates bacterial growth should be removed. When floral material arrives it should be removed from whatever bondage it has had to endure to travel to you (away with plastic sleeves, rubber bands, twist ties and the like), go in a containment spot and dunked into buckets of clean water, hopefully sorted by type: delicate flowers with other delicate friends, greens with greens, and wooden stems by themselves, etc.


Strap cups together, put in bucket for gathering.

Place cut stems, by type, into divided bucket.
Ideally, all material would get a fresh cut before the first dunking, but it is most important to get stems in water. The next step is really important. It is no fun and takes awhile— but will help your flowers and greens stay pretty for much longer! All the leaves and growth that go below the surface of the water should be stripped off, a fresh cut made and placed in fresh water — hopefully water that has a bit of floral cleaner and/or food from a commercial packet.
This job takes time. If you have a lot of material to work with, it takes a lot of time. Wholesale flowers typically arrive in boxes bunched together by type with really long stems. Grocery store or retail store flowers have already been stripped, cut and prepped so typically need less work, but less is not zero. Stems should be rinsed and any wet leaves or growth removed which will sit below the water line in your receiving bucket, leaving at least 6-9 inches of just stem to go in water. Depending on the variety of flower, the “free stem” might be really long— that’s okay, in fact it is super (see Alstroemeria). You actually want to start with as long a stem as possible.
Greenery, is a whole different category, and, depending on the type, needn’t be stripped quite as severely. Most greens love an entire water bath and can be immersed in a larger tub, to be shaken out and used when called into service— just don’t forget that fresh cut when it arrives and another before being inserted into floral foam or vase.

Snips are your friends. Clean them :)
If you have picked flowers or greens yourself, they require some special attention. We have rushed some retail flowers into arrangements on an emergency basis because they had actually been prepped on arrival to the store. Picked flowers need time to get used to their non-rooted condition. Some may not make it. Best to allow for “conditioning” time for floral material to harden off and overpick to account for wilters if these flowers are intended for display at an event. Cut picked flowers or greens with clean, sharp implements. Cut longer stems than you think you will need so they can be recut and still usable. Try not to pick a lot of new leaf growth (greens that are brighter in color or softer in feel) as these usually don’t hold up well when cut. Try to pick flowers that are coming open and, as tempting as it is, not those that are fully open as they are actually in decline and on the way to being “blown.” Older flowers will most likely wilt faster and not make it to your event. Once fresh flowers are conditioned, it is possible to hold them fairly steady if kept really cool or to accelerate bloom by using warm water and direct sunshine.
Place cut stems in bucket with a little clean, warmish water (you don’t want to shock pores closed with cold water) as you pick. Get picked materials into a cool darkened area, gently rinse off all material, recut stems and place in cool water in clean buckets. Then, let them rest…. see who makes it. Hopefully, you will be greeted with robust beauty when next seen!
Once the stripped floral material is all in buckets, they can rest drawing up water and strength for what is to come— and you should too. Good job. You have prepped your tools, your work area and your material. You are ALMOST ready to make an arrangement!
For more tips and tricks, take a look at our Floral Design and Floral Arranging DIY boards on Pinterest.