


heart-felted friends for adventures near and far
Just as in our post about creating animal ornaments with needle felted wool, we began our hopeful emissary with a chenille stem armature wound with 100% wool roving. Once the form was fleshed out, we sewed on glass bead eyes, then felted on wool ears, paws, and pink nose. In order to replicate a true field mouse’s coat of browns and greys, it was necessary to comb together a blend of wool fibers.

Undermouse ready for felting on the details! Needle felting uses a special barbed needle to entangle the fibers together pretty permanently.

This entanglement allows for great details. The more the fiber is felted, the tighter the wool. Light felting allows for fuzzy fur etc.

We added nylon thread whiskers as a finishing touch! We were following the model of Augustine Mouse from the Instagram account story unfolding @augustineamouse, but this little one went as an encouraging pick-me-up to a good friend and Augustine fan working through chemotherapy in lieu of flowers or a card.


The original Augustine and her stunt double, Resilient Mouse hanging out between takes.

Resilient Mouse (above) in her duplicate gear heading out to bring some cheer.

Augustine rolling along in her story post.
we are not just a one chick pony
We’ve been working around the cluck… ahem… to get some tutorials up for easy peasy spring decor. If you thought the pom poms could only be used one way? Yolks on you— Chick this out: same pom, different chicken.
We used the same techniques as our spring chicken post. A store-bought or homemade yarn pom pom, eyes, a beak, then encircled with wire or chenille stems for legs and feet, embedded down in the fiber approximately halfway on the sphere, and made secure fairly tightly. A new twist on chicken legs!

Defying eggspectations, we changed it up and dyed the yarn chickie-yellow, using easy-to-hand food coloring. Hint: leave off gluing on eyes and beak until after the dyeing and drying process is complete.
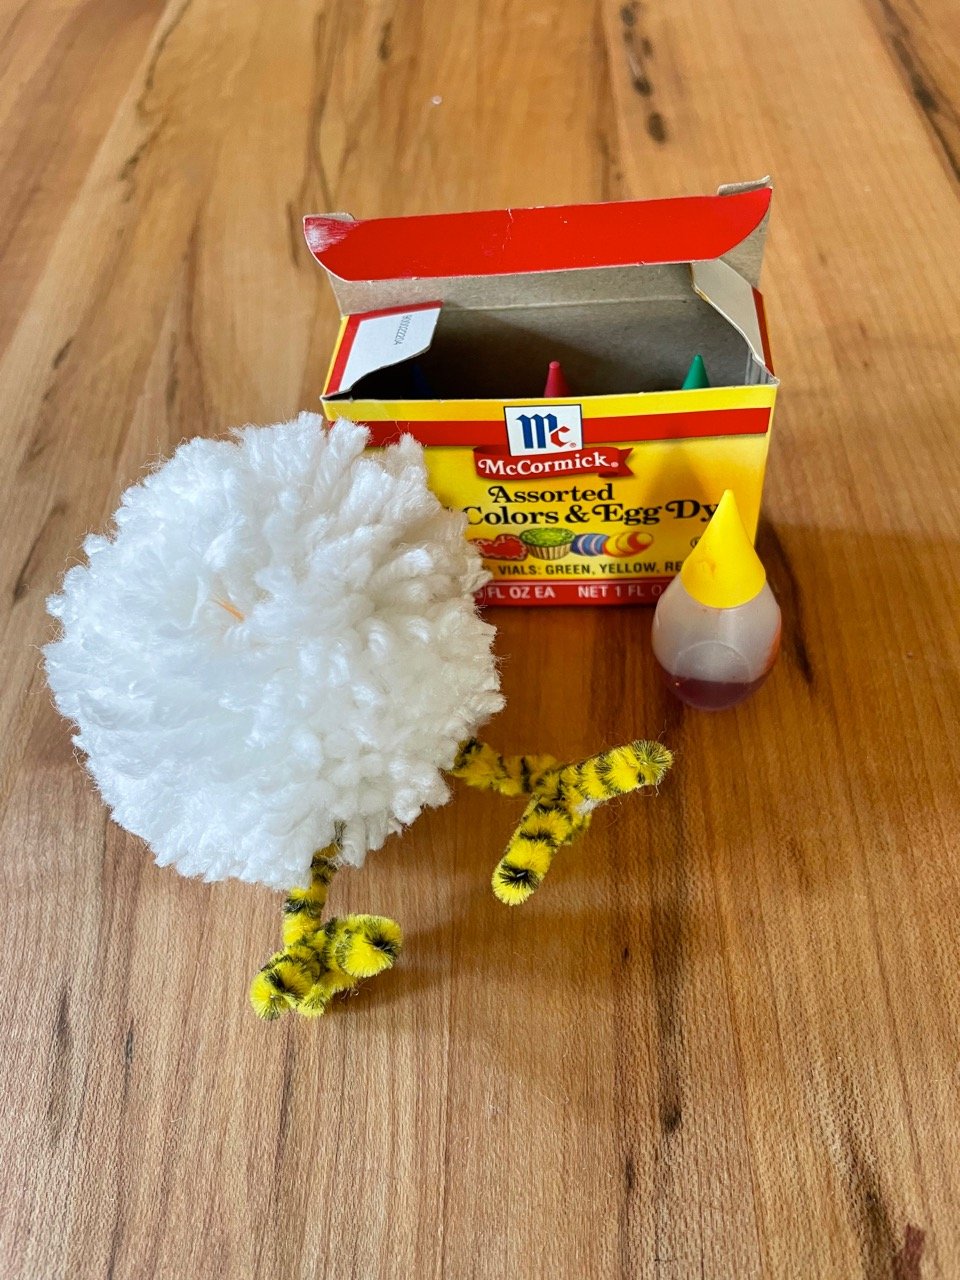
So we got up to our old chicks, covered our work surface, protected our clothes, and put on some plastic gloves in preparation for operation Tres Chic II…Hensome Lad: Son of a Biscuit.

We mixed yellow food coloring and water in a small bowl.
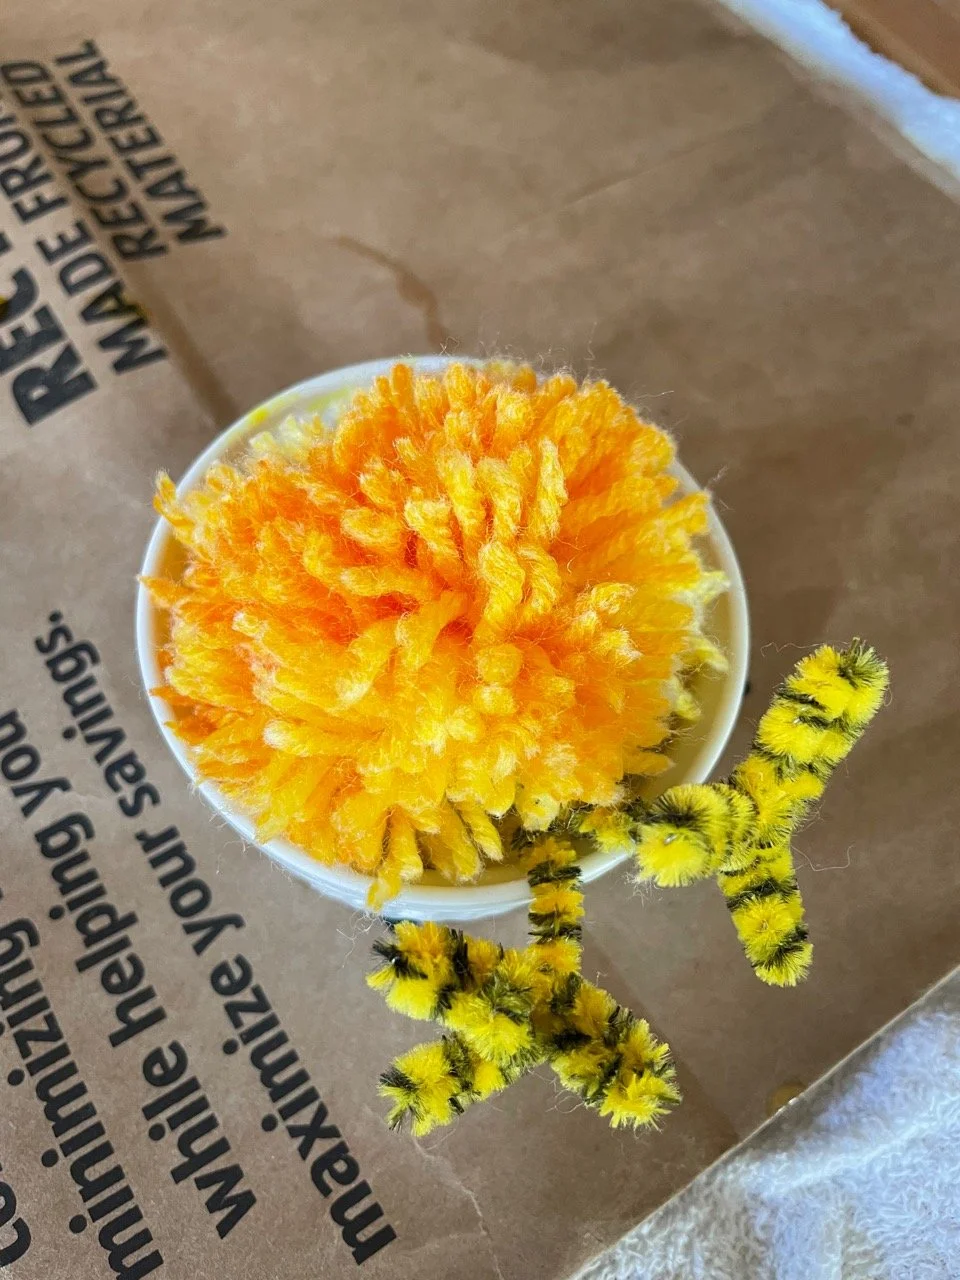
In a poultry amount of time, the yarn became saturated with dye by turning the pom a couple times. We rinsed the dyed pom in cool water, wrung it out carefully, then put it in the dryer with a couple old towels (the dye will come off until it is fully dry and set).

Trimming out some of the fiber to add some shaping, gives our chick some definition.

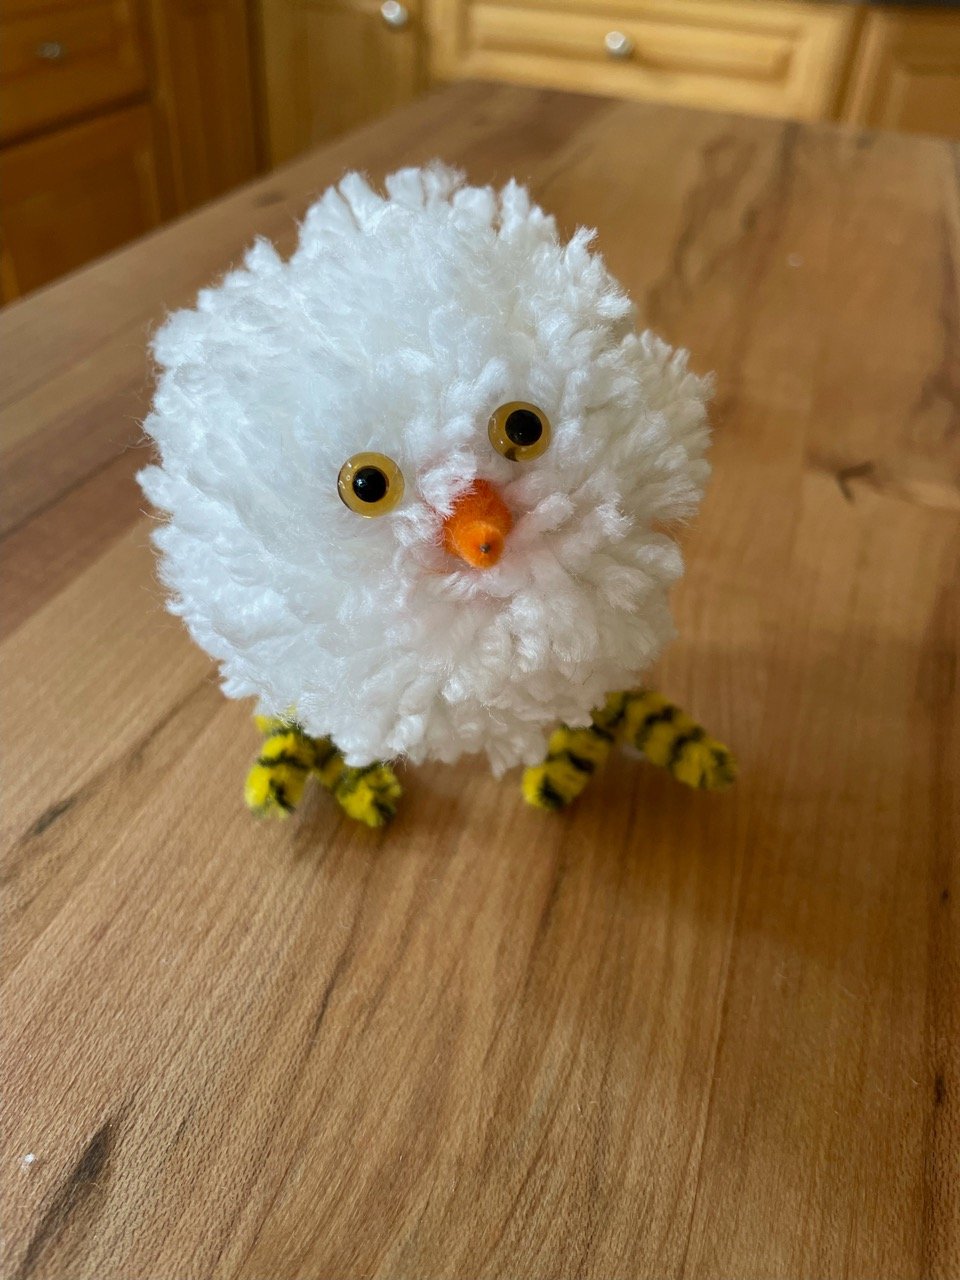
Talk is cheep… pictures say it best: this little one is im-peck-able!

Don’t mind us. Everyone around here is a comedi-hen. The best chicken puns don’t fall far from the poul-tree and we have all been dealing with not one, but several, eggs-istential crises, so we had to get them all in. Can’t wing for losing…
We’ll show ourselves to the eggs-it…
this IS a spring chicken
Adding handmade Spring decorations to your home or someone’s basket is easy and fun! Use homemade or purchased yarn pom poms as a start for this simple Spring Chicken.

Small pom poms, which can be made or store-bought, chenille stems or simple wire, any type of eyes— combine to make this adorable little Easter tree ornament or basket stuffer.
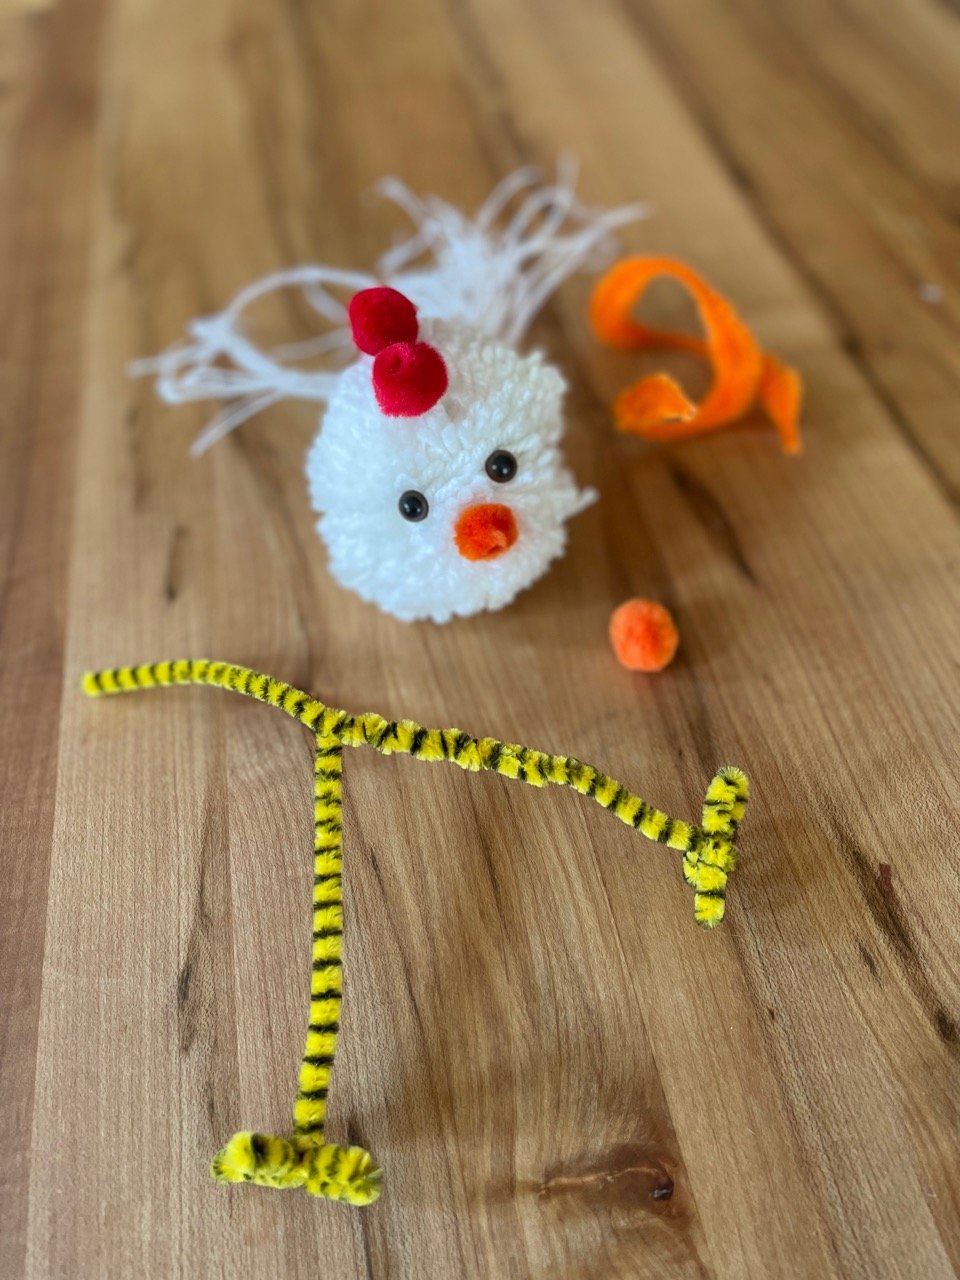
We twisted the stems to form simple feet, trimmed a purchased pom into a beak shape —but an end of orange chenille stem would work as well. We added simple animal eyes, trying everything in place before gluing with water-based glue (school glue or tacky glue will work and are not as messy as hot glue).
The stem or wire legs and feet are wrapped around and into the pom pom tightly so that the fiber covers it all around. We added a bit of ostrich feather for a floofy tail.
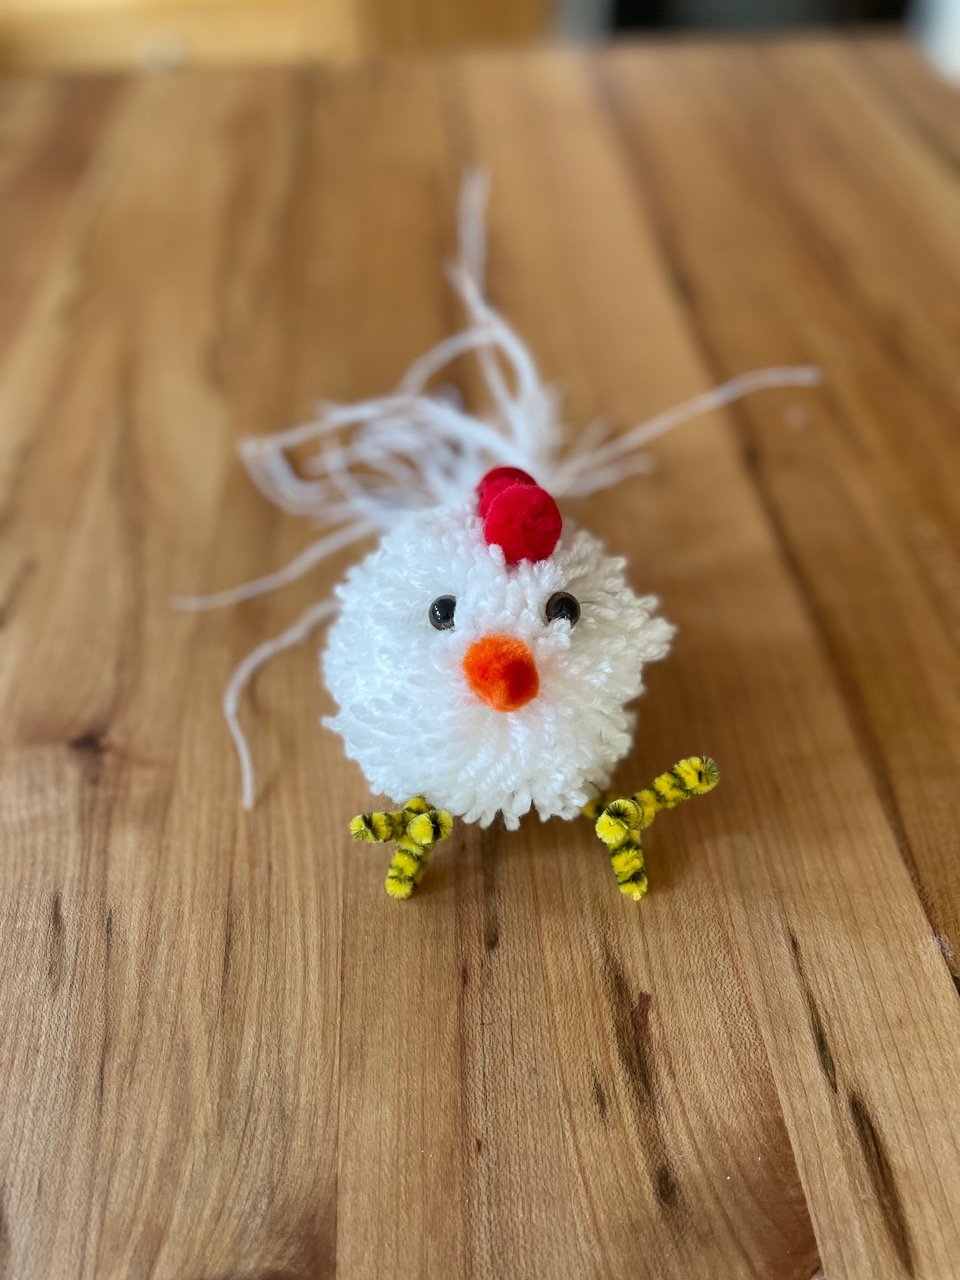
Tres chic!
upcycled easter
We are still loving the idea of using what you have on hand, re-using what can be given a second purpose, and cutting back as far as possible on cheap, imported, high carbon-cost decor. Bein’ that it is Spring and we turn to all things renewing, we are going entirely renewable. Take an old wool coat and rehabilitate it as your bunny!
This fellow is stuffed with chopped up, mismatched socks. The carrots are spindles, twine, and last year’s Easter grass combined.


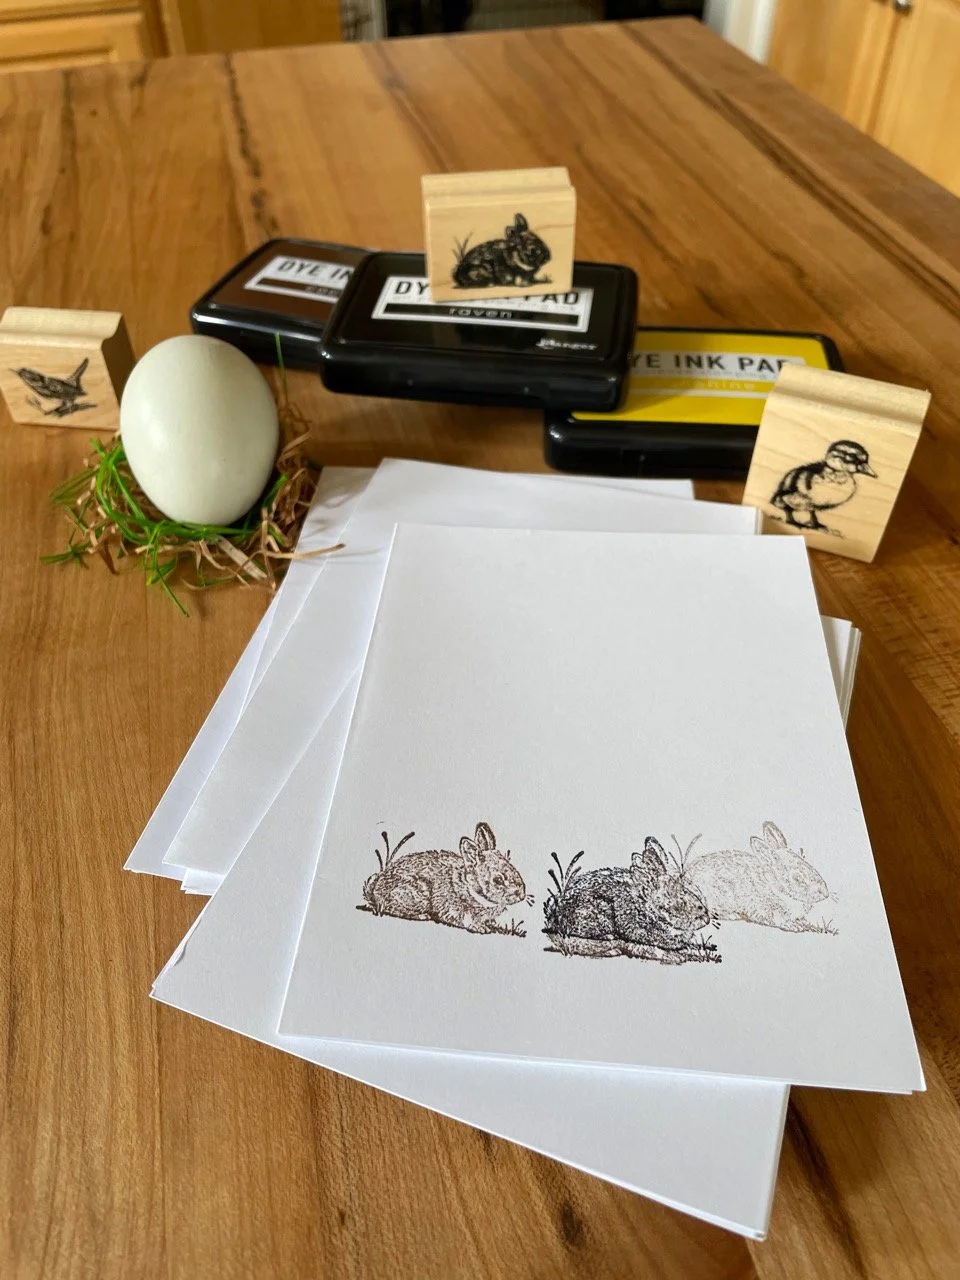
Simple stamped cards to send your happiest thoughts. Stamp and embellish with markers, stickers, or paint.
Wool coat bunny showing the simple, sturdy construction.

We thought he looked a bit downcast, so we brightened him up with needle felted wool accents.

A leftover yarn “ribbon,” and Rabbit is ready!

heron repair— kinda kintsugi
Getting out a bit by wearing a really good, well-fitting mask. Finding a way back to being in business at some point. Hit the local antique mall, one of the few locals left standing after pandemic shutdowns. We came across a neat piece in need of a bit of TLC and invited him home for tea and kintsugi.
At some point this carved and painted folk art heron had a run in with a Tudor dynastic failure or Alice’s Red Queen. The head was re-attached with love, but not skill… and with Super Glue. For the love of all that is Good in the World— DO NOT USE SUPER GLUE. It is overrated, brittle and impossible to remove from a lot of surfaces— hello E/R trip for fingertips or eyelashes…Cyanoacrylate is only super at being the basis for fuming for fingerprints in an sealed aquarium. If you know, you know and you are our peeps— and if you have done more than watched/read/podcasted True Crime and tried this at home? Welcome, tribe.

This really nifty carved bird needed careful surgery and re-gluing. We broke that g-darned brittle seal and picked out the plastic super glue, applied cellulose-based glue which melds with the fibers of the carving, expanding into a nice bond… WOOD glue— the hint is in the name, people...re-fit the head to the neck, and wound it with rubber bands for about 24 hours to hold the pressure seal until the glue was pretty set.

Assemble tools, prepare an area to work— covering vulnerable surfaces, please (We are looking at you, swipes of Super Glue permanently attached to the kitchen countertop by other occupants).

The repair is multi-stage process though. The super glue adhesion formed bubbles outside of repair line and removing it did pull out some wood fiber. We mixed some paint to begin a match. Letting the paint dry over the continuing repair adds to the effect of old paint already on the surface of the heron.
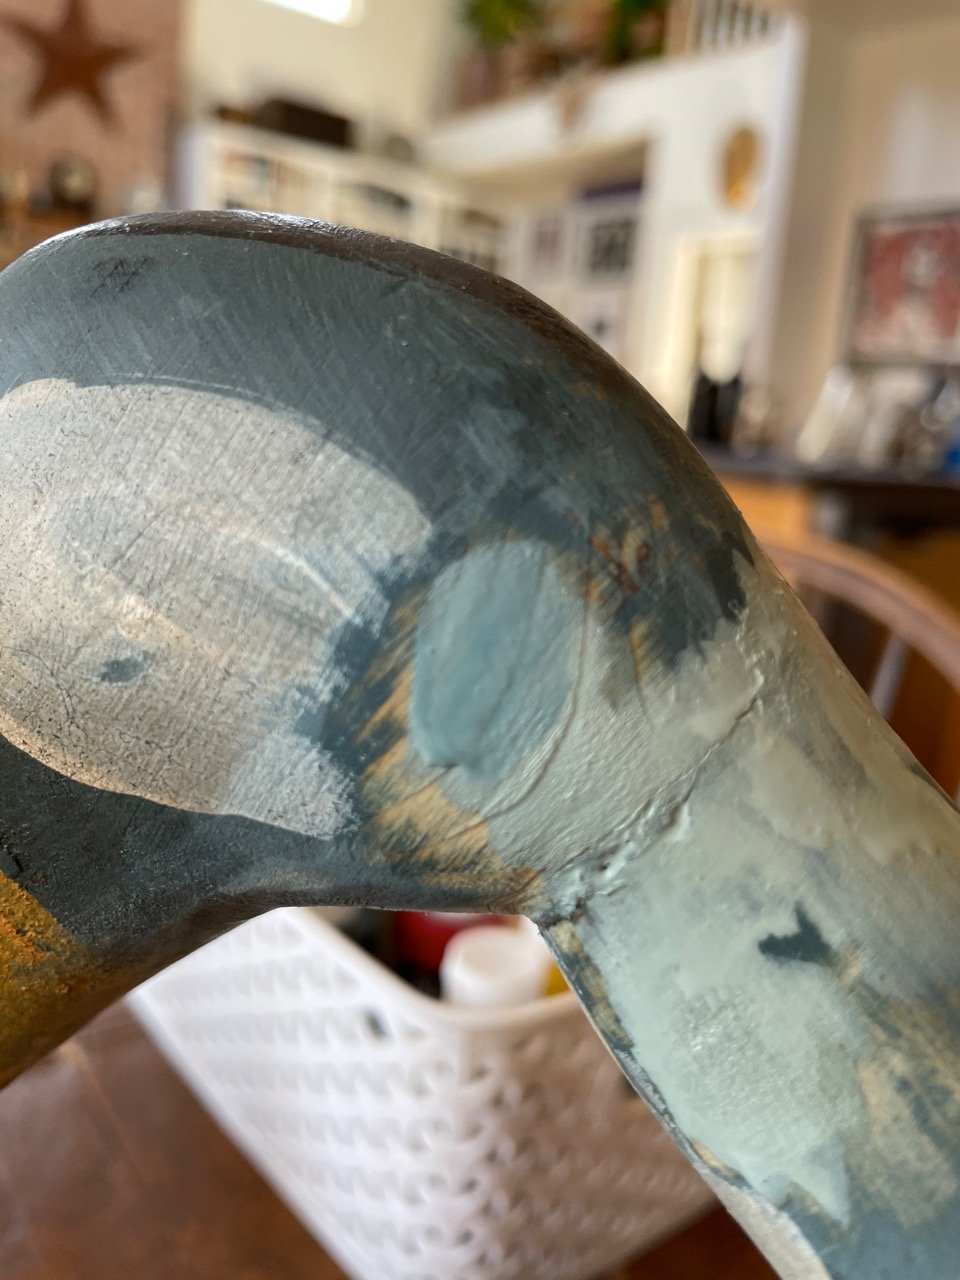

Cured wood glue and dry paint can be gently sanded with small grit sandpaper such that the “seam” is nearly seamless.

Mixing the color of the body of the bird. A house paint sample— flat latex has the chalky finish of paint that has been weathered.

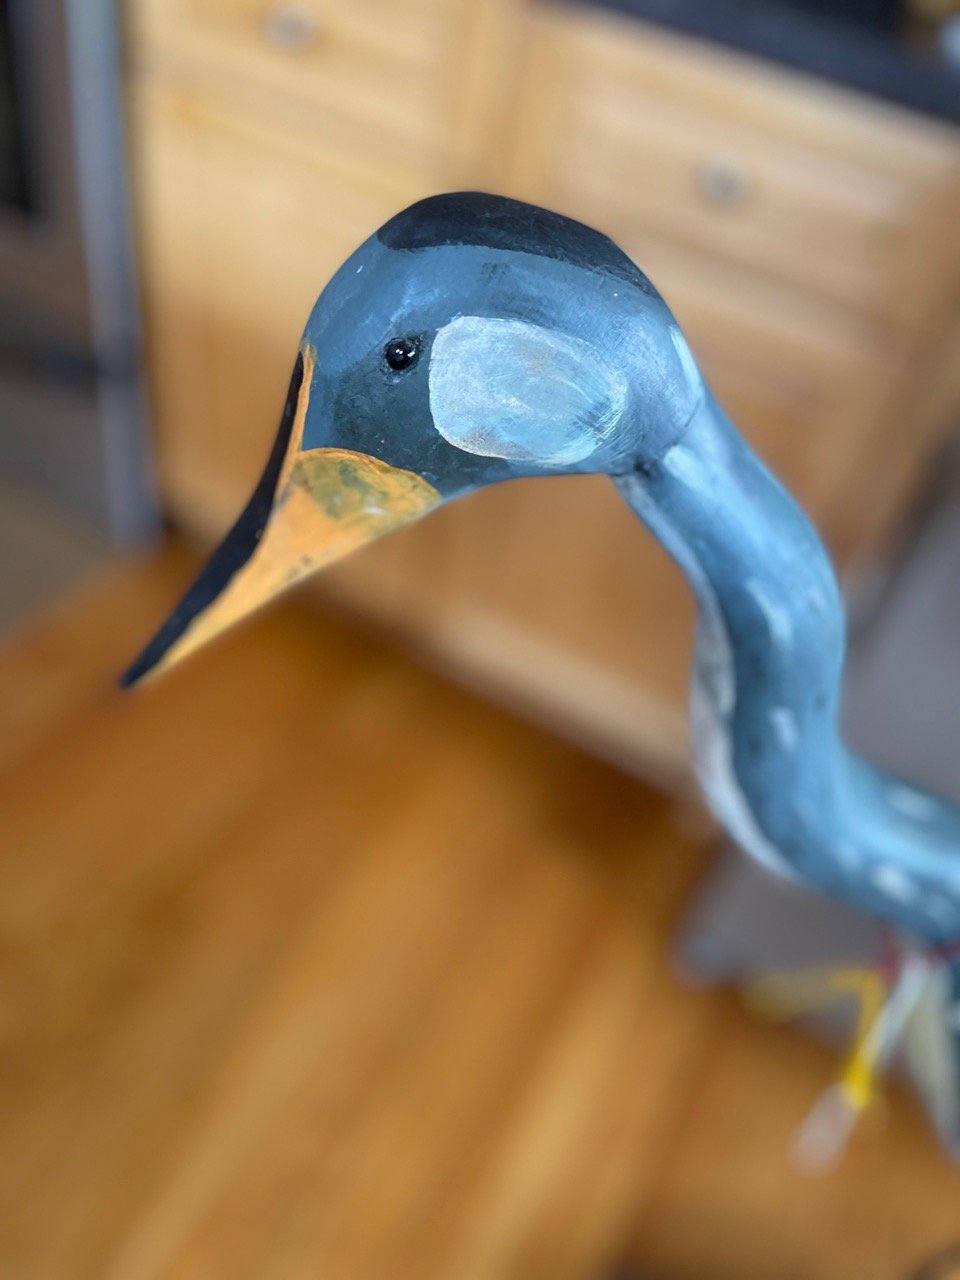
The blue green was a little bright, so to grey down the color— add the opposite on the color wheel. Orange added to blue. We also added in a universal neutral umber brown which “ages” anything right down. Touched up a few of the markings so that it is tough to see that anything was ever amiss. But we did NOT do a conservation repair. Not trying to fool anyone here— just give new life to a deserving piece of art!
Valentine's, Pal O'Mine

Heart it or hate it, the day of Lurve is on the way. You might be celebrating Valentine’s or Galentine’s or Palentine’s, so we have a little “SHOW ME” sesh for making homemade cards that are really cute and truly easy.
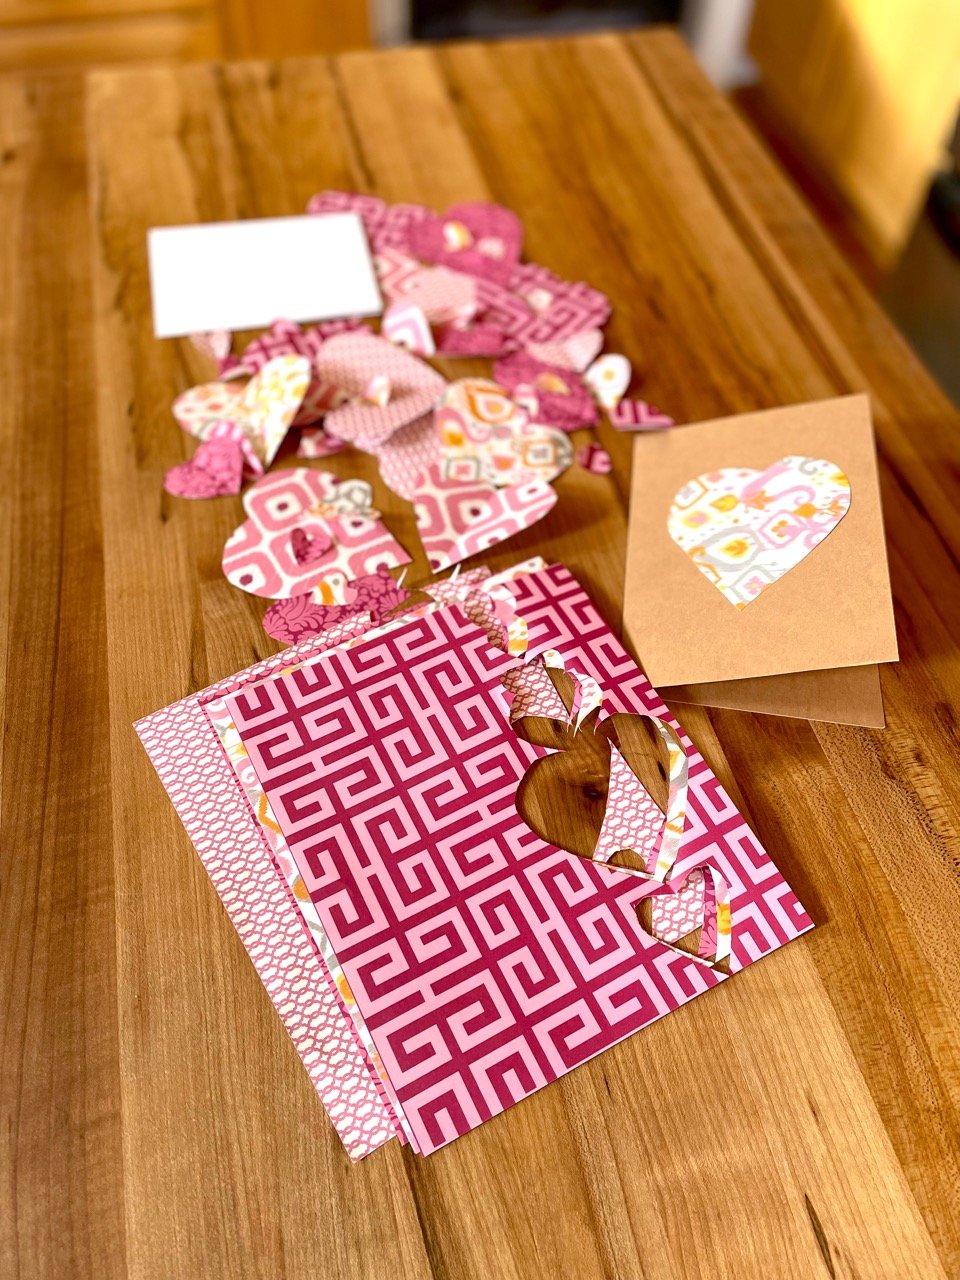
Reuse papers from old envelopes or those stacks of patterns you got that time when you were going to organize all the photos and scrapbook the hell out of mementos… no? yes? no? We’ve given up that idea, too, friends. It’s a GOOD thing.
Take papers of different, related patterns and fold in half. Cut half-heartedly, ah… we mean cut half hearts… along the folded edge such that you end up with a little pile of heart shapes in different sizes and patterns.

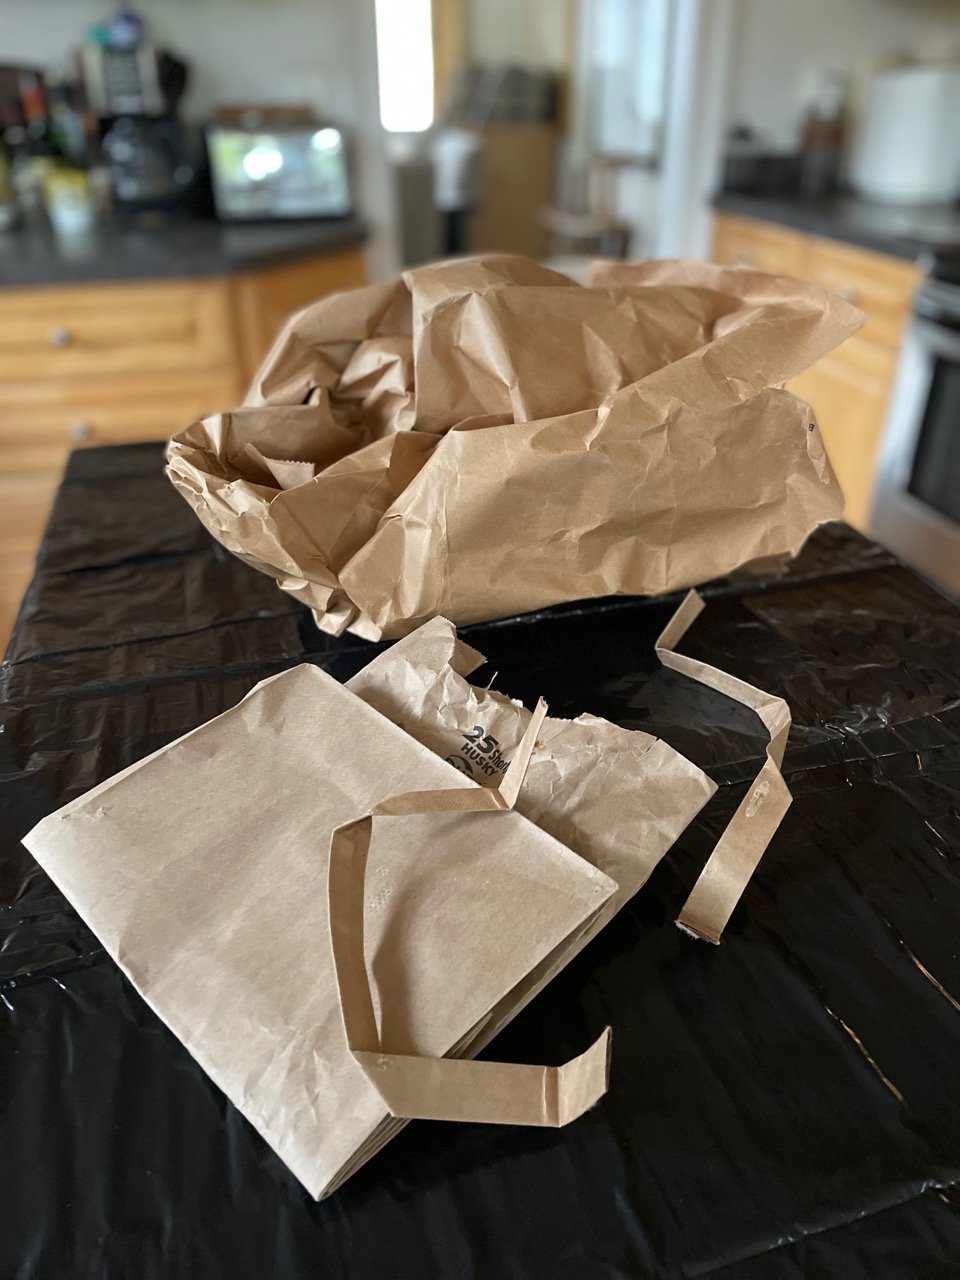
If you have blank card stock, glue hearts on the fronts of cards. OR create your own cards and envelopes from trusty kraft paper.
We used bits and bobs from the whole process— parts of leftover paper and the negative space hearts left over from our first cuts, which, as we all know, are always the deepest.
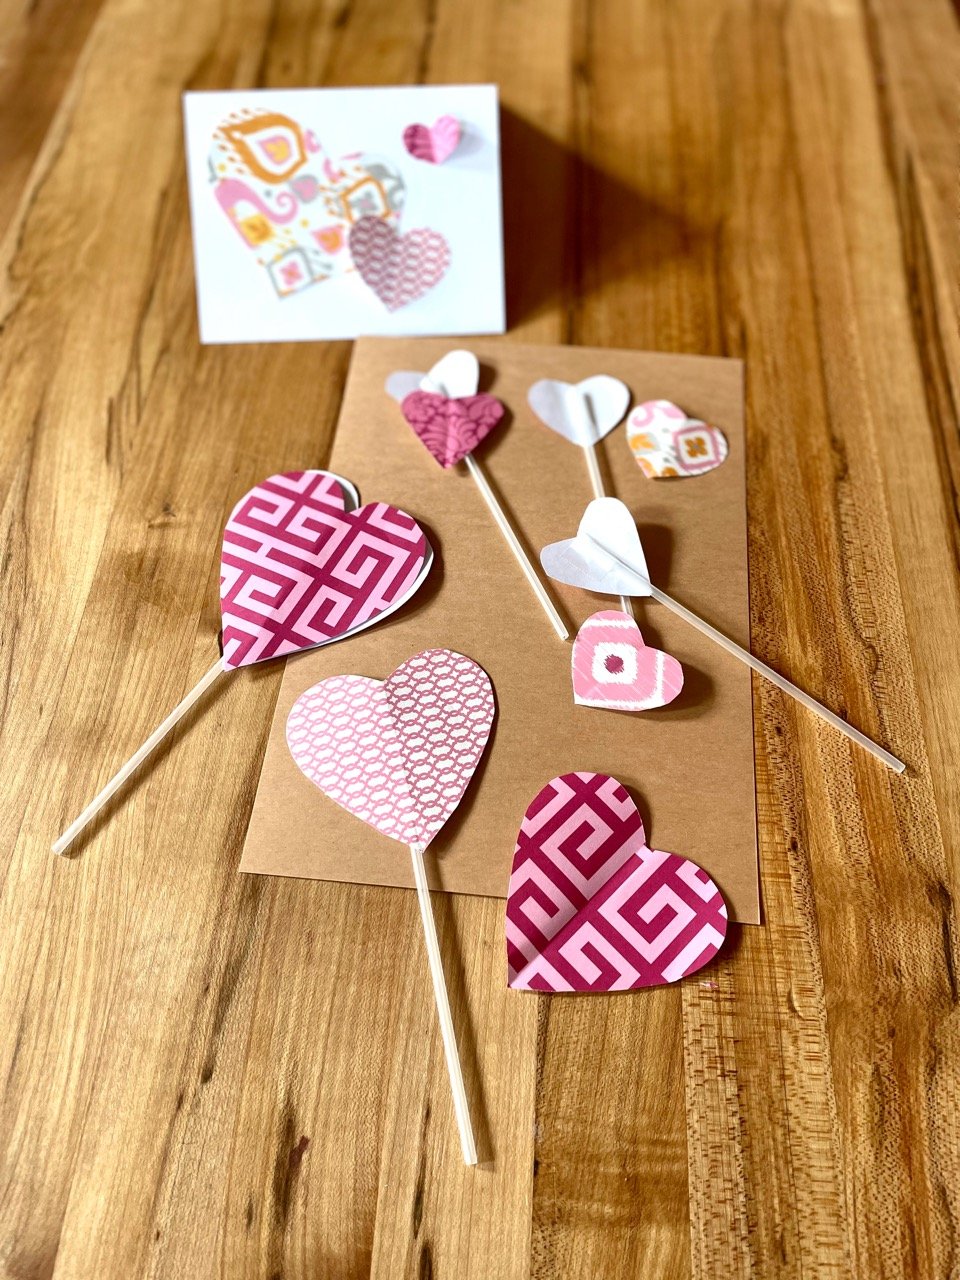
Have fun! Lay out hearts and pieces in different configurations, balancing patterns, values. It is A-Okay to just glue one heart on each card too! It’s the love you are sending, not the art.
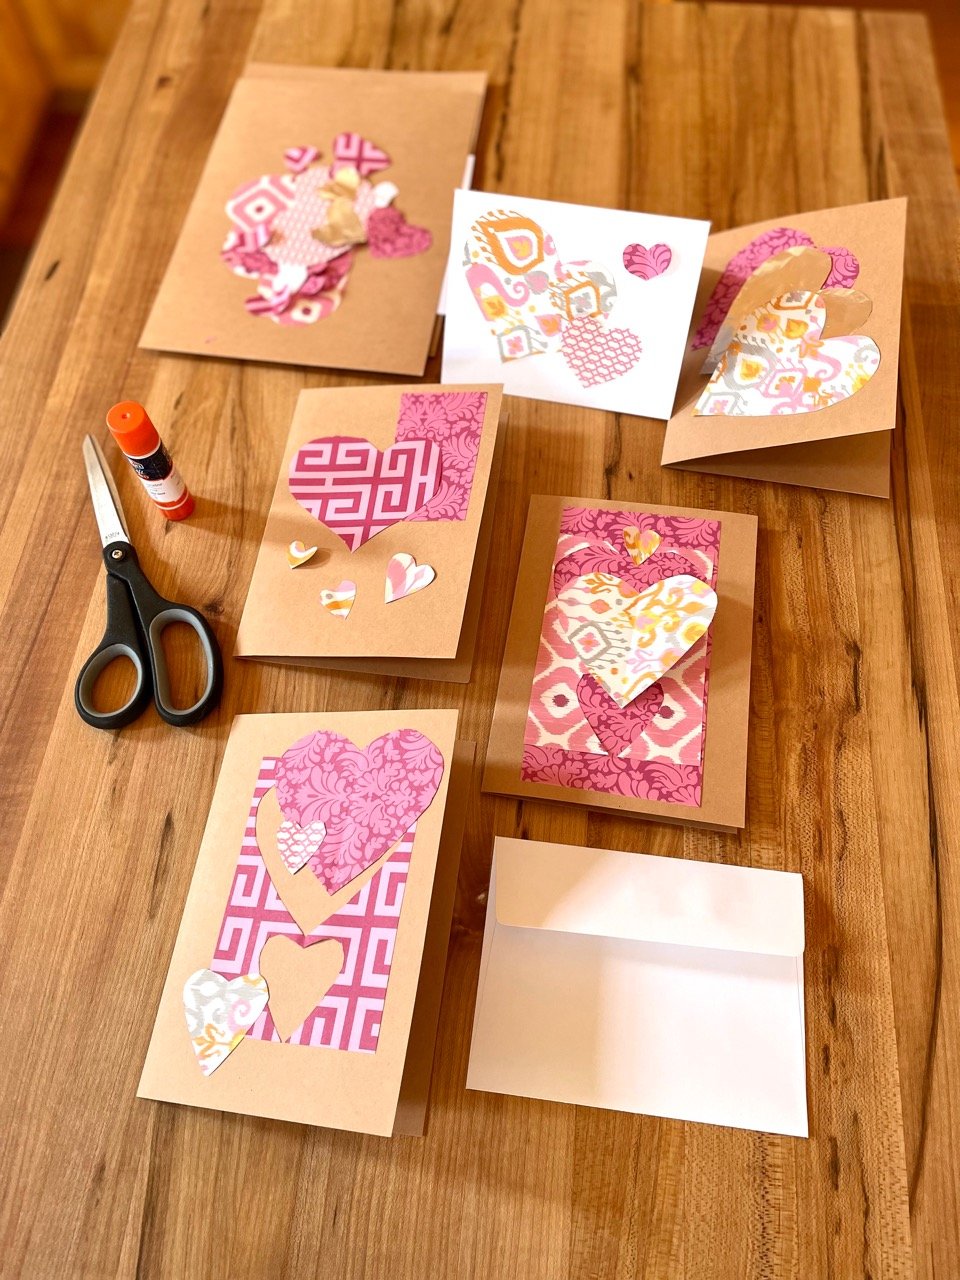
We are playing with 3-D pop-up effects as well. Pop-Up cards are a top trend…. but more on that in a bit.
Whatever you do, make sure you put on enough postage, especially if your envelope is a non-standard form. Last thing: S.W.A.K. (seal it with a lick, because a kiss won’t stick!) Lil bit gross, but goes right to the 9-year-old in you, doesn’t it?
odds and svens

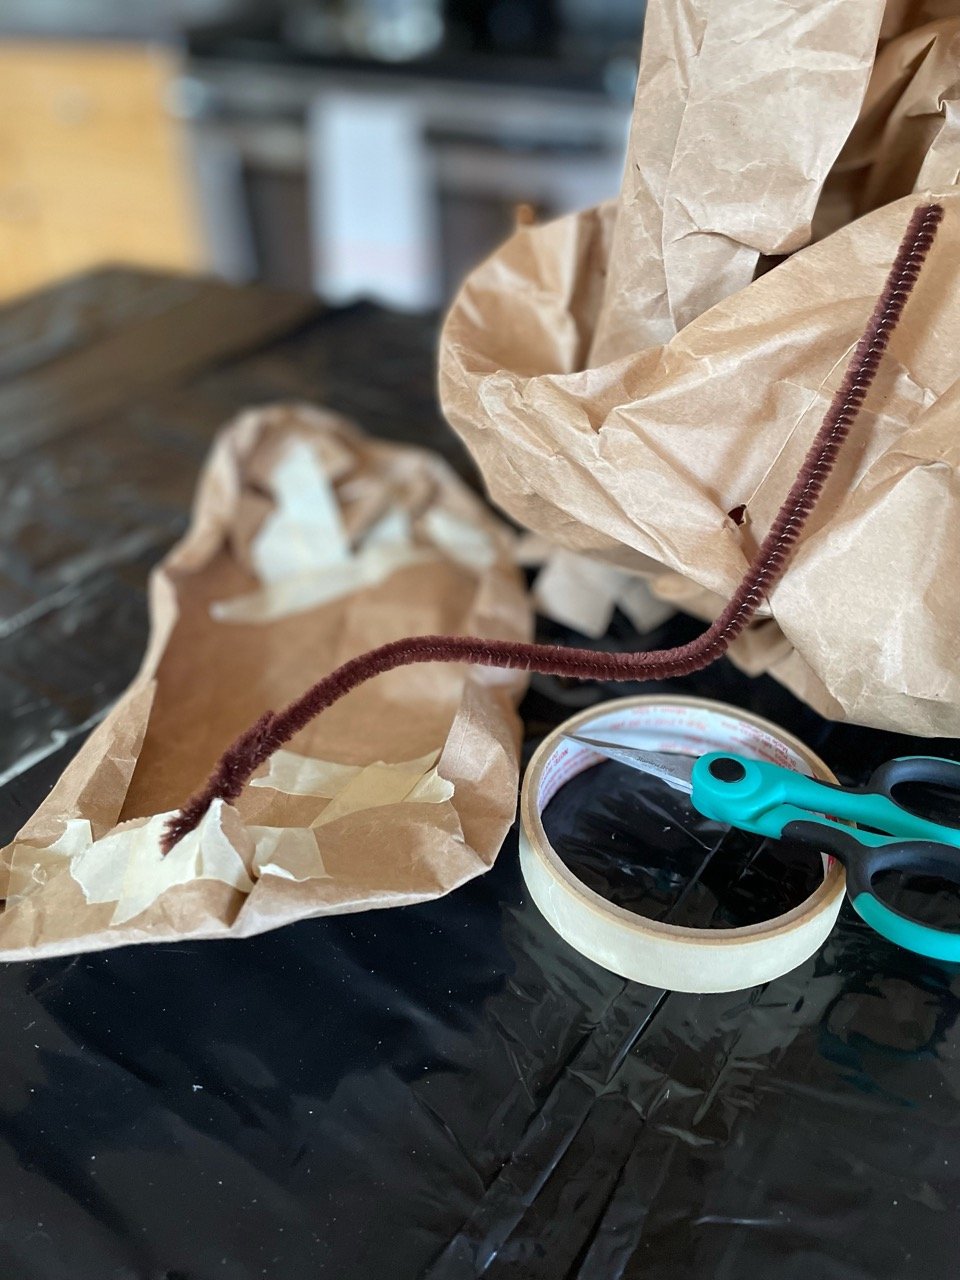
Before this fuzzy dude, lovingly dubbed “Sven,” headed home as a gift, he was a thrift store find in need of a little TLC.
A close-up shot shows the wonky neck and derpy expression of a deer in need of repair/upgrade. Kinda how we all strolled into 2022, amiright?

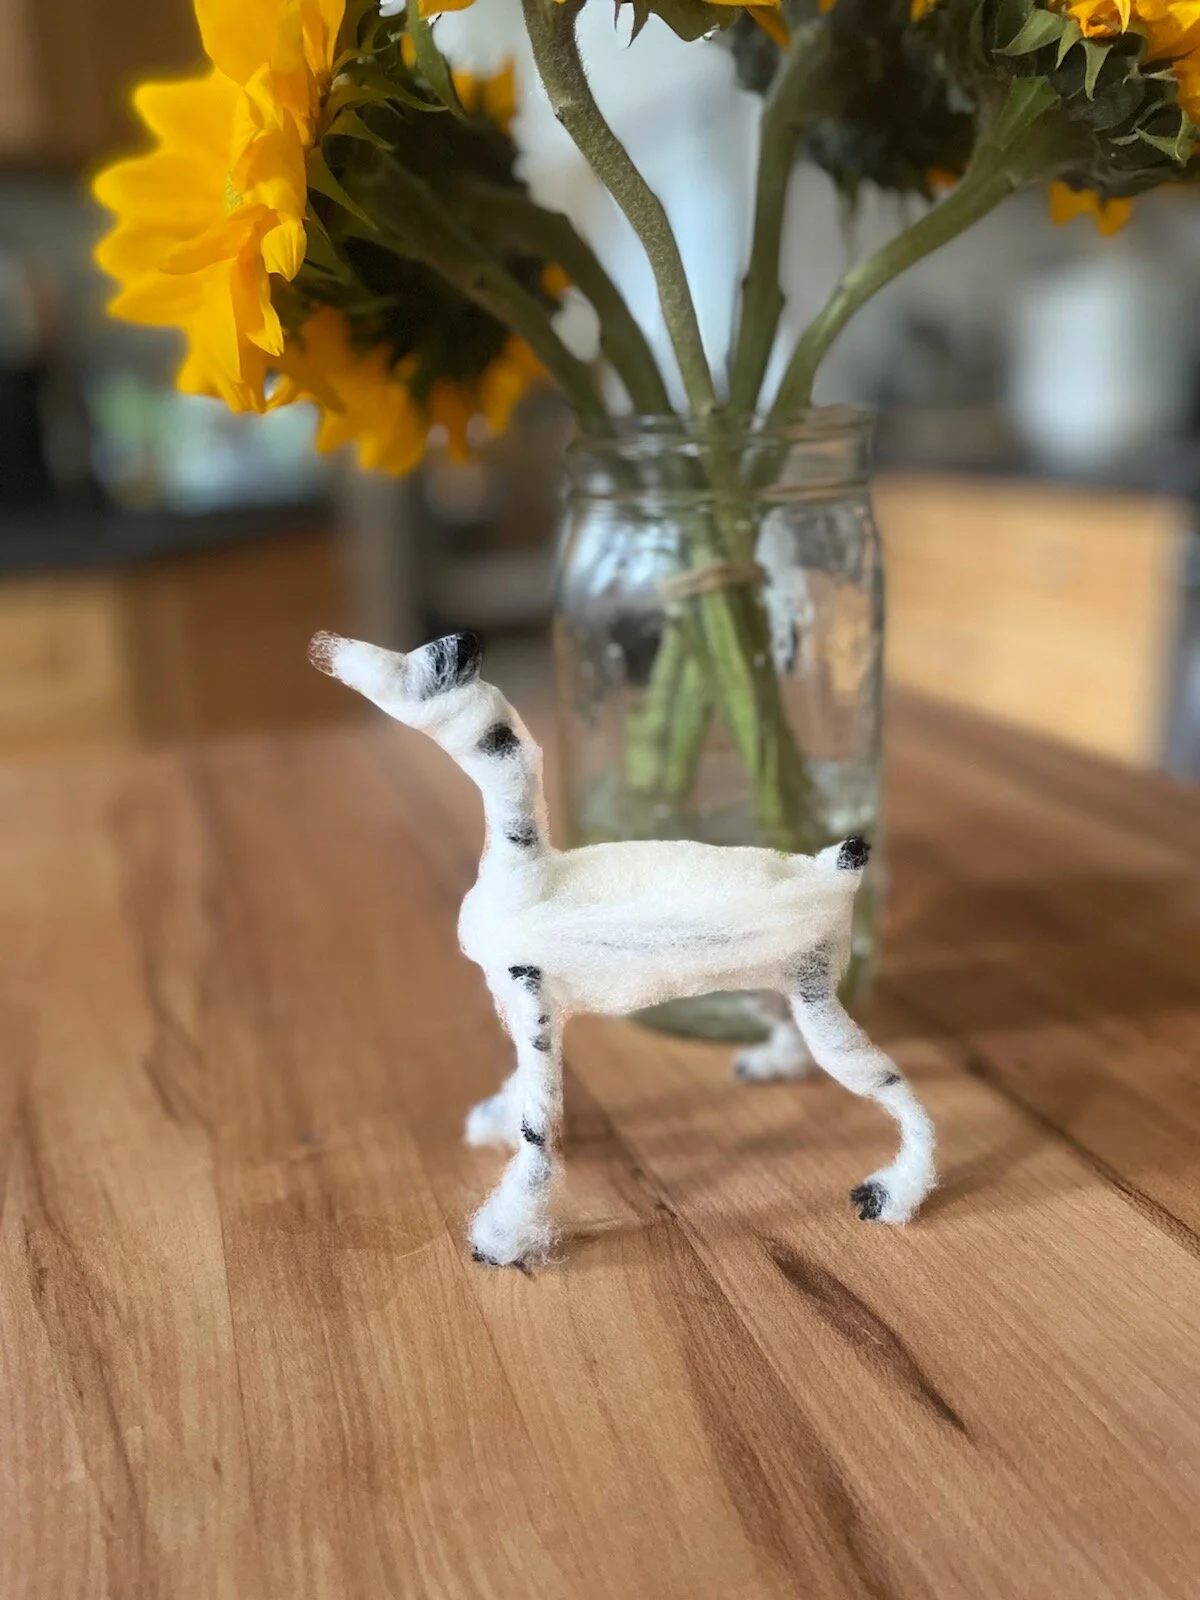
Here’s the $2 thrift store find in its original condition, along with wool roving that will be carded together to mix the same color of the body as we repair/upgrade the lil fella.


And finally, the finished reindeer retaining a comical expression, but with more colors and features — which, amazingly, just happens to be our wish for all our loves as we step into this new year. Look at that. XOXO
hat ornament upgrade: gnome big deal

We are always learning, ya’ll. Sometimes the same lesson over and over! It took a bit of time to create the hat ornament from leftover and recycled materials. We have illustrations below on how to add on elements to create a jolly little gnome.

Perusing the wider webs, we saw so many examples. Gnomes are in! We saw some that were really adorable — and crazily “affordable.” Hard to resist absolutely adorable ornaments for $3. But the real costs are actually higher. Made us think we could not or would not work for such a low return on our time and materials, but somewhere someone has to do so.
Please, all, take a moment and contemplate how little workers everywhere are paid! Work towards changing the corporate approach to labor and supply.

Gather wool roving, cotton fluff, or any fuzzy bit for a gnome beard. Felt up wool roving into a ball for a nose, or use a standard commercially available pom pom.

Use tacky glue, white glue, or hot glue to secure the beard to the inside of the base of the yarn hat ornament, and the felted ball or pom pom to the front just above the beard. We secured the ball and beard with cord for extra stability. Then we added a nice Brooklyn groomed mustachio for extra panache! Go big or go Gnome, right?

recycle material turkey centerpiece

Friendsgiving, Black Friday Eve, Thanksalotapalooza…. however you are celebrating, it is fun to pay tribute to the bird most associated with the fourth Thursday in November, though turkey may or may not have been on the menu for the storied meal shared by the Plymouth Colonists and Pilgrims and the Wampanoag people indigenous to the area. Novelist Sara Josepha Hale popularized the idea of turkey as the main dish for Thanksgiving in the 1820’s with a campaign to make Thanksgiving a national holiday. We are presenting a budget friendly turkey for the center of the table that even your vegan friends and family will approve. Raiding the recycling, we have put together a step by step for a life-size gobbler— no brining, no basting, and no baking required!
You will need 3-4 regular paper grocery bags, kraft paper or kraft paper used for packing, toilet paper rolls and/or paper towel rolls, tape, and glue. A stapler helps expedite the construction — can be used as temporary holds while glue dries and removed later or hidden inside paper folds.
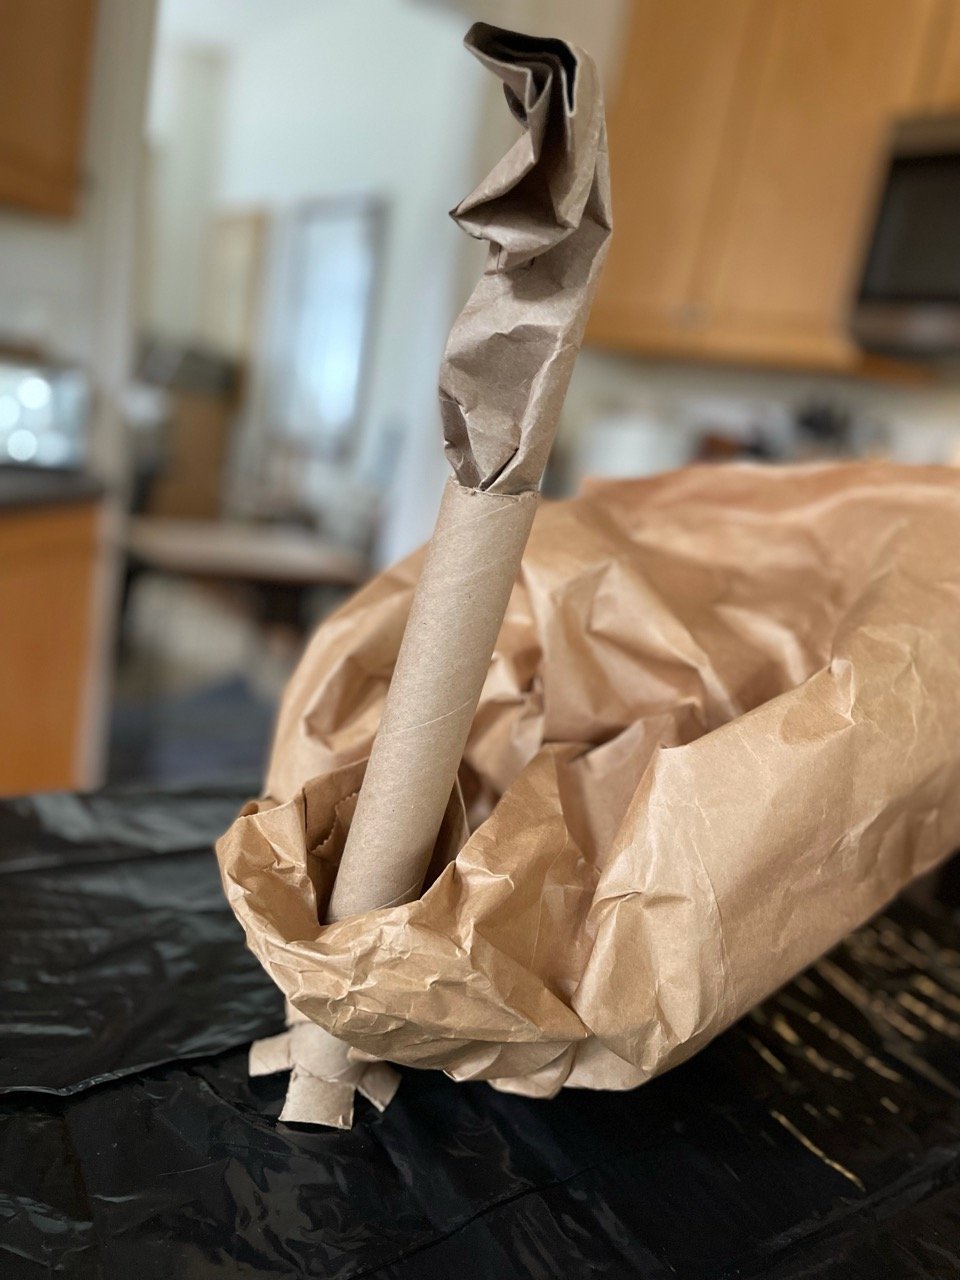
Starting with a kraft paper grocery bag, turn it inside out if it has any printing and puff it out to form the basis of the turkey body.
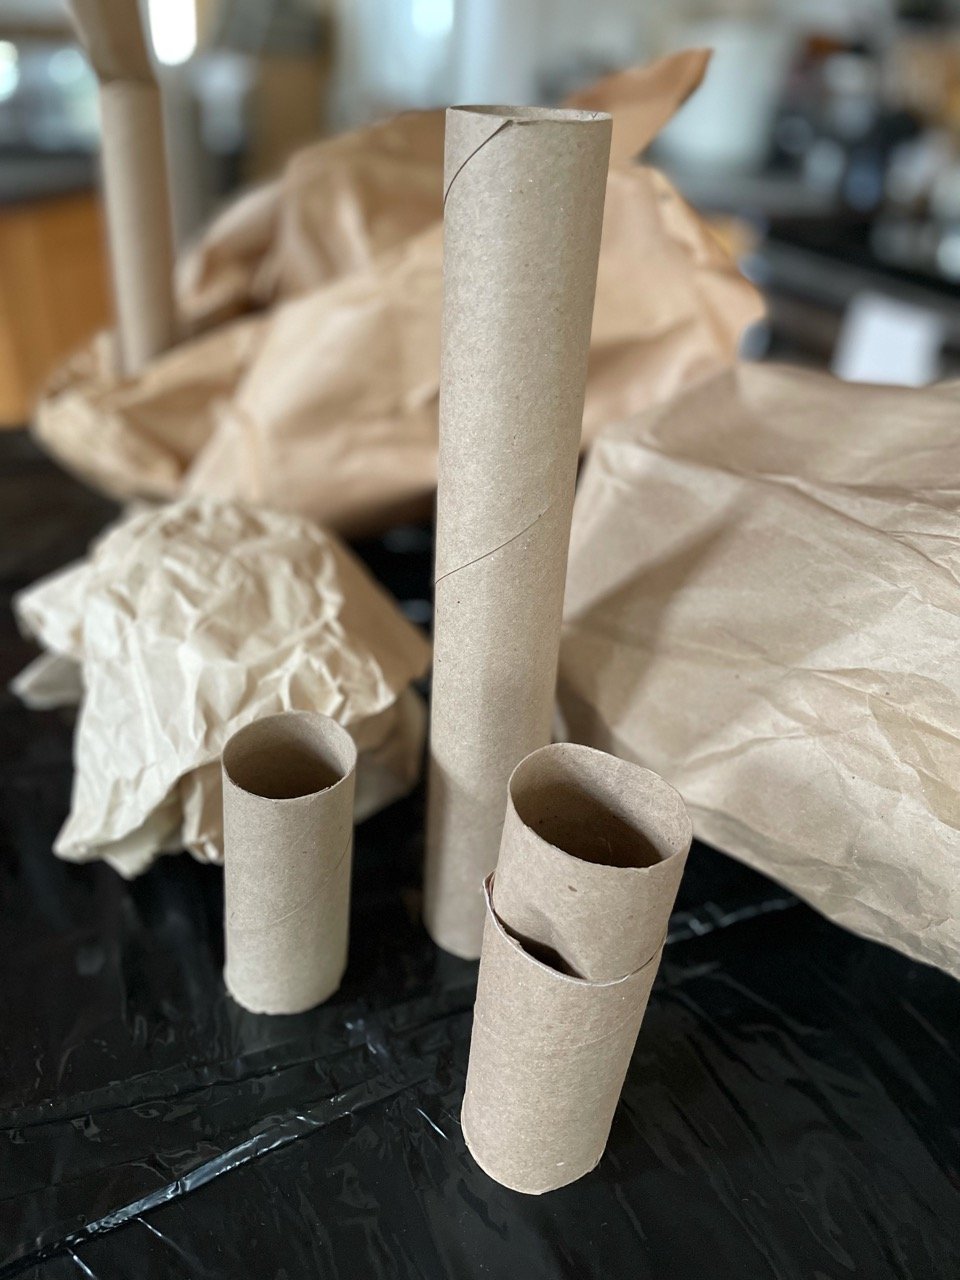
Using the paper towel rolls, scrunch the bottom of one to fit inside the body of another and another to form a support or armature for the turkey’s head and neck.

Checking length of the future tail against grocery bag body, cut to same length then accordion pleat or fold kraft paper or packing paper.

Gather pleated paper together tightly and secure with twine, string, or wire. We used a chenille stem.

Create a hole in the front of the grocery bag turkey body just large enough to pass the paper roll neck/head assembly through. We split the bottom into four flaps and folded them outwards to provide more stability.
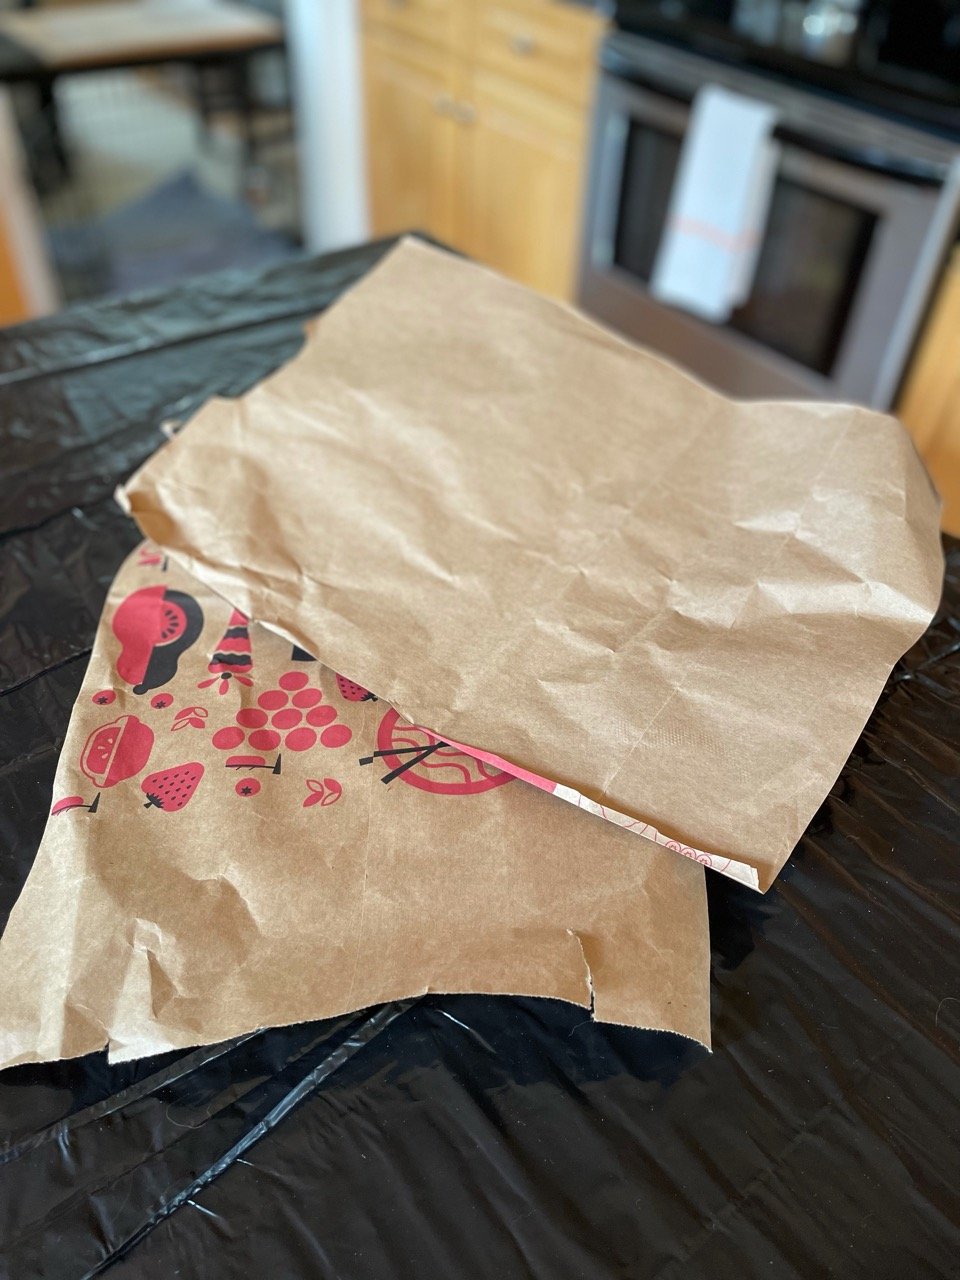
Cutting basic kraft grocery bags apart provides working material for wrapping the neck and head, crafting wings and stuffing the body.
We wrapped the neck assembly with kraft paper, leaving excess at the top to form the head. Crush shape the head into an almond shape with a pinched point to make a beak.
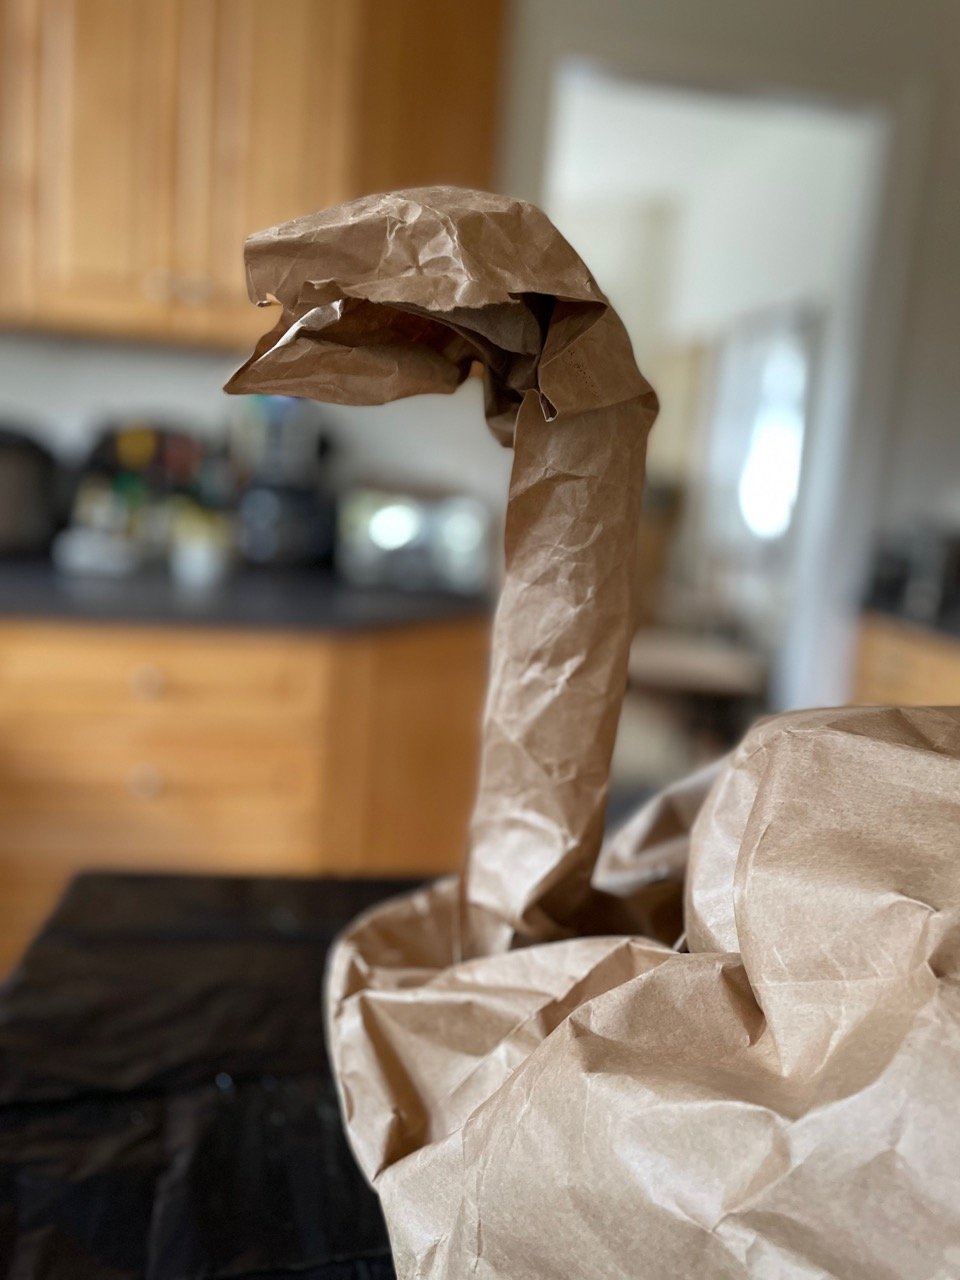
Once the head is in a basic bird shape, glue down folds in the paper to refine. We used chenille stems to stabilize the head until the glue dried.


Taking a cut out side of a kraft paper bag, crush curve the edges to form an oval to attach across the front of the turkey to build out the breast and help hide the mechanics of the paper tube at the bottom of the neck. Tape down the crush rolled edges of the oval. We reinforced spots on each edges of the oval, made an opening, and ran a chenille stem from side to side behind the paper roll neck so the wire can draw tight to be stable.
In the this photo, you can also see the twist of paper added, draped over the beak, to form the distinctive turkey wattle.

Turning to the rear of the turkey, we balled up heavy kraft paper give the body substance, and added pillars of toilet roll paper columns to increase stability in the interior.

Splay out the fans of the accordion pleated paper to form the tail. It helps the paper to stand to attach edges of individual fans together. We made two layers of paper fans so the tail is really full. We attached the tail with brass brads — but could have used tape or glue. As the tail stands by itself, it could be set behind the body sitting as a centerpiece without being attached.

Wings on turkeys are sort of useless, but as a design element on a centerpiece, they add a lot! We cut kraft grocery bags into wing shapes and add symmetrically matching sections imitating rows of feathers, gluing them one over the other. Before gluing, we folded the faux feathers down the center to add textural interest and a give a more featherlike appearance.


Once the layers of feathers were glued and the glue dry, we crushed rolled the outer edges of the wings— the non-feathered edges — to add dimension. We attached the wings with brass brads— but tape or glue works as well
(Hint: clothespins make great tools for softly holding paper edges while glue dries.)

Tom on the table showing the layers of paper added at the front to fill in any gaps, hide any mechanics or attachments and imitate a turkey’s feathered breast.

gnome time like the present
With time change behind us, looooong evenings ahead and certain holidays zooming up quickly— uh hum... we are looking at you, Christmas train— we are taking some time to do small, manageable projects. In order to speed up the process, thereby MAKING these project manageable, we don’t start at zero, but utilize bases that are already started i.e. upcycle readily available decor, but add better materials, or personalized finishes. For example, these thrifted gnomes followed us home and we set to work reusing a much loved, but timeworn sweater to improve their looks.
It’s fun to get something done in an afternoon or two and points for sustainability as well!!

We started by removing as much of the polyester fluff from the thrifted gnomes as possible. Using the existing gnome, we drew a simple pattern on a scrap piece of fabric and set to work. When reusing old sweaters, we prefer real wool or animal fiber, though any type will do. However an animal fiber sweater can be tightened up or felted if it is washed and then tossed in the dryer. This process expands the scales on real wool, helping them catch together, closing openings — or choose one that has already been through that process inadvertently… not that YOU put sweaters in the wash by accident…
We lined the sweater we chose to use with lightweight cotton fabric so that we could speed up the process with a sewing machine. Lining knitwear, especially loose or loopy knits, prevents yarn from catching on the presser foot. All of the sewing for this product can be done by hand with a tapestry needle if you are not proficient with a sewing machine.

In order to cut the sweater arms into gnome legs, we ran seams along a central line — then carefully cut each sleeve into 2 tubes by following the red line in between the sewn seams. Presto! Instant wooly gnome leggings!

In the narrowest portions of the gnome outfit, we clipped the lining at the finished seams to make turning the legs and arms right-side-out and fitting them on the gnome body a little easier.

Lookin’ a leetle creepy there, upcycled sweater parts…. but it gets WAY better!

Choosing some fun leftover yarn— any type, color, or texture will do— we made the SIMPLEST yarn gnome beard ever!! You may have bits of faux fur or alpaca or wool roving or goat hair or cat hair — whichever. Have we mentioned we are not judge-y? We are NOT judge-y. But for these gnomes, we circled the base of the hat with red trim — but could have used rope or twine — and tied on lengths of yarn by checking the length of desired hair or beard, doubling the yarn before cutting, making a loop at the top of the double yarn, placing the loop over the trim circling the hat, and then pulling the two strands of yarn through its own loop and pulling up on the strands until the loop is tight. We have heard it called a "lark’s head knot” but we call it “two strands through a loop thingy.” Po TAY to. Po TA to. Vodka. Whatever works.

Repurposed sweater cut and sewn and gently tacked to repurposed thrifted gnome. Please note the fuzzy bottom of thrifted fellow— tacking on a patch cut from the sweater completes the matching pants. Reusing an existing form, but changing the finish cuts this project time in half!

Mister and Milady, Jingle and Jangle, Him, Her, Them… they are complete!
meant to bee

While we are not fans of time change, early in and out of the chilly darkness, DOES mean it's time for small projects that can be done cuddled up with a blanket on your lap! These "gathering wool" sessions are for a purpose... handmade ornaments are lifetime keepsakes. Knitted, crocheted or felted wool are some of our favorites— but they could be quilled or cut paper or wire and beads!
Here is a knit bee from a Claire Garland pattern available from her website or on Ravelry.

Claire Garland has tutorials available for her techniques, so knitters with basic skills can learn new ways to create for charming results!


Little projects are a nice relief from a long knit, use small amounts of yarn, and building new skills is so satisfying. We really love the lifelike results... bee happy, friends! 🐝

Needle felting wool is another way to make easy, manageable projects like personalized ornaments from sustainable materials.
diy on a dollar: fall leaves
Another sustainable seasonal idea: Upcycle paper grocery bags into colorful Autumn decorations.

Cut open a grocery bag and fold accordion style. Use stencils, trace real leaves, or, heck, just take a guess! Then cut out multiples to scrunch and crunch around centerpieces, use in wreaths, or scatter on the table.

Use the bottom of the bag as a palette and sponge color onto a few or all.

You are doing DIY on a Dollar! You've got FALL in the bag 🍁 🍃 🍂
diy on a dollar: fall ideas

Dryer vent tube secured with hot glue, painted with acrylic paint. Add leftover faux leaves and/or dried material. Twist of paper and cut grocery bag leaves.

More pumpkin fun with simple, economical materials. Pots migrating inwards after summer? Repurpose them for Fall with paint inspired from vintage cards or felt cut outs — bring on the Kawaii smiles!

Any craft is welcome therapy, especially if the kiddos are involved! Perfection is soooo not the goal... but PROCESS! Much loved pumpkin from preschool days has pride of place.